
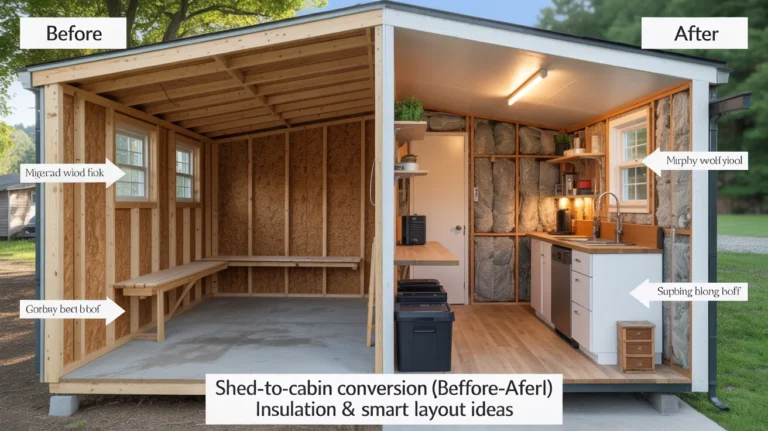
Turning a plain storage shed into a cozy cabin is one of the fastest, most budget-friendly ways to create a guest space, rental, studio, or off-grid retreat. This shed-to-cabin conversion (before/after) guide walks you through legal prep, insulation that actually works, ventilation, and layout ideas that make small spaces live big—plus realistic timelines and off-grid upgrades you can add step-by-step.

If you’re leaning toward a self-reliant, backyard-friendly build, you’ll love the practical homestead insights in The Self-Sufficient Backyard—a useful companion as you plan power, water, and food systems around your new cabin.
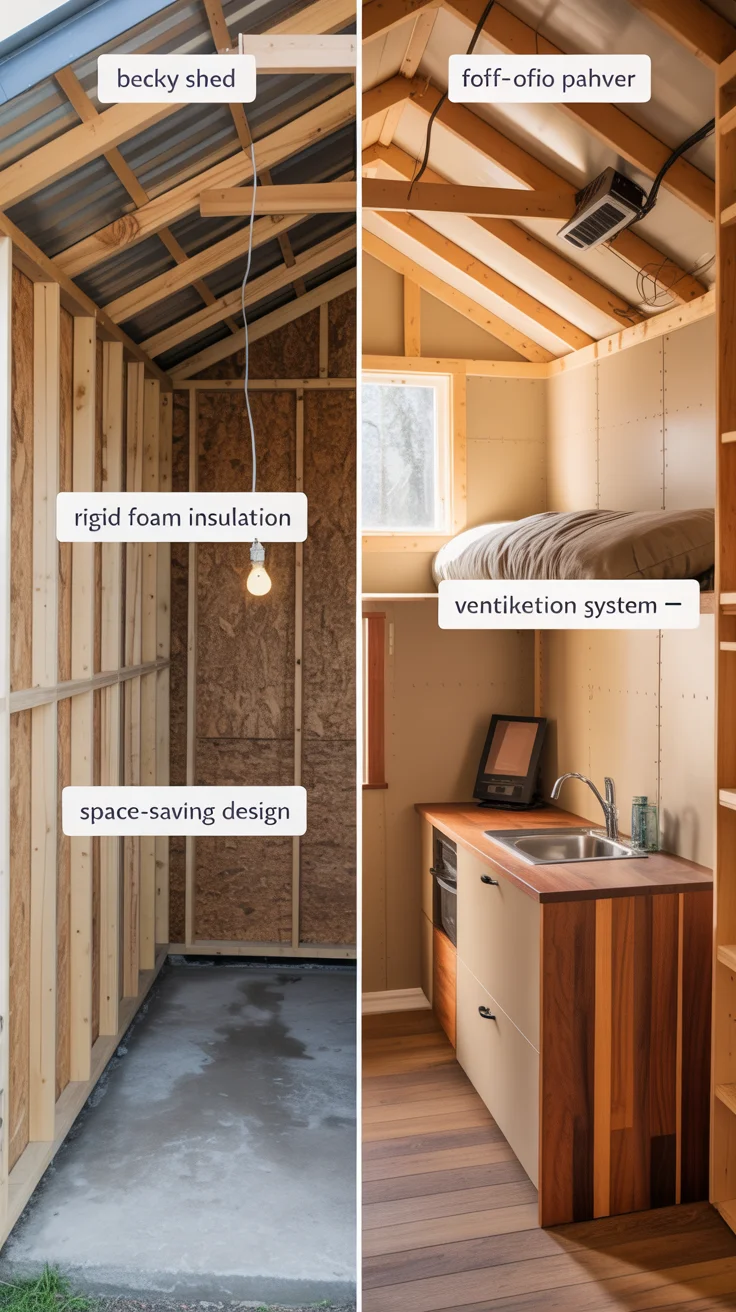
Planning a Shed-to-Cabin Conversion
Think of this phase as the foundation of your before/after success. A shed-to-cabin conversion changes a structure’s use—from storage to habitable—which typically triggers codes, utility safety standards, and sometimes zoning considerations.
Key planning steps:
- Confirm legal use: In most areas, “habitable” means minimum ceiling height, emergency egress, heating, ventilation, and sometimes a permanent foundation. Call your local building department and planning/zoning office before you buy materials.
- Choose a use case: Guest cabin, backyard office, short-term rental, studio, or off-grid bunkhouse. Your use determines insulation levels, plumbing needs, and budget.
- Identify your climate zone: Your region’s temperature swings and humidity drive R-values, vapor control, and ventilation choices. Cold climates need higher R-values and continuous exterior insulation; hot-humid climates need robust vapor-open assemblies so walls can dry.
- Set a realistic budget: Expect a typical 10×16 to 12×20 conversion to range widely depending on upgrades. Prioritize structural integrity, insulation, and ventilation before finishes.
- Sketch a floor plan first: Decide bed location, egress windows, kitchenette footprint, bathroom placement, and circulation paths. Good layouts reduce costly rework.
- Plan utilities early: Every wire, pipe, and vent is easier before you close up walls. If you’ll stay off-grid, plan for power, water storage/filtration, and waste solutions from the start.
Pro tip: If you’re converting a pre-built shed, ask the manufacturer for structural details (truss spacing, load ratings, materials). If you’re modifying a DIY shed, document framing sizes, spacing, and connections. When in doubt, an engineer’s quick review is inexpensive insurance.
Internal resources to help you plan:
Structure and Weatherproofing Upgrades
Before insulation and interior finishes, verify the shell is strong, level, and dry. Habitable space needs a solid base, a tight roof, and walls that shed water.
Foundation and floor:
- Level and anchor: Sheds that sit on skids or concrete blocks may need upgrades. A perimeter concrete beam or helical piers can stabilize and anchor against wind uplift. Check frost depth where required.
- Floor insulation plan: If your shed sits above ground, you’ll need a strategy to insulate the floor from below or from above before finish flooring. Address rodent exclusion with metal mesh at vents and seams.
Framing and structural checks:
- Wall and roof framing: Many sheds use 24-inch on-center studs and lightweight trusses. For a cabin, you may add studs or sister lumber to stiffen walls, especially where you’ll add windows or a loft.
- Window and door headers: When cutting in new openings, size headers per span and snow/wind load. Use proper flashing and self-adhered membranes to prevent leaks.
Roofing and weatherproofing:
- Underlayment and drip edge: If the shed roof lacks proper underlayment, fix that now. Install a drip edge and kick-out flashing where roofs meet walls.
- Roof ventilation: Ensure there’s a clear airflow path from soffit to ridge if you plan a vented roof assembly. If not possible, plan an unvented assembly with continuous insulation and strict air sealing.
- Siding and water management: Add a drainable housewrap or rainscreen behind siding for a drying gap. Flash all penetrations (exhaust fan, mini-split lineset) carefully.
Air sealing as a first “insulation” layer:
- Seal sheathing seams, wall-to-floor plates, and penetrations using tapes and high-quality sealants. A tight air barrier is the single best performance upgrade, boosting comfort and cutting energy use.
This is the best time to run electrical and low-voltage wiring, rough-in plumbing (if adding), and set blocking for cabinets, shelves, and lofts so you don’t chase studs later.
Insulation That Works in Small Cabins
Insulation is where shed-to-cabin conversions go from seasonal to truly livable. A good assembly balances R-value, airtightness, vapor control, and drying potential.
Climate-smart options:
- Mineral wool batts: Fire-resistant, sound-dampening, and moisture-tolerant. Great for 2×4 or 2×6 walls and sloped ceilings. Pair with an airtight interior layer (smart vapor retarder or taped drywall).
- Dense-pack cellulose: Excellent for filling irregular cavities and improving air control. Works well in walls/ceilings with proper netting and ventilation strategy.
- Rigid foam (exterior continuous): Continuous foam outside the sheathing (EPS, XPS, or polyiso) dramatically reduces thermal bridging and can allow an unvented roof in some assemblies. Tape seams meticulously.
- Closed-cell spray foam: High R per inch and great air sealing. Useful where space is tight (e.g., roof slopes, rim joists) but consider cost, install quality, and vapor implications.
Walls:
- For 2×4 walls, R-13 to R-15 mineral wool plus a smart vapor retarder (Class II-III, variable-perm) is a balanced system in many climates. Add 1–2 inches of exterior rigid foam if you can.
- In hot-humid zones, keep the assembly vapor-open to the interior so the wall can dry. Prioritize exterior water management and interior dehumidification.
Roof/ceiling:
- Vented cathedral: Baffles with a 1–2 inch air gap from soffit to ridge, then batts (R-30+ where possible). Install a smart vapor retarder under the drywall.
- Unvented roof: Use a code-appropriate ratio of exterior rigid foam or enough closed-cell spray foam against the roof deck, then fill remaining cavity with batt or cellulose.
Floor:
- Over a vented crawl or open piers, staple mesh and friction-fit mineral wool, then add a rigid-foam layer under the subfloor before finish flooring if headroom allows. Air seal the rim joist and skirt the perimeter to block wind washing.
Moisture and vapor control:
- Air seal first. Then choose a smart vapor retarder inside (variable-perm membranes or smart paint) to let assemblies dry when seasons change.
- In small cabins, interior humidity spikes quickly. Plan mechanical ventilation and, in damp regions, a small dehumidifier.
Insulation mistakes to avoid:
- Stuffing batts without air sealing.
- Blocking soffits with insulation in a vented roof.
- Ignoring floor insulation and rim-joist drafts.
For deeper detail on insulation layers by climate, see Complete tiny home insulation guide.
Windows, Doors, and Ventilation
Windows and doors turn a dark shed into a bright cabin, but they’re also your primary pathways for fresh air and code-required egress.
Openings and egress:
- Place a large egress-capable window near the bed or sleeping loft. Confirm local egress size and sill height rules.
- Use properly sized headers, sill pans, and fully integrated flashing (sill, jamb, head with shingle-lap order) tied into your housewrap.
Ventilation strategies:
- Trickle vents and operable windows: Simple, cost-effective, and helpful for quick cross-breezes in mild weather.
- Exhaust-only bath fan: A quiet, continuous fan (30–50 CFM) controls humidity from cooking and showering. Duct it outside with smooth, short runs and a backdraft damper.
- Balanced ventilation (ERV/HRV): In colder or very airtight cabins, a compact ERV maintains fresh air with less heat loss and manages moisture better than exhaust-only.
- Kitchen airflow: If you add a cooktop, use a recirculating hood with a good charcoal filter or, better, a ducted range hood venting outside (small, efficient models work well in tiny spaces).
Condensation control:
- Keep indoor humidity in check (40–50% RH in winter, lower in hot-humid climates). Use bath fans and dehumidifiers as needed.
- Temperature matters: Insulated, well-sealed windows (with good installation) reduce condensation at the glass.
Doors:
- Upgrade to an insulated exterior door with full weatherstripping and adjustable sill. Seal the threshold to stop air leaks.
- If snow or rain is heavy, add a small awning or entry porch to protect the door and keep the interior dry.
With proper fresh air, your new insulation won’t trap humidity, mold risk drops, and interior finishes last longer.
Layout Ideas for Shed-to-Cabin Conversions
Smart layouts transform a modest footprint into a livable cabin. Here are proven arrangements for popular shed sizes and use cases.
12×16 studio cabin:
- One-room open plan with a full-size daybed or Murphy bed on the short wall.
- Galley kitchenette along one long wall: 24-inch cabinets, undercounter fridge, induction hob, and a bar sink.
- Fold-down table under the egress window doubles as desk/dining.
- Storage wall with built-ins: Upper cabinets meet the ceiling; a shallow wardrobe replaces bulky closets.
- Pocket door to a compact 30×60 bath (if adding plumbing).
10×20 guest cabin with loft:
- Kitchenette near entry; bathroom adjacent to minimize plumbing runs.
- Straight run of stairs with storage pull-outs below, or a ship ladder if code allows and use is occasional.
- Sleeping loft above kitchen/bath; keep loft less than half the floor area to preserve airiness.
- Living zone with a loveseat and drop-leaf table by a large window for natural light.
8×12 micro office/retreat:
- No bath; focus on workspace plus a daybed for occasional overnights.
- Tall built-in shelving and a small credenza with a bar sink if allowed.
- Large operable window and skylight to keep the space from feeling cramped.
Universal layout rules:
- Establish a “dry zone” (living/sleeping) and a “wet zone” (kitchen/bath) to simplify plumbing and ventilation.
- Zone lighting: Ambient ceiling lights, task lights at the kitchen and desk, and warm accent lighting for evenings.
- Clear circulation: Keep a 30–36 inch pathway from door to bed and bath.
- Use vertical volume: High storage above doors and windows, peg rails, and ceiling-hung pot racks free floor space.
Furnishing tactics:
- Multi-use pieces: A bench with storage, nesting tables, and a convertible sofa bed.
- Slim-depth cabinets (12–18 inches) for storage along tight walls.
- Ceiling heights: Maintain at least one full-height “spine”—especially under a loft—so the space feels open.
If you plan to rent the cabin, add a small lockable owner’s cabinet and durable surfaces for easy turnover.
Utilities, Heat, and Off-Grid Options
Utilities are where your shed-to-cabin conversion becomes year-round capable. Decide early whether you’ll connect to the grid and municipal services or go off-grid.
Heating and cooling:
- Electric mini-split: Highly efficient heating and cooling in a compact package. Excellent comfort if you have power.
- Wood stove: Great for cold climates and off-grid use. Choose small stoves suitable for tiny spaces and follow clearance, chimney, and hearth requirements closely.
- Propane heaters: Ventless models add moisture; in cold climates this can be tricky. Direct-vent propane wall heaters are safer and drier.
- Portable backup heat: Oil-filled radiators or infrared panels can supplement main heat during cold snaps.
Water and plumbing:
- Grid-tied: Standard PEX supply lines, electric water heater or on-demand unit, and a simple septic or sewer tie-in.
- Off-grid: Collect, store, and filter water. Gravity-fed or low-power pumps can serve a sink and shower. For dependable water access, consider a simple vertical storage-and-filtration system like The AquaTower to keep potable water on hand without heavy infrastructure.
Electrical and power:
- Grid service: Subpanel from the main house or new service drop (requires permitting). Use dedicated circuits for heat and kitchenette appliances.
- Solar + generator: A small PV array paired with a compact backup generator covers winter/calm periods. If you want reliable backup without complex installs, the Ultimate OFF-GRID Generator offers a straightforward, portable way to bridge cloudy days and high-demand moments.
Waste solutions:
- Traditional: Tie into sewer/septic if available and permitted.
- Composting toilet: Reduces plumbing complexity; choose models that manage moisture and odors well. Vent outside.
Moisture control and IAQ:
- Run the bath fan during showers and for 20–30 minutes afterward.
- In humid climates, a small dehumidifier protects finishes and keeps your cabin comfortable.
Recommended off-grid tools and resources:
- The Self-Sufficient Backyard: Practical homestead systems that pair perfectly with a small cabin.
- Ultimate OFF-GRID Generator: Portable backup power when solar and grid fall short.
- The AquaTower: Water storage and filtration for dependable cabin water.
- The Lost Superfoods: Ideas for shelf-stable foods to stock a tiny pantry.
Looking for step-by-step wiring basics? Start here: How to wire a small cabin safely
Budget, Timeline, and Shed-to-Cabin Before/After Roadmap
A realistic plan keeps your conversion moving and your budget intact. Here’s a phased roadmap you can adapt to your scope and climate.
Phase 1: Due diligence and shell (Week 1–3)
- Confirm zoning/permits, assess the shed’s structure, and finalize your layout.
- Upgrade foundation/anchoring if needed; fix roof and siding issues; rough-in utilities.
- Air seal obvious gaps so your interior stays clean as work proceeds.
Phase 2: Envelope and openings (Week 3–5)
- Install windows/doors with proper flashing. Add housewrap/rainscreen if re-siding.
- Frame any interior partitions and a loft (with engineered load paths).
- Air-seal again after rough-ins; install baffles for roof ventilation if vented.
Phase 3: Insulation and ventilation (Week 5–6)
- Insulate walls, roof, and floor per your climate strategy.
- Install bath fan and, if applicable, a compact ERV. Test fan flows.
Phase 4: Mechanical, finishes, and fixtures (Week 6–8)
- Mount mini-split or heater; connect plumbing fixtures and set the water heater.
- Hang drywall or paneling; paint with vapor-open finishes where appropriate.
- Install cabinets, countertops, lighting, and flooring.
Phase 5: Furnish, stock, and test (Week 8–9)
- Place furniture, test all systems, and finalize trim.
- Load a basic pantry and emergency supplies; practice a “day in the life” to check comfort.
Cost-control tips:
- Spend first on structure, air sealing, and insulation; these pay off forever.
- Keep your layout “wet wall” compact; shorter runs = lower cost.
- Choose durable finishes that handle humidity swings.
- Build or salvage where it won’t compromise performance (e.g., open shelves, reclaimed doors).
A simple before/after snapshot:
- Before: 10×16 shed, no insulation, dark interior, musty air.
- After: Tight envelope with mineral wool walls and a vented roof, two new egress windows, a galley kitchenette, sleeping loft, mini-split, and a dehumidifier; fresh air via a quiet bath fan plus operable windows. The transformation isn’t just aesthetic—the cabin is quiet, draft-free, and holds comfortable temperatures with much less energy.
Call-to-action for a confident finish:
- If your goal is a low-maintenance, self-reliant retreat, dive into backyard systems in The Self-Sufficient Backyard.
- For reliable backup power during build-out and beyond, keep the Ultimate OFF-GRID Generator on hand so tools, lights, and heat never stall your progress.
For a deep dive into tiny plumbing strategies, see Compact plumbing layouts for small cabins.
Conclusion
A successful shed-to-cabin conversion (before/after) comes down to a strong, dry shell; climate-smart insulation; reliable ventilation; and a layout that respects every square inch. Start with legality and structure, dial in your building envelope, and only then move to finishes and furnishings. Whether you connect to the grid or go fully off-grid, plan power and water early so your cabin is comfortable the day you move in—and for years of low-cost living afterward.
FAQ
Can you legally convert a shed into a cabin?
- Often yes, but it depends on local rules. Converting a shed into a habitable cabin typically requires permits, and your city or county may enforce standards for insulation, egress windows, minimum ceiling height, fire safety, ventilation, and utilities. Zoning may also restrict accessory dwellings or short-term rentals. Call your local building and planning departments before you start; it’s easier to design a compliant cabin upfront than to retrofit later.
What insulation is best for a shed-to-cabin conversion?
- There’s no one-size-fits-all, but mineral wool batts are a safe, versatile choice for walls and ceilings because they resist moisture and fire while offering good sound control. In tight roof cavities or where you need high R-value per inch, closed-cell spray foam can work but requires careful moisture management. Exterior continuous rigid foam dramatically improves performance by cutting thermal bridging. Always air-seal first, then choose insulation appropriate to your climate and assembly.
How do you add ventilation to a converted shed?
- Start with a quiet bathroom exhaust fan ducted outside; run it after showers and as needed to manage humidity. Add operable windows for cross-ventilation. In airtight or cold-climate cabins, consider a compact ERV to balance incoming and outgoing air with minimal heat loss. If you’re venting the roof, maintain a clear soffit-to-ridge airflow using baffles. Keep humidity around 40–50% in winter (lower in hot-humid climates), and use a small dehumidifier if needed.
What’s the best layout for a small shed cabin?
- Prioritize a simple open plan with a compact “wet wall” for kitchen/bath, an egress-capable sleeping area (often a loft over the kitchen/bath), and built-in storage that goes vertical. In a 12×16 footprint, a galley kitchenette along one wall, a fold-down table by a large window, and a daybed/Murphy bed make the cabin feel spacious. Keep circulation clear (30–36 inches), use pocket doors, and choose multi-use furniture to stretch the square footage.