

Introduction
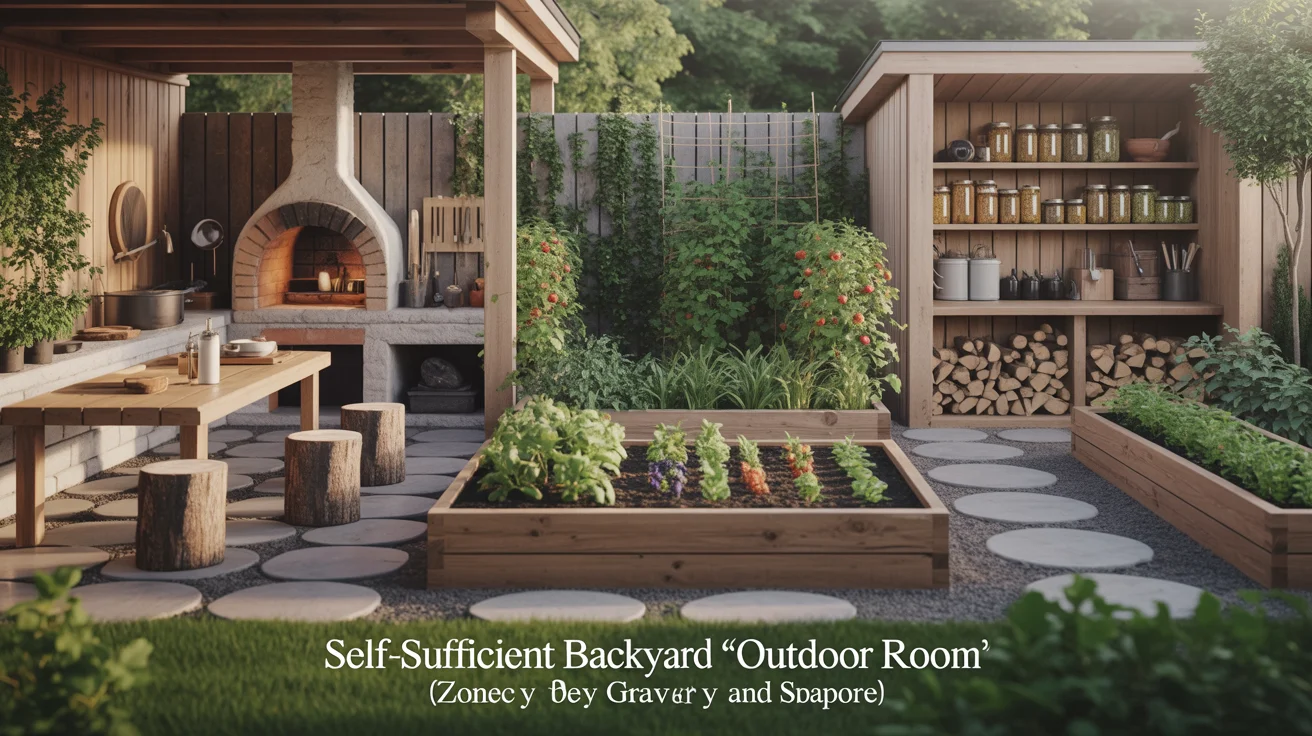
A self-sufficient backyard “outdoor room” is more than a patio and a few raised beds—it’s a purposeful layout of zones for cooking, growing, and storing that work together as one integrated system. By arranging your space like a functional room with dedicated stations and clear workflow, you reduce daily effort, cut waste, and harvest fresh food right where you’ll use it.
This guide walks you through a practical, zone-based design that fits most suburban lots and small homesteads. You’ll learn how to place your kitchen-adjacent cooking station, plan a productive kitchen garden, add water and energy systems, and create storage that makes preserving food easy all year.
If you want a field-tested blueprint for maximizing small homesteads, see The Self-Sufficient Backyard (step-by-step layouts and projects tailored for everyday households). The Self-Sufficient Backyard
Foundation for a Zone-Based Backyard Layout
Think of your yard as an “outdoor room” with zones organized by how often you use them. The closer a task occurs to your back door, the closer that zone should be. This simple approach cuts steps, helps you maintain consistency, and keeps the most frequent chores fast and enjoyable.
- Closest to the house (Zones 0–1): High-frequency tasks like cooking, herb harvesting, hand-washing harvested greens, and grabbing tools.
- Mid-yard (Zone 2): Daily-to-weekly tasks such as tending vegetable beds, compost turning, and quick pruning.
- Farther out (Zones 3–4): Lower-frequency tasks like managing a small orchard, wood storage, or long-term projects.
Start with a base map. Sketch the footprint of your house, doors, spigots, power outlets, existing trees, sun path, and prevailing winds. Walk your site at different times of day to see where sun and shade fall. Mark slopes, soggy spots, and wind tunnels. Observe where you naturally walk so you can place paths that feel intuitive rather than forced. Permaculture zones explained
Optimize microclimates. Warm south-facing walls favor tomatoes, peppers, and a solar-heated bench or potting table. Breezy corners are ideal for a smoker, rocket stove, or a charcoal grill where you want smoke to dissipate. Cooler north sides of structures help with summer salad greens or mushroom logs.
Design for flow. Arrange core stations—cooking, washing, prepping, growing, composting, and storing—so they form short loops. A typical loop: kitchen door → herb rail and grill → prep table with sink → salad bed → compost bin → back to kitchen. Keep gate widths wheelbarrow-friendly, and set path materials (fine gravel, pavers, wood chips) to fit traffic type and drainage.
Build incrementally. Install hardscape and key systems first—paths, water access, dedicated work surfaces—then layer in plants and storage. This staggered approach prevents rework and clarifies which features you truly use.
Cooking and Food Prep Zone Near the Kitchen
The cooking zone is your daily engine, so put it within steps of the back door. Plan it like a compact outdoor kitchen that handles fast weeknight cooking and weekend preservation projects.
Core elements to include:
- Heat sources: a grill or griddle for daily meals; add a smoker, rocket stove, or pizza oven if you enjoy slow cooking and baking.
- Work surface: a durable prep table with space for cutting, brining, and resting cooked food. Stainless or sealed hardwood works well.
- Washing station: a utility sink tied to an outdoor spigot or rainwater supply for rinsing produce and washing hands/tools. Ensure greywater disposal aligns with local codes.
- Shade and shelter: a pergola with a light shade cloth keeps heat manageable; a retractable awning or small roof makes the space usable in all seasons.
- Lighting and power: low-glare task lighting and a GFCI outlet support evening cooking and small appliances.
- Fire safety: set all heat sources on non-combustible pads, keep a fire extinguisher handy, and maintain clearance from siding and pergola beams.
Add a “living pantry” within arm’s reach. Place container herbs (basil, rosemary, thyme, chives) along the edge of the cooking area or on a narrow rail. Tuck in strawberry jars and small greens for constant garnishes. Use vertical trellises for quick-clipping vine crops like snap peas or cucumbers that climb and shade the prep area.
Create a salad station. Place one or two small raised beds just beyond the prep table for cut-and-come-again lettuces, arugula, cilantro, and scallions. Keep a harvest basket and shears on hooks near the door. A rinse bin or perforated colander nest located at the sink speeds washing.
Design for traffic. Arrange the grill and hot surfaces so the cook has a clear work triangle with the prep table and sink, and position seating slightly downwind to avoid smoke. Place the dining area so plates move directly from the prep table to the table without crossing the grill’s “hot zone.”
Maintain with simplicity. Store a small toolkit—tongs, brushes, knife, cutting board—in a weatherproof box under the prep table. Sweep cooking debris daily and empty the grease tray weekly. A tidy, well-lit cooking zone makes it easy to cook from your garden night after night.
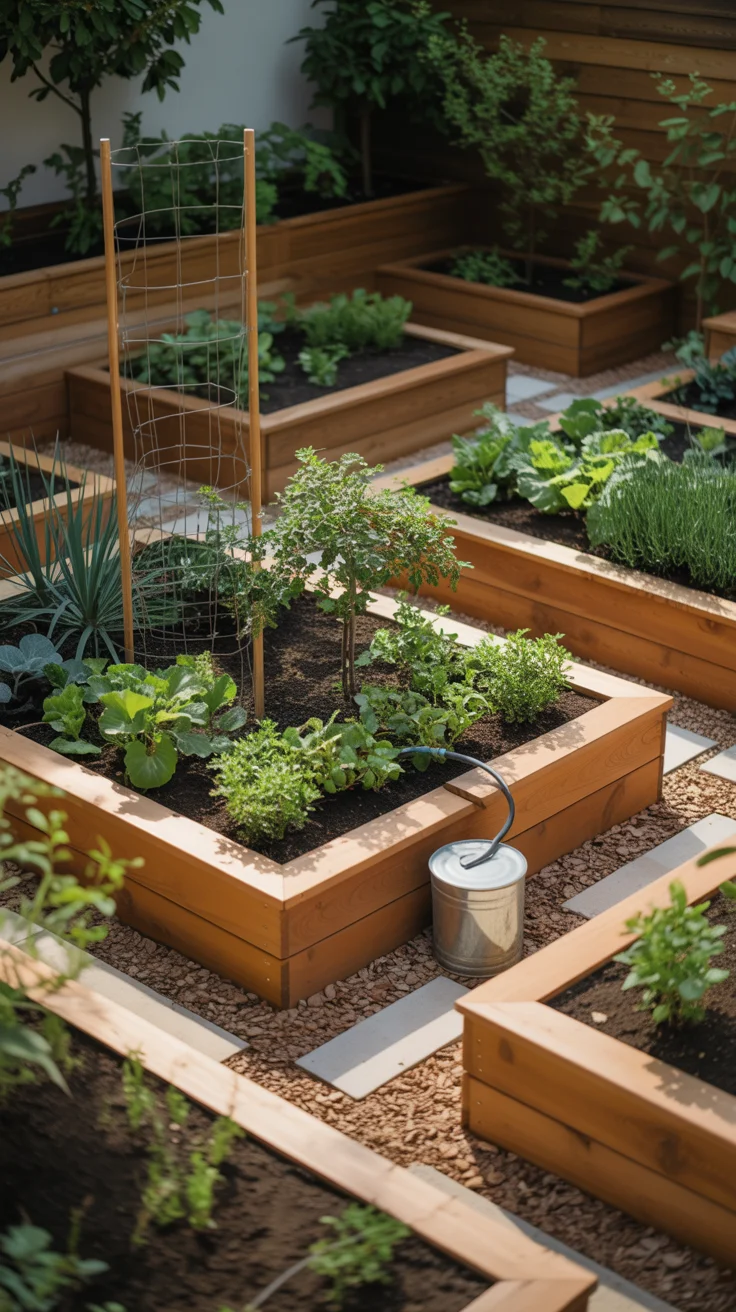
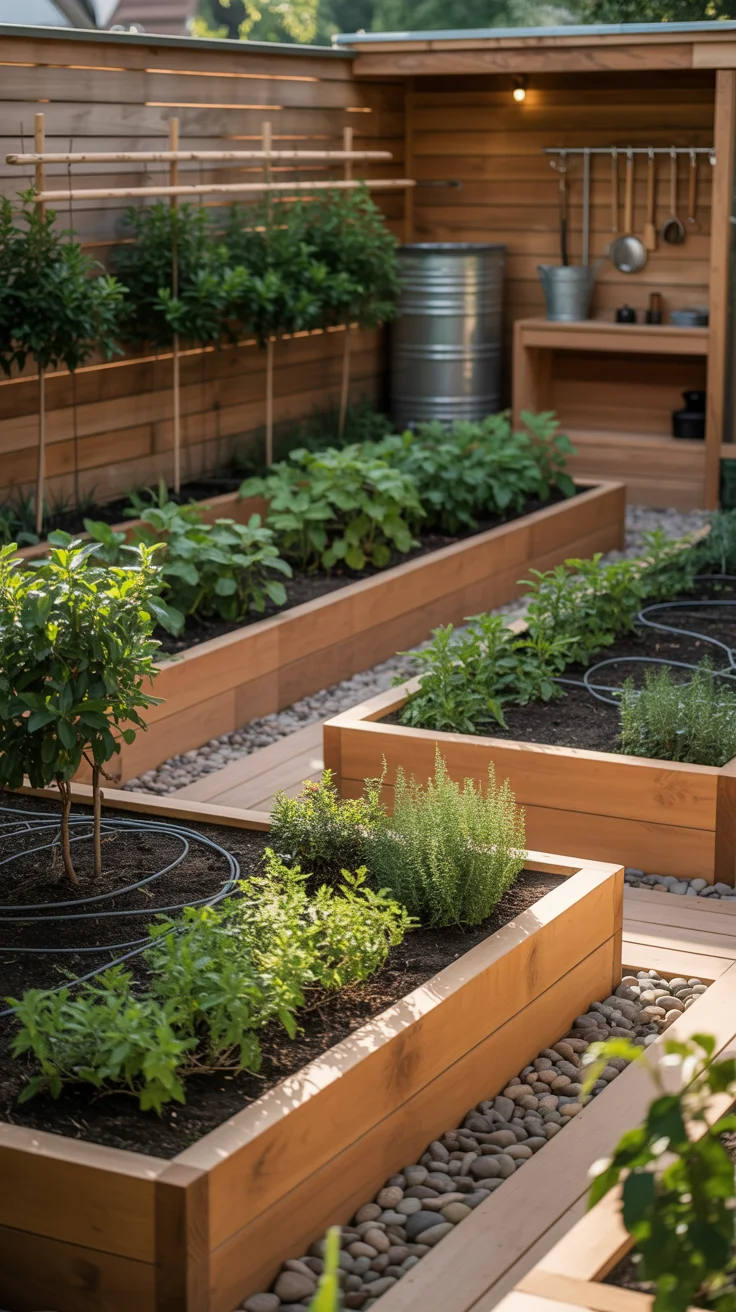
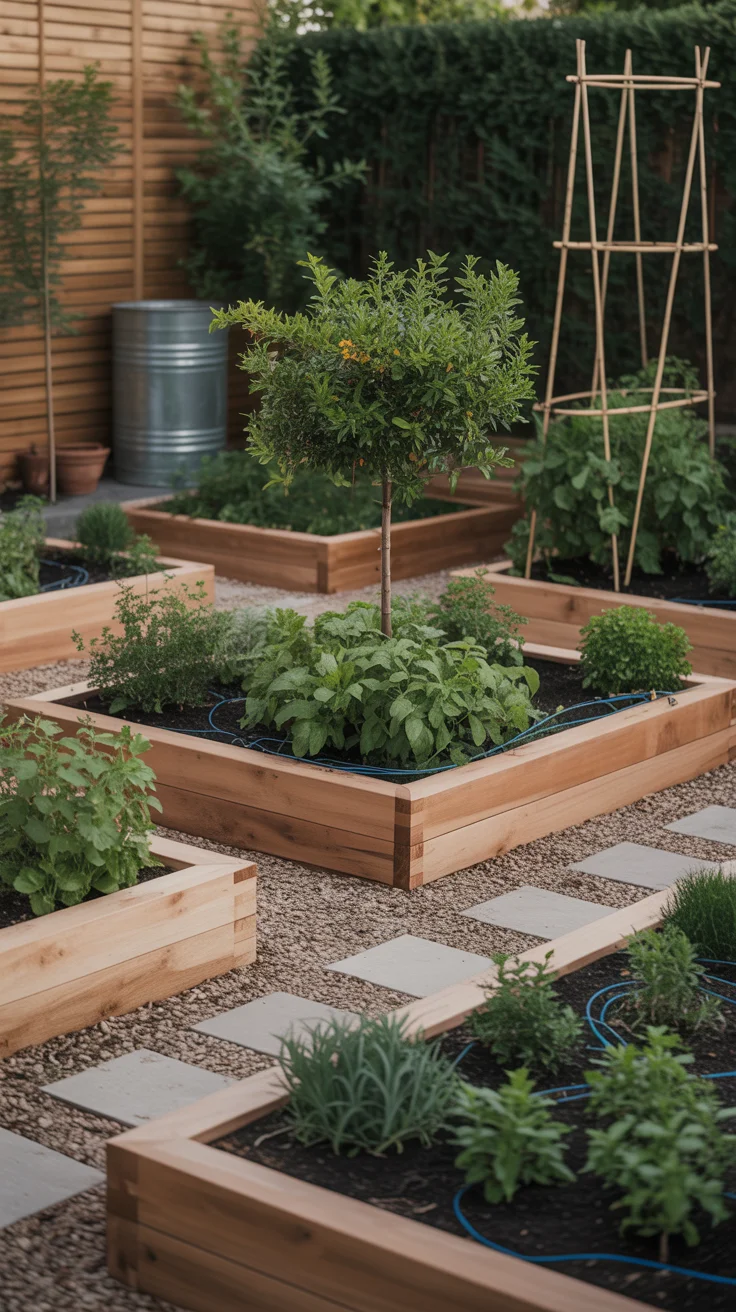
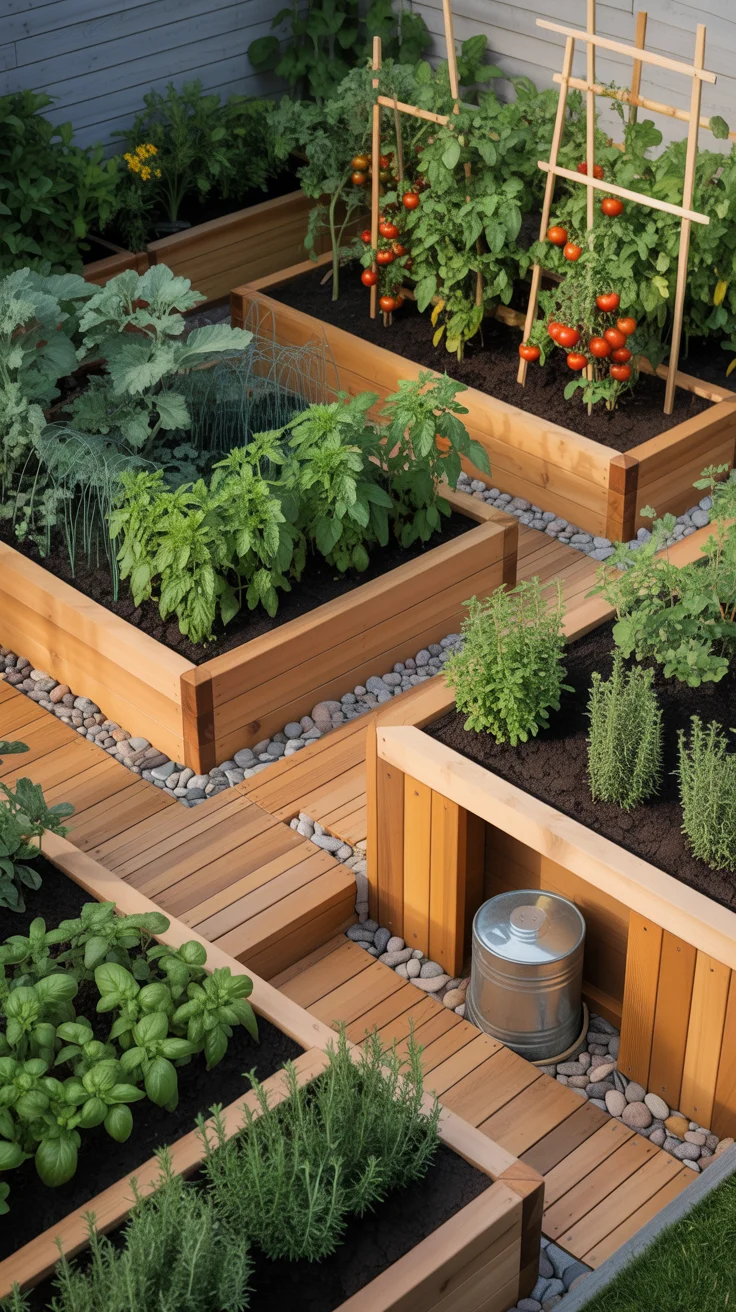
Productive Growing Beds and an Edible Landscape
Your growing zone should begin just beyond the cooking and prep area so harvesting is natural and frequent. Start with 3–6 raised beds or in-ground rows arranged for efficient access and irrigation. Keep bed widths to about 30 inches with paths at 18–24 inches to fit a wheelbarrow where needed. Orient beds north-south for even sun, unless local winds or slopes suggest otherwise.
Build for soil health. Fill beds with compost-rich soil and topdress with mulch (straw, leaf mold, wood chips for perennials). Install a simple drip line with a pressure regulator and filter, and use a timer to keep watering consistent. How to install drip irrigation
Layer crops for year-round harvest:
- Zone 1 veggies: lettuces, spinach, radishes, herbs, bush beans, and peppers closest to the door.
- Zone 2 staples: tomatoes, squash, potatoes, onions, carrots, and brassicas in the next ring.
- Perennial edges: asparagus, rhubarb, artichokes, and culinary herbs at bed ends and borders.
Add verticality. Trellises, arches, and a simple cattle-panel tunnel maximize yield and create shaded nooks for summer greens. Use the sunny side for tomatoes and cucumbers; tuck heat-sensitive greens on the shaded side.
Consider protected growing. A cold frame, mini hoop, or small greenhouse extends the season by weeks. Combine thermal mass (stone, water barrels) to stabilize night temps.
Integrate aquaponics or vertical hydroponics for quick salad production. Modular towers save ground space and can be placed near the kitchen door for daily picking. If you want a compact, water-efficient vertical grow system that integrates easily into small patios, explore The AquaTower to stack greens and herbs in a small footprint. The AquaTower
Plant guilds and habitat. In the farther ring, mix dwarf fruit trees with companion plants like comfrey (chop-and-drop mulch), pollinator flowers, and dynamic accumulators. This food-forest edge stabilizes your ecosystem, reduces pest pressure, and supplies biomass for mulching.
Focus on convenience. Keep a potting bench and soil bins near the beds. Place a hose hangar and quick-connect fittings within a few steps. Mount a whiteboard or waterproof notebook on the fence to track sowing dates and harvest notes.
Water Systems That Drive Productivity and Resilience
A self-sufficient backyard runs on dependable water. Design storage, delivery, and drainage as a coherent system so beds, trees, and the cooking station always have water when you need it.
Rain capture first. Start with your roof. Install gutters with leaf guards and route downspouts to first-flush diverters and food-grade tanks or barrels. Elevate tanks on a sturdy platform for gravity-fed pressure. Plumb a hose bib from your tanks to supply the washing station, irrigation manifolds, or both. Use opaque tanks to reduce algae and add an overflow line to a swale or rain garden that safely disperses excess.
Irrigation made easy. A simple, zoned manifold near the tanks or spigot feeds drip lines to beds, a low-flow line to vertical towers, and a separate line to fruit trees. Add shutoff valves so you can service one zone without disrupting others. Timers or smart controllers deliver consistent watering, freeing you from daily chores while protecting against under- or over-watering.
Shape the land to slow, spread, and sink water. On sloped sites, shallow swales on contour collect runoff and hydrate the root zone of shrubs and trees. Mulch deeply to minimize evaporation. Use stepping stones and well-drained paths to stay mud-free during shoulder seasons.
Greywater, where legal. A laundry-to-landscape or shower diversion can irrigate fruit trees or ornamental buffers. Follow local regulations, use biodegradable soaps, and filter lint to protect soil biology.
Year-round reliability. Plan winterization from the outset: drain low points, insulate exposed runs, and install quick-disconnects. In hot climates, shade tanks and bury lines shallowly to keep water cooler. Keep a spare filter and pressure regulator on hand.
Water at the workstations. Your washing sink and prep area should have a direct line—ideally from rain storage—so rinsing greens and washing tools does not require detours. Return rinse water to the landscape via gravel infiltration or mulch basins.
The goal is frictionless watering and clean-up. When your water system “disappears” into daily life, you’ll maintain beds more consistently, harvest more often, and prevent stress on plants through drought or heat spells.
Power, Utilities, and All-Weather Use
Reliable utilities make your outdoor room usable sunrise to well after sunset and during shoulder seasons. Thoughtful, low-energy infrastructure keeps bills in check and maximizes resilience.
Lighting layout. Combine ambient and task lighting. Use warm, overhead string lights or integrated post lights along seating, with focused, shielded task lights over the prep table and sink. Solar path markers help orient nighttime movement. Put everything on timers or smart switches to save power.
Small appliance support. A GFCI-protected outlet powers a blender, vacuum sealer, or dehydrator during preservation days. Weatherproof covers and a dedicated outdoor circuit increase safety. If you plan to run larger loads (freezers, pumps), map circuits on your base plan to reduce extension-cord clutter.
Backup power for resilience. If you want an independent, compact backup system for lights, small tools, and critical appliances, consider the Ultimate OFF-GRID Generator. It’s designed to provide on-demand electricity without relying on the grid, ideal for short outages or remote setups. Ultimate OFF-GRID Generator
Thermal comfort. Install a retractable shade or pergola to cool summer afternoons. In cool seasons, a portable propane heater or a rocket-mass bench (if appropriate for your climate and safety regulations) extends usability. Windbreaks made of open lattice, hedges, or polycarbonate screens temper gusts without creating turbulence.
Water and lighting efficiency. Choose 12V DC pumps for rain tanks and pair them with a small solar panel and battery if you want off-grid water pressure. Motion sensors on path lights conserve power. For the washing station, add a foot pedal or sprayer trigger to reduce waste.
Noise and neighbors. Locate generators, compressors, or loud appliances in a corner screened by fencing or shrubs. Consider hours of operation and airflow needs so equipment stays cool and quiet.
Plan for growth. Conduit runs under paths (even if empty) allow easy upgrades without tearing up hardscape. Install extra hose bibs and a couple of spare outlets now to save big headaches later.
A modest, well-planned utility backbone gives your outdoor room professional polish—and ensures you keep using it when weather or grid hiccups would otherwise drive you inside.
Storage, Preservation, and the Year-Round Pantry
Storage is the silent partner of self-sufficiency. When your preserving tools, jars, bins, and ingredients have clearly defined homes, harvest days feel smooth, not chaotic.
Organize the “wet works.” Keep canning pots, racks, and jars in a weatherproof cabinet near the prep sink. Store sanitizing solution, towels, and a drying rack there too. For produce wash/pack days, set out a staging table with color-coded tubs: wash, rinse, drain, pack.
Create cool, dry storage. A shaded, ventilated cabinet or an insulated box for onions, garlic, winter squash, and potatoes extends shelf life. If your climate allows, a small earth-cooled chamber or an insulated bin at the north side of a shed mimics a mini root cellar for carrots and beets. DIY root cellar options
Shed strategy. Divide the tool shed into zones: harvest tools and baskets by the door; pruning and sharpening mid-shed; soil and amendments deeper inside. Use vertical wall storage and label everything. Dedicate a section for food preservation gear only, so it never gets buried under shovels.
Cold storage and power. If you run a chest freezer, place it in a shaded area with adequate ventilation and under a small roof. Consider a power monitor to track energy use. Keep a battery-backed temperature alarm if outages are common.
Preservation pathways. Build a simple calendar rotating methods by season: spring pickles and dehydrated greens; summer canning and fermented salsas; fall drying apples and winter squash curing; winter stock-making and pressure canning beans. A two-shelf “finished goods” pantry next to the kitchen door speeds dinner decisions.
Stock for resilience. For shelf-stable staples and recipes designed to last, see The Lost Superfoods. It’s a useful collection of long-keeping foods and techniques that pair well with garden produce. The Lost Superfoods
Waste becomes resource. Set a three-bin compost system or tumbler near the garden edge, not next to the dining area. House a worm bin in a shaded corner; worms turn kitchen scraps into vermicompost for seedlings and salad beds. Keep carbon (leaves, shredded straw) in a lidded bin to balance kitchen greens. Backyard composting 101
With smart storage and preservation flows, your backyard feeds meals today and builds reserves for tomorrow.
Paths, Workflow, and Low-Maintenance Design
Great backyard layouts feel effortless because the daily workflow is built in. Aim to minimize steps, reduce bending and lifting, and cluster tasks that naturally go together.
Path design for speed. Lay main arteries 36–42 inches wide to accommodate a wheelbarrow and two people passing. Secondary paths can be 24 inches. Use long, gentle curves that guide movement between zones without backtracking. Define edges with brick, stone, or flexible metal for clean mulch or gravel boundaries.
Ergonomics and tool placement. Mount hooks for harvest baskets and tools near the garden gate. Keep a lightweight hoe and small rake right by the beds for quick morning touch-ups. Store heavy items—soil bags, amendments—near the driveway or a garden cart to reduce repeated hauling.
Time-block your care. Assign short, recurring tasks to specific days: 10-minute morning watering check (if not automated), mid-week harvest, weekend bed prep. Keep a laminated task board with checkboxes by the back door. Simple routines beat marathon workdays and are easier to sustain.
Mulch, automate, and simplify. Mulch everywhere—beds, tree rings, and path edges—to choke weeds and conserve moisture. Use drip irrigation on timers so watering happens even when you’re busy. Plant dense groundcovers under shrubs to reduce bare soil.
Plant wisely. Group crops by watering and maintenance needs. Keep high-maintenance plants (tomatoes, cucumbers) close; put longer-season, low-touch crops (winter squash, corn) farther out. Avoid dozens of one-off varieties; instead, grow a manageable set you truly enjoy eating.
Design for clean-up. Place a hose and stiff brush at the garden gate to spray off boots and tools. A small boot tray by the door keeps mud outside. A tidy work surface that’s easy to hose down encourages consistent use.
Iterate every season. After each harvest cycle, note which paths you used most, which beds underperformed, and where bottlenecks occurred. Adjust bed locations, widen a path, or move a hose bib accordingly. Small changes compound into a backyard that works like a well-tuned workshop.
By focusing on movement and maintenance from the start, you’ll create a self-sufficient outdoor room that is not just productive, but also pleasant to use every day.
Bringing It All Together: A Sample Zone Map
Use this simple template to translate ideas into a backyard map you can build over a few weekends.
Closest to the kitchen door (Zone 0–1):
- Herb rail, salad bed, grill or griddle, and a compact prep table with a sink.
- Weatherproof cabinet with knives, boards, tongs, sanitizing spray, and a fire extinguisher.
- Hose bib or rain-fed spigot, task lighting, and seating for two to four.
First ring outward (Zone 1–2):
- 3–6 raised beds with drip irrigation on a timer.
- A potting bench with soil bins and tools.
- A small compost tumbler or worm bin nearby but downwind of seating.
Second ring (Zone 2–3):
- Trellis tunnel for cucumbers and beans; tomato rows with stakes.
- Vertical towers or aquaponics unit for quick harvests.
- A three-bin compost system, mulch pile, and storage for leaves and straw.
Outer ring (Zone 3–4):
- Dwarf fruit trees with companion guilds, bee/pollinator flowers, and a rain garden.
- Shed with preservation cabinet, chest freezer, and tool zoning.
- Rain tanks elevated on a platform, with overflow directed into swales.
Utilities overlay:
- Conduit runs under paths for future lighting and outlets.
- Dedicated GFCI outlet by the prep table; low-voltage lights along paths.
- Optional backup power for essentials like pumps and a freezer.
Resources to guide implementation. If you want a complete homestead playbook tailored to small yards, including practical projects and checklists, consider The Self-Sufficient Backyard. The Self-Sufficient Backyard And if you plan to layer in water-efficient vertical growing, look at The AquaTower for a compact, modular solution that slots into your Zone 1. The AquaTower
Conclusion
Designing a self-sufficient backyard “outdoor room” with zones for cooking, growing, and storing turns your yard into a living pantry and open-air kitchen. Start at the kitchen door, map short loops between workstations, automate water, and build storage that supports daily meals and long-term preservation. With a few weekends of setup—and incremental improvements each season—you’ll enjoy fresh harvests, resilient systems, and a backyard that actually saves time.
When you’re ready to accelerate the process, lean on proven resources: a small homestead blueprint like The Self-Sufficient Backyard for layouts and projects, a compact backup power plan via the Ultimate OFF-GRID Generator, a vertical grow system such as The AquaTower, and long-keeping recipes from The Lost Superfoods. These tools complement the core design and help your outdoor room stay productive in every season. Build a solar dehydrator
FAQ
How do you plan zones in a self-sufficient backyard?
Start at the back door and place the most frequent tasks closest—cooking, herbs, salad beds, and a wash station. Next, position main vegetable beds with drip irrigation and a potting bench in a loop that returns to the kitchen. Put compost and mulch just beyond the beds but downwind from seating. Finally, site fruit trees, rain gardens, and bulk storage at the outer edge. Sketch a base map with sun, wind, and slopes, then walk your paths to ensure the flow feels natural. Revisit the map each season and tweak widths, locations, and utilities.
What should be close to the kitchen vs farther away?
Keep daily-use items close: grill or cooktop, prep counter with sink, herb planters, salad beds, and a small tool cabinet. Within a few steps, add the main veggie beds and a hose bib. Place compost within easy reach of the beds but away from dining areas. Farther out, group lower-frequency elements: fruit trees, bulk mulch piles, rain tanks, and the shed with long-term storage. If you add a smoker or pizza oven, site them downwind and slightly farther away than the daily grill. In a self-sufficient backyard outdoor room, proximity saves steps and keeps routines effortless.
What are the most important backyard systems to build first?
Start with the backbone: paths, water, and a work surface. Lay main paths that stay dry in rain, run a reliable hose bib or rain-fed spigot to the cooking and garden areas, and install a stable prep table with a sink. Next, add a few raised beds with drip irrigation and a simple compost setup. Once the daily loop works, consider rain tanks, trellises, vertical towers, and, if desired, small backup power for pumps or lighting. Priority systems are those that reduce daily friction and keep the garden watered and the cook station ready.
How do you design a backyard layout for easy maintenance?
Design for short, repeatable routines. Use drip irrigation with a timer to automate watering. Mulch beds and tree rings to suppress weeds. Standardize bed sizes and keep paths wide enough for a wheelbarrow. Store frequently used tools near their work zones and build a small cleaning station at the garden gate. Choose a modest plant variety list you can truly maintain, grouping crops by water and care needs. Above all, create logical loops—kitchen → cook zone → beds → compost → kitchen—so tasks flow naturally. A self-sufficient backyard “outdoor room” thrives when the layout fits your daily habits.