
Water is expensive, weather is unpredictable, and plants still need a steady drink. The good news: a rain barrel and a simple network of drip lines can turn “free” rainfall into consistent, low-waste irrigation. This guide walks you through designing, installing, and optimizing a Rain Barrel to Drip Irrigation: Simple Backyard Water-Saving System that works for raised beds, containers, and small food plots—without drowning in complex gear.
If you’re building a resilient backyard where water, power, and food all support each other, consider the practical homestead strategies in The Self-Sufficient Backyard. It can help you plan beyond one project and tie all your systems together thoughtfully.
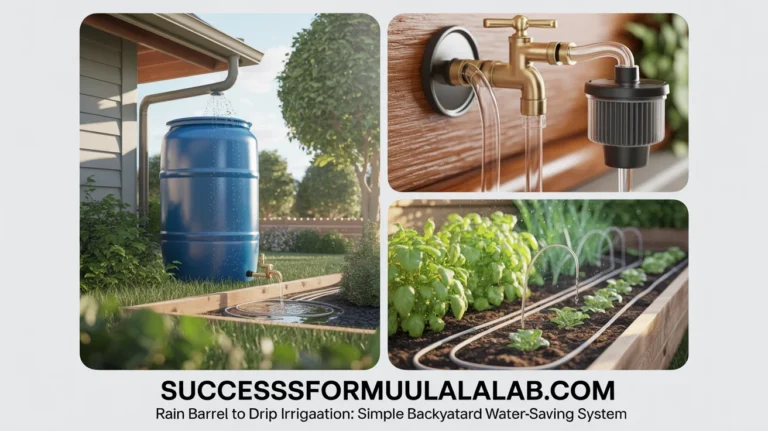
Rain Barrel to Drip Irrigation: Simple Backyard Water-Saving System basics
At its core, this system captures rainfall from your roof, stores it in a sealed barrel or tank, and dispenses it slowly to plants through drip tubing. Drip is more efficient than overhead watering because it delivers moisture to the root zone with minimal evaporation and runoff.
Here’s how it works:
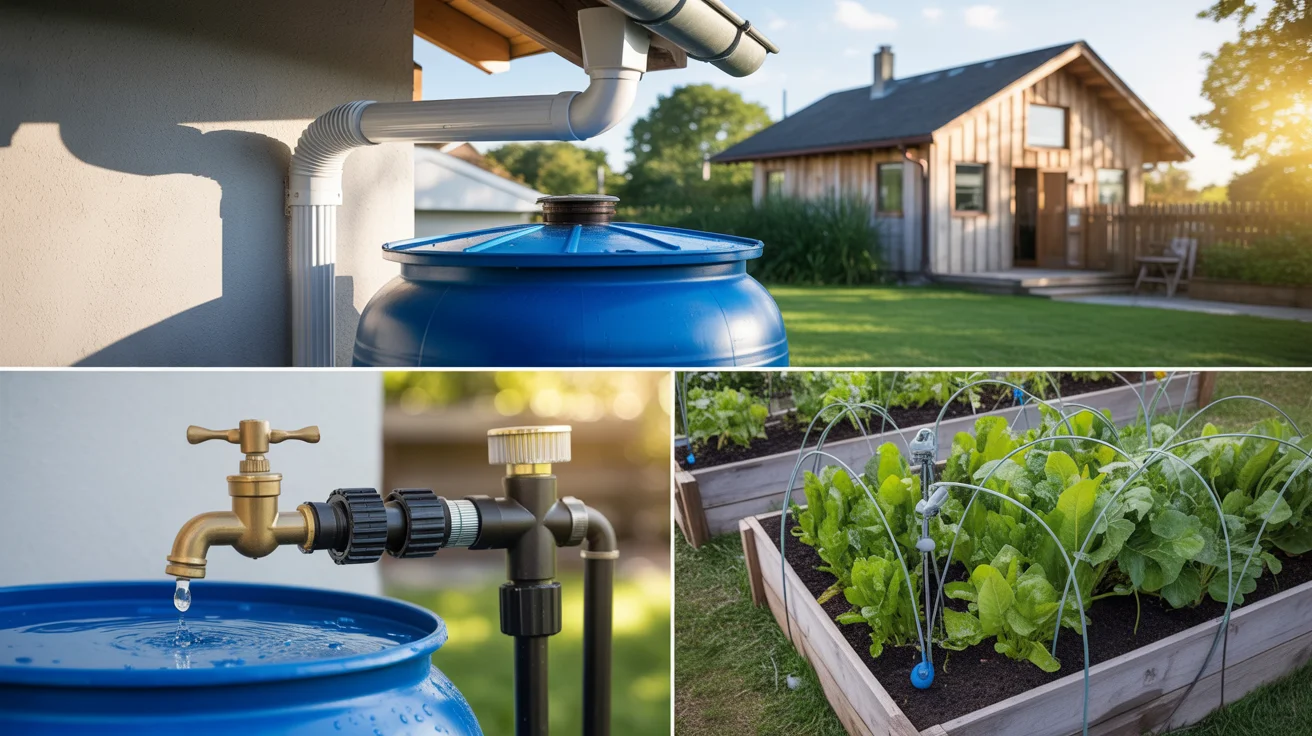
- Collection: A downspout diverter or inlet screen channels roof runoff into the barrel. A first-flush device can route the initial dirty roof wash to waste.
- Storage: A food-grade barrel or small tank keeps water shaded and covered to reduce algae and mosquitoes.
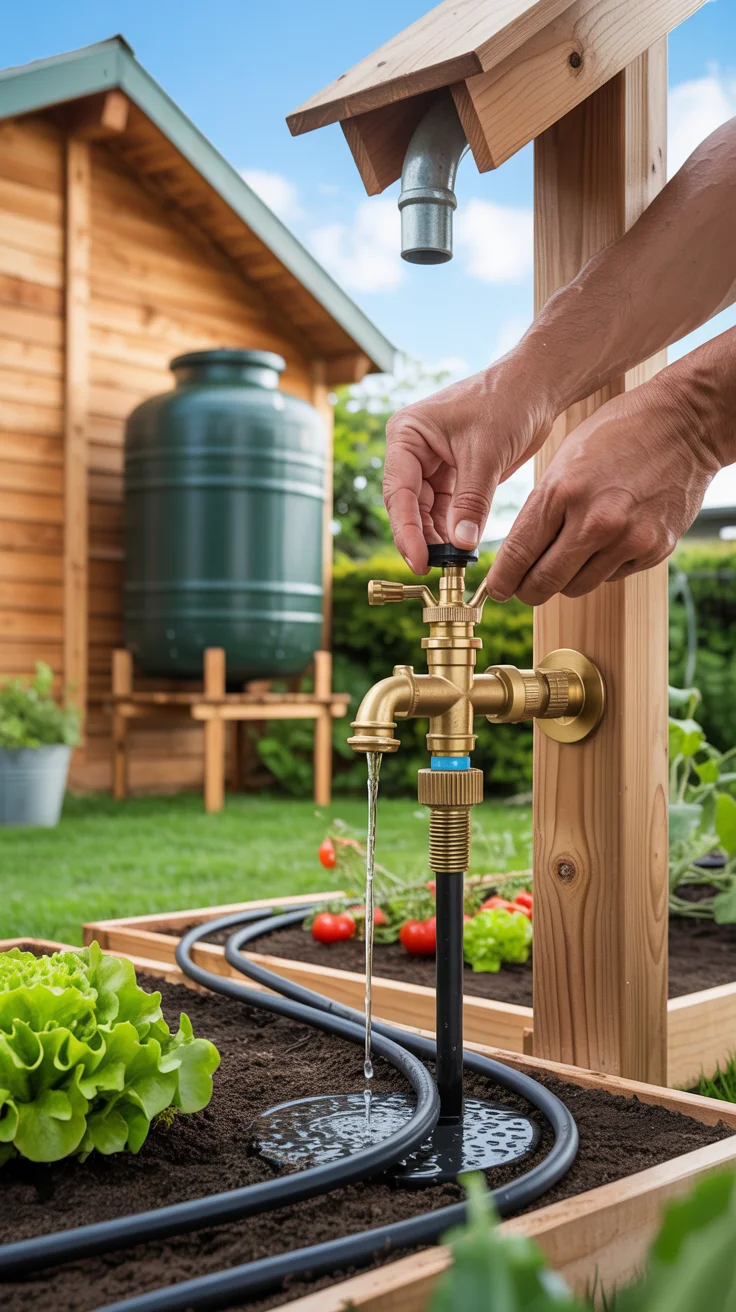
- Distribution: A bulkhead fitting near the bottom of the barrel connects to a spigot or valve. From here, a filter, pressure regulator, and mainline tubing feed low-flow drip emitters.
- Flow: Gravity provides water pressure. A height difference of 1 foot equals about 0.43 psi. Emitted flow depends on elevation, tubing length, and the number of emitters.
Why gravity-fed drip works:
- Drip doesn’t require high pressure. Many emitters function at low psi, especially non-pressure-compensating types or micro-drippers designed for gravity.
- You can design short zones matched to your barrel’s elevation to maintain steady flow.
- The system waters slowly and consistently, which plants love and soil absorbs efficiently.
Plan for success by embracing these principles:
- Keep zones compact. Shorter tubing runs maintain better flow under gravity.
- Elevate the barrel. The higher the water surface, the more head pressure you have.
- Filter everything. Grit from roofs and barrels will clog emitters unless you strain it out.
- Use shutoffs. Zone valves and end caps let you adjust flow and flush lines easily.
With the basics in place, you’re ready to design a setup sized to your garden and climate.
Planning your Rain Barrel to Drip Irrigation: Simple Backyard Water-Saving System
A smart plan saves time, materials, and water. Start with these steps:
Estimate your water budget:
- Rainfall capture: 1 inch of rain on 1,000 square feet of roof yields roughly 623 gallons. A 200-square-foot shed roof catches about 125 gallons per inch.
- Storage: A single 50–60 gallon barrel is a great start for containers or a small bed. For multiple beds or drought stretches, daisy-chain barrels or use a larger tank.
- Plant demand: Most vegetables like 1–1.5 inches of water per week in summer. That’s about 0.6–0.9 gallons per square foot weekly, though actual needs vary with soil and weather.
Right-size your zones:
- Drip flow rates: Common emitters range from 0.25–1 gph (gallons per hour) under ideal pressure. Gravity flow may be lower, especially at longer runs.
- Example: If your barrel supplies a zone with twenty 0.5 gph emitters, the zone theoretically uses 10 gph at rated pressure. Under gravity, expect less. Start conservative and test.
- Runtime: Water longer, not harder. Instead of trying to push high pressure, let the system drip for an hour or more to achieve target soil moisture.
Maximize gravity:
- Elevate the barrel 2–4 feet above the highest emitter for better flow. A sturdy platform of blocks, a framed stand, or a slope can help.
- Position the barrel upslope from beds to reduce head loss.
Simplify your layout:
- Put mainline tubing along the top edge of each bed. Run micro-tubing or dripperline alongside plant rows or around containers.
- Break your garden into zones by bed, exposure, or plant type. Leafy greens like constant moisture; tomatoes prefer deep, less frequent drinks.
Budget for control and protection:
- Include a Y- or T-valve near the barrel, an inline filter, and a low-pressure regulator suited for gravity (or skip the regulator and use gravity-friendly drippers).
- Add manual shutoffs per zone. If you later add a small pump or timer, the backbone is ready.
Planning resources help you dial in numbers and layout. See How to size a rainwater system and Drip irrigation layout for raised beds for simple worksheets and diagrams you can adapt.
Components and materials that make the system reliable
A dependable system comes from a handful of well-chosen pieces. Here’s what to consider:
Barrel or tank:
- Use a sealed, opaque, food-grade barrel or tote. Opaque walls limit algae growth by blocking sunlight.
- A secure lid and screened inlets keep out debris and mosquitoes.
- Place the barrel on a flat, strong base capable of supporting about 8.3 pounds per gallon.
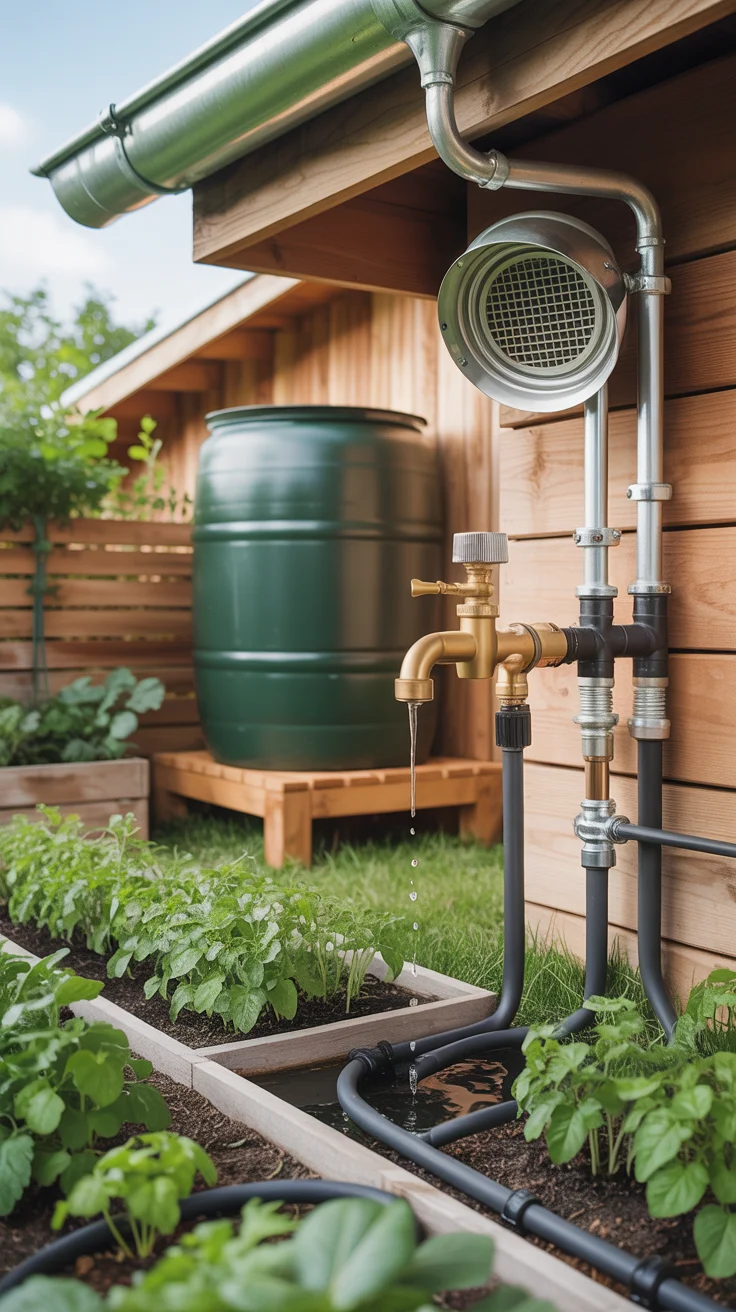
Gutter inlet and first flush:
- A downspout diverter routes water into the barrel while letting overflow continue down the downspout.
- A simple leaf screen blocks large debris.
- A first-flush device diverts the dirty initial runoff after dry spells, improving water quality for emitters.
Bulkhead and spigot:
- Install a bulkhead fitting near the barrel bottom for a watertight outlet.
- Add a ball valve or spigot to control flow and allow service.
Filtration and regulation:
- An inline filter (100–200 mesh) before the mainline is essential to prevent clogging.
- A low-pressure environment suits gravity-fed systems. If you add a pump later, a pressure regulator matched to your emitters protects the lines.
Backflow and safety:
- If you ever connect to municipal water, use an appropriate backflow preventer to protect potable supply. For rain-only systems isolated from mains, this is not required at the barrel, but follow local codes.
Tubing and fittings:
- Mainline poly tubing (typically 1/2 inch nominal) carries water across beds.
- Micro-tubing (1/4 inch) delivers to individual plants or short rows.
- Dripperline with built-in emitters can be efficient for uniform crops.
- Include tees, elbows, end caps, and figure-8 clamps for easy loop-outs and flushing.
Emitters and accessories:
- For gravity, non-pressure-compensating emitters or adjustable micro-drippers often perform better at low psi.
- Pot stakes, hold-downs, and clips keep lines tidy.
- A hose quick-connect at the barrel makes seasonal service easier.
Optional add-ons:
- A battery or mechanical timer compatible with low pressure can automate watering.
- A water level gauge (sight tube or float) helps you plan runtimes.
- A simple sediment trap before the filter prolongs filter life.
As you select materials, remember: lids closed, water filtered, lines flushable. That trio solves 80% of long-term reliability questions. For ideas on barrel covers and gnat-proof screens, see Mosquito-proof rain barrel lids and screens.
Step-by-step installation guide from roof to root zone
Follow this practical sequence for a clean install:
- Site and stand
- Choose a location close to your downspout and higher than your garden beds.
- Build a stout stand: compacted gravel base topped with pavers or a timber frame. Ensure it’s level.
- Barrel prep
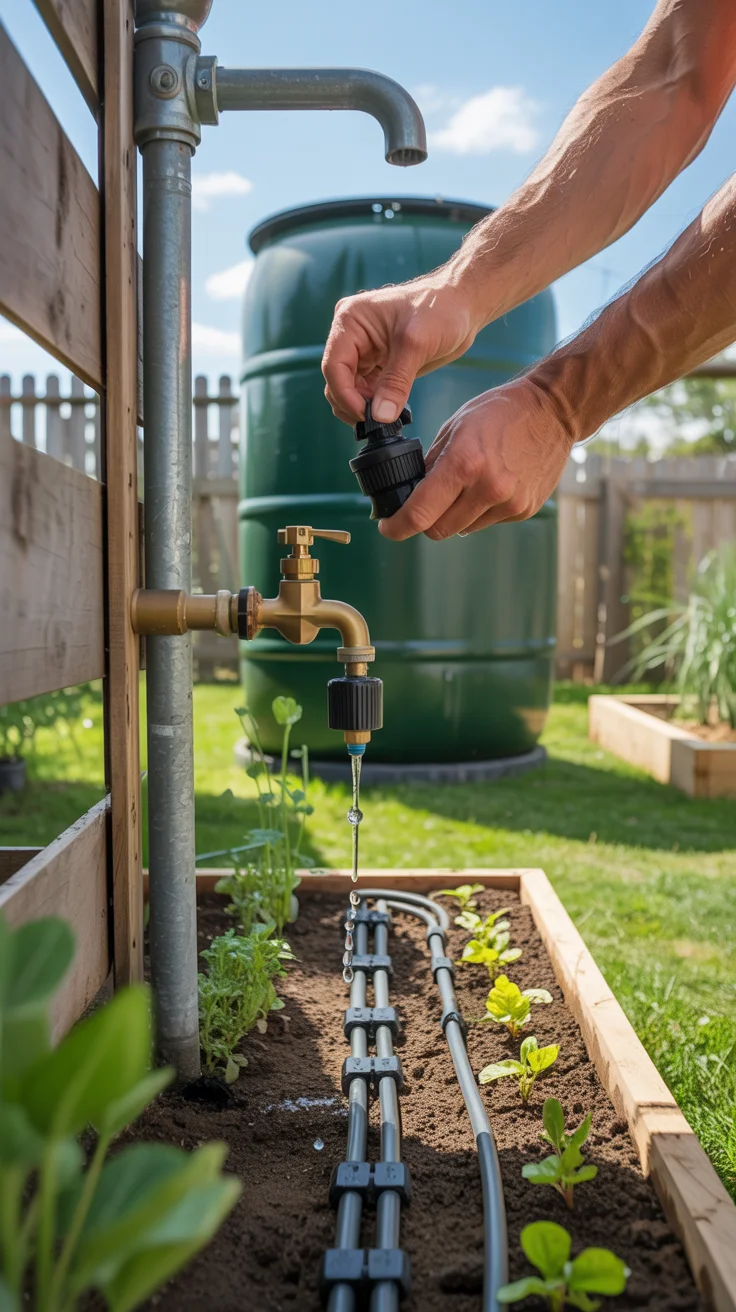
- Drill and install a bulkhead fitting near the bottom sidewall (not the base) for your outlet. Use thread sealant where appropriate.
- Attach a ball valve or spigot to the bulkhead. Add a hose quick-connect if desired.
- Fit a screened overflow port near the top with a hose or pipe to direct excess away from the foundation.
- Downspout diverter and first flush
- Cut the downspout and install a diverter that feeds the barrel during rain and bypasses when full.
- Add a leaf screen at the gutter and a first-flush device if you want cleaner water for your emitters.
- Filter and mainline
- Mount an inline filter downstream of the spigot. Place it where you can open and clean it easily.
- If you’re strictly gravity-fed with compatible emitters, you may skip a regulator. If you plan to add a pump later, include a regulator rated for low flow.
- Run 1/2-inch mainline tubing along the garden perimeter, securing with hold-down stakes.
- Zones and emitters
- Use tees and shutoff valves to split the mainline into separate bed zones.
- For raised beds, lay dripperline or run 1/4-inch leads with button emitters near the root zones.
- For containers, a ring of micro-tubing with one or two low-flow emitters per pot works well.
- Flushing and testing
- Leave line ends open and run water to flush debris. Then cap the ends with figure-8 clamps.
- Test one zone at a time. Observe flow uniformity, leaks, and pressure at the barrel (watch the water level change).
- Adjust emitter counts, add or close valves, and tweak elevations to balance flow.
- Set runtimes
- Start with longer, infrequent sessions (for example, 45–90 minutes per zone, 2–3 times per week) and adjust based on soil moisture and plant response.
- Use a moisture check: dig a small hole near the root zone after watering; the top few inches should be moist but not soggy.
- Label and document
- Label valves by bed and keep a simple map and seasonal schedule. It saves guesswork later.
A neat install is easier to maintain and troubleshoot. Keep lines accessible, minimize sharp bends, and consider a hinge or removable panel on any enclosure around the barrel for quick service.
Flow tuning, troubleshooting, and maintenance
Even simple systems benefit from small optimizations that keep water flowing where and when you want it.
Improve gravity performance:
- Raise the barrel: Every extra foot of elevation increases pressure. If your farthest emitters drip weakly, add height or shorten the run.
- Balance zones: Group plants with similar water needs and similar elevation into the same zone.
- Use larger mainline: Bigger tubing reduces friction losses, improving flow at the ends.
Dial in emitters:
- Prefer non-pressure-compensating drippers at low pressure. Adjustable micro-drippers can be set to a trickle for containers and thirsty crops.
- Avoid mixing many emitter types on the same low-pressure zone, which can cause uneven delivery.
Prevent clogs:
- Clean the inline filter regularly—more often after the first storms of the season.
- Install a short flush line at the end of each mainline. Open it briefly to purge silt.
- Keep the barrel lid sealed and downspout screens clear.
Solve common issues:
- Airlocks: If flow sputters, crack an end cap to release trapped air while water is running.
- Leaks: Hand-tighten fittings, replace worn grommets, and avoid over-pressurizing lines by keeping valves open during tests.
- Uneven watering: Trim overly long micro-tubes, redistribute emitters, or split a zone into two smaller loops.
Maintain seasonally:
- Spring: Inspect the roof, gutters, screens, and first flush. Replace any brittle tubing. Flush the system thoroughly.
- Summer: Check soil moisture weekly. Clean filters. Watch for algae or mosquito entry points and fix lids or screens promptly.
- Fall: Remove leaves from gutters. Drain lines if frost arrives early.
- Winter: In freezing climates, drain the barrel and lines, disconnect from the diverter, and store small components indoors. For tips on protecting outdoor plumbing, see Freeze-proofing garden water systems.
Automation note:
- If runtime consistency is hard to maintain, a simple low-pressure-friendly timer can open and close zones reliably. For power-resilience, a battery timer or future solar setup can keep schedules during outages.
If power reliability is a concern in your area, a backup energy source can keep small pumps or automation running during heat waves. For off-grid resiliency, see Ultimate OFF-GRID Generator for ideas on powering essential homestead systems.
Seasonal care, water quality, and safe irrigation practices
A water-wise system should also be safe and considerate of your plants, soil, and local environment.

Protect water quality:
- Keep everything covered. Mosquito-proof lids and screened inlets are non-negotiable.
- Manage the “first flush.” The first runoff after dry spells carries dust, pollen, and roof debris. Divert it to waste if you plan to run fine emitters.
- Clean filters and flush lines after big storms.
Garden safety guidelines:
- Roof materials matter. Avoid collecting from roofs with peeling lead paint, old treated wood shingles, or other questionable surfaces.
- Soil, not leaves: Apply water at the soil line, not over edible foliage. Drip inherently helps with this.
- Preharvest buffer: As a precaution, pause rainwater irrigation for a period before harvesting leafy greens and low-growing produce, and water with fresh tap if needed.
Local rules and ethics:
- Check local regulations. Some regions have guidelines on rainwater use.
- Manage overflow responsibly. Direct excess to a rain garden, swale, or safe drainage path to prevent foundation issues and protect neighbors.
Mosquito control basics:
- Seal every opening bigger than a mosquito with fine mesh.
- Keep the overflow covered and screened.
- Avoid standing water in saucers, buckets, and tools around the garden.
Winterization:
- Drain and disconnect in freezing climates to prevent cracks. Store the diverter plug-in piece per manufacturer instructions so winter precipitation bypasses the barrel.
- Coil and store small lines. Leave end caps loose to fully drain.
With these measures, your Rain Barrel to Drip Irrigation: Simple Backyard Water-Saving System remains a net positive for plant health and the environment.
Upgrades and automation for larger gardens and containers
Ready to scale? A few smart upgrades can expand your reach without sacrificing simplicity.
Add more storage:
- Daisy-chain barrels: Connect overflow from one barrel to the next so the first fills first, then the second, and so on. Keep them at similar heights to share pressure.
- Step up to a slim tank: Space-saving tanks hug a wall and offer more gallons per footprint.
Boost pressure with a small pump:
- A compact, low-flow pump can stabilize emitter performance on long runs or slight slopes.
- Use a filter before the pump and a regulator after it if your emitters require a specific pressure.
- Power options: Mains power with a GFCI outlet, or plan for outage resilience with a dedicated off-grid power source. For ideas on keeping essential backyard systems running during grid hiccups, explore Ultimate OFF-GRID Generator.
Automate irrigation:
- Multi-zone battery timers or smart controllers (in a weatherproof box) can rotate through beds based on season and rainfall.
- Add a simple moisture sensor or follow a soil-based schedule. Drip favors fewer, deeper waterings rather than daily sips for in-ground beds.
Integrate with your growing style:
- Container gardens: Use adjustable drippers with pot stakes to fine-tune plant-by-plant needs.
- Vertical and compact systems: For space-saving food production, modular towers pair well with a dedicated drip line or small recirculation pump. If you’re exploring vertical growing to augment your harvest, see the concepts behind The AquaTower for inspiration you can adapt to your space.
Refine data and decisions:
- Track rainfall and barrel levels weekly during your first season. Simple notes help you right-size storage and zones for next year.
- Adjust emitter density as plants mature; fruiting crops often need more water at peak production.
An upgrade path is easy when your foundation is solid. Start with gravity and good habits, then add power or automation only where it solves a clear problem.
Upgrades, automation, and recommended resources
Bringing it all together means thinking beyond hardware: planning, resilience, and a little inspiration go a long way.
Starter checklist:
- Catchment: Downspout diverter, leaf screen, first flush
- Storage: Sealed, opaque barrel on a sturdy stand
- Distribution: Bulkhead, spigot, inline filter, mainline, zone valves
- Delivery: Dripperline and/or micro-tubing with low-flow emitters
- Maintenance: End flush caps, spare fittings, brushes for filters
- Safety: Screened overflow, secure lid, seasonal drain plan
Real-world tips:
- Keep spare emitters and couplings in a small box by the barrel. Quick swaps beat emergency store runs.
- Label zones with weatherproof tags so anyone can help water while you’re away.
- Build a small gravel splash pad under the overflow to prevent erosion.
Helpful resources and tools:
- Planning beyond the barrel: The Self-Sufficient Backyard shares practical strategies for tying water, energy, and food systems together in a manageable way.
- Reliable backup power: For those occasional weeks when a pump or timer is essential, the Ultimate OFF-GRID Generator provides ideas for keeping the essentials on.
- Vertical harvest inspiration: If space is tight but you want more greens, check out the concepts behind The AquaTower to complement your drip-fed beds.
Looking for more DIY garden projects that stack benefits? See How to build a raised bed with water-wise soil for a foundation that pairs perfectly with drip.
Conclusion
A Rain Barrel to Drip Irrigation: Simple Backyard Water-Saving System turns storms into steady, efficient plant care. By elevating a sealed barrel, filtering well, and matching low-flow emitters to compact zones, you can irrigate vegetables, herbs, and ornamentals with less waste and less work. Start small: one barrel, one bed, one clean loop. Observe, adjust, and expand. With a few weekend hours and a modest budget, you’ll have a system that pays back in healthier plants, lower bills, and a more resilient backyard.
Frequently Asked Questions
How do you connect a rain barrel to drip irrigation?
Install a bulkhead fitting near the bottom of the barrel and attach a ball valve or spigot. From there, add an inline filter and connect 1/2-inch mainline tubing with a hose adapter. Use tees and shutoff valves to create zones, and run dripperline or 1/4-inch micro-tubing with emitters to plants. Flush lines first, then cap and test each zone. Elevate the barrel for better gravity flow. This is the standard path for a Rain Barrel to Drip Irrigation: Simple Backyard Water-Saving System.
Do you need a pump for rain barrel drip lines?
Not necessarily. Many setups work by gravity alone if you keep zones short, elevate the barrel 2–4 feet, and use low-pressure-friendly emitters. A small pump helps on long runs, with uphill beds, or when you need perfectly uniform output. If outages are common and you do use a pump or timer, consider backup power like the Ultimate OFF-GRID Generator for resilience.
How do you keep mosquitoes out of a rain barrel?
Use a tight-fitting, sealed lid; fine mesh screens on all inlets and the overflow; and keep every opening smaller than a mosquito. Maintain the diverter and leaf screens so water moves freely without pooling. Empty standing water around the yard (tray saucers, buckets), and flush the system after big storms. A covered, moving path of water plus regular filter cleaning prevents mosquito breeding and keeps drip emitters clean.
Is rain barrel water safe for vegetable gardens?
Many gardeners successfully use rainwater on edible crops by applying it to the soil—not the leaves—and by using reasonable precautions: collect from suitable roof materials, use a first-flush diverter, filter before the drip system, and pause rainwater irrigation close to harvest if you want extra caution. Local guidelines vary, so check your area’s recommendations. With those best practices, a Rain Barrel to Drip Irrigation: Simple Backyard Water-Saving System can be a safe, efficient way to water vegetables.