
Home resilience starts with a single room that absolutely must not fail when it matters most. This guide lays out “No-Fail” Wind & Storm Safe Room Build Basics (Layout + Key Specs) so you can plan, spec, and build a shelter that meets modern standards, integrates cleanly into your home, and keeps people comfortable during short stays. We’ll cover core design principles, location choices, structural details, door and hardware specs, ventilation and power, and how to outfit the space so it’s usable under stress.
If your home plan includes backup electricity for shelter lights and charging, a compact, quiet solution like the Ultimate OFF-GRID Generator can keep essentials running without relying on the grid.
The no-fail mindset and performance standards
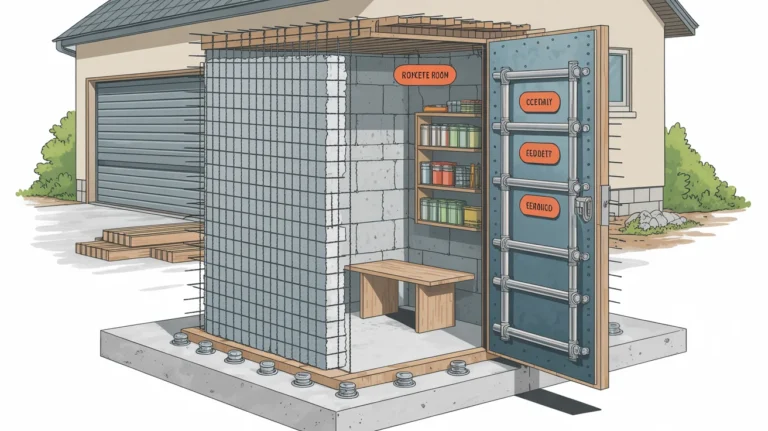
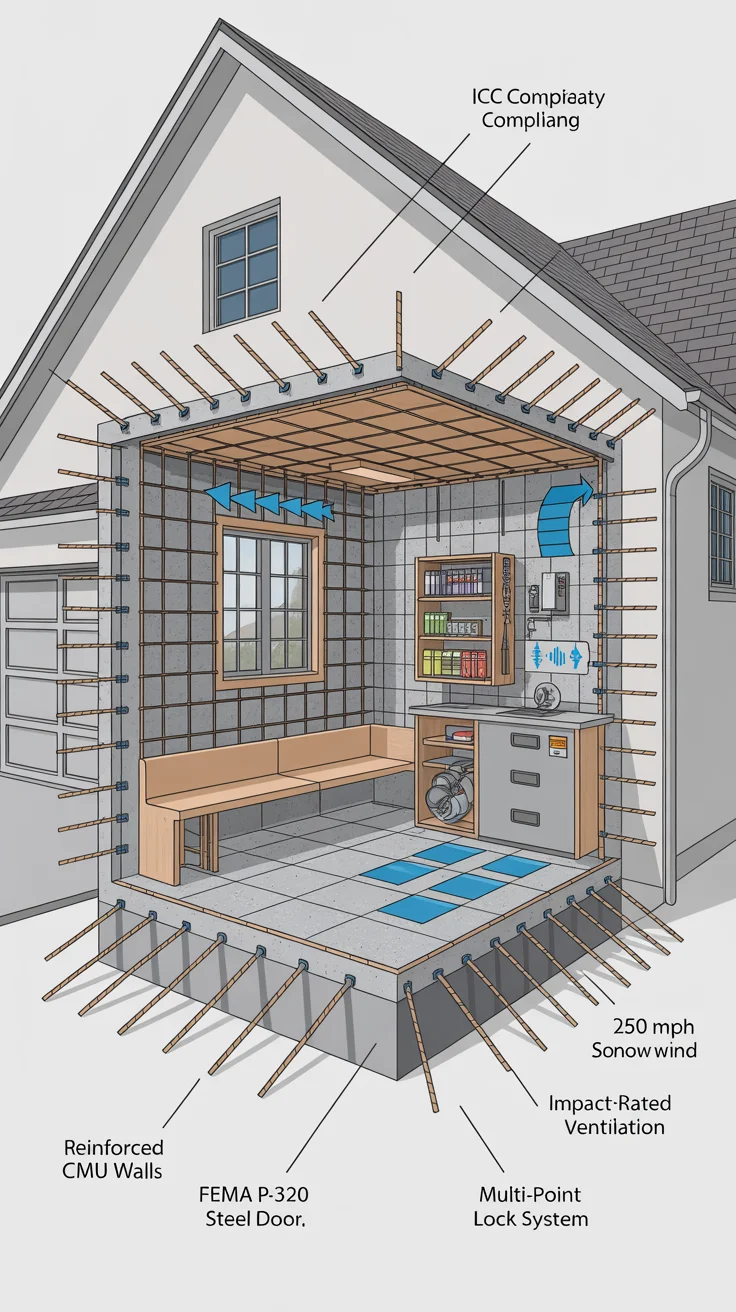
A safe room is not just a strong closet. It’s a purpose-built, structurally independent envelope designed to resist extreme winds, flying debris, and pressure fluctuations. The no-fail mindset means you design for performance first, convenience second. That starts by aligning your plan with widely accepted references:
- ICC 500 (International Code Council/NSSA Standard for the Design and Construction of Storm Shelters) sets minimum design, testing, and construction criteria for residential and community shelters.
- FEMA P-320 (Taking Shelter from the Storm) and FEMA P-361 (Safe Rooms for Tornadoes and Hurricanes) provide design guidance, layouts, anchorage details, and siting principles for residential safe rooms.
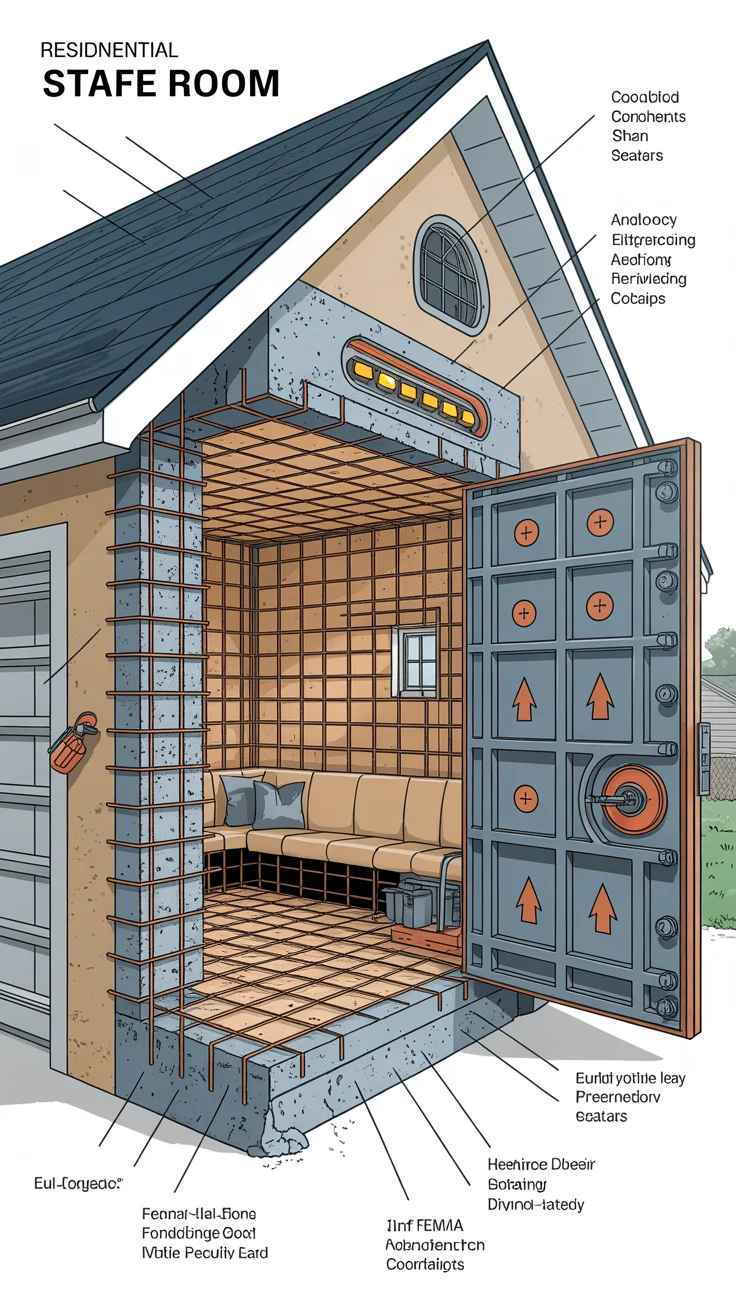
Key concept: a safe room is a hardened “box within a box.” It has a continuous load path from roof/ceiling through walls to the foundation, tested door assemblies, protected vents, and anchorage that can resist uplift and lateral loads. In high-wind events—tornadoes or hurricanes—debris impact drives many critical details. Components are only as strong as their weakest link; for instance, an untested door negates the strength of reinforced walls.
Types of residential safe rooms include:
- Site-built (cast-in-place concrete, concrete masonry with grout and rebar, insulated concrete forms, or structural steel).
- Prefabricated/engineered modules tested to ICC 500 debris criteria.
- Retrofit rooms within existing homes, often adapted from closets, pantries, or garages with structural upgrades.
Start with a clear “design storm.” Tornado zones prioritize short-duration, high-impact resistance. Hurricane zones consider longer-duration wind, water intrusion potential, and debris from building materials. Flood risk is crucial: below-grade spaces are generally not acceptable in flood hazard areas. If flooding is possible, elevate or relocate the shelter.
Finally, sizing should be realistic. People, not just square footage, define success. Plan for your household plus a buffer. Factor pets, mobility devices, and emergency supplies. The best safe room is one you can reach quickly, lock down easily, and endure within for hours without undue stress.
“No-Fail” Wind & Storm Safe Room Build Basics applied to location and layout
Placement is about reaching safety fast and avoiding secondary hazards. Interior locations on the lowest inhabitable level are typical, but local flood maps and site drainage can override that rule. Avoid exterior wall exposure where possible, and eliminate overhead structural vulnerabilities (e.g., large, heavy fireplaces or water tanks directly above).
Practical placement candidates:
- First-floor interior room close to bedrooms or the family living area.
- Garage corner built as a hardened module (mind vehicle clearance and fume isolation).
- Basement interior room away from windows, with careful attention to flood and egress issues.
- New-build stairwell core or pantry converted into the shelter envelope.
Layout should favor:
- A nearly square footprint for efficient structural performance (fewer long, slender walls).
- Clear, inward-opening door swing (inward helps if debris piles up outside).
- Unobstructed door interior so people cannot be trapped behind stacked supplies.
- Visibility of the door from common areas for rapid rallying.
- Durable, fixed seating integrated into walls to preserve floor space.
- Simple, redundant ventilation paths with protected exterior terminations.
Consider how people move. If you have kids or older adults, keep the shelter no more than a few seconds from sleeping areas. If your home has multiple levels, a shelter on the main sleeping level can beat a basement in real-world accessibility, especially at night. For new construction, consolidate the shelter with a pantry or closet—dual-use spaces increase daily utility but must keep protected walls clear of penetrations that compromise structural performance.
Sizing considerations:
- Determine maximum expected occupants and set a minimum floor area that permits seated rest and limited movement. Use ICC 500/FEMA guidance and your local code official’s recommendations.
- Plan standing room near the door for late arrivals without disrupting seated occupants.
- Dedicate a wall bay to storage: water, first aid, communication gear, and tools.
Finally, build a “path to safety.” Keep hallways uncluttered, locate emergency lights night-visible from bedrooms, and run drills. In storms, seconds count.
How to create a family emergency rally plan
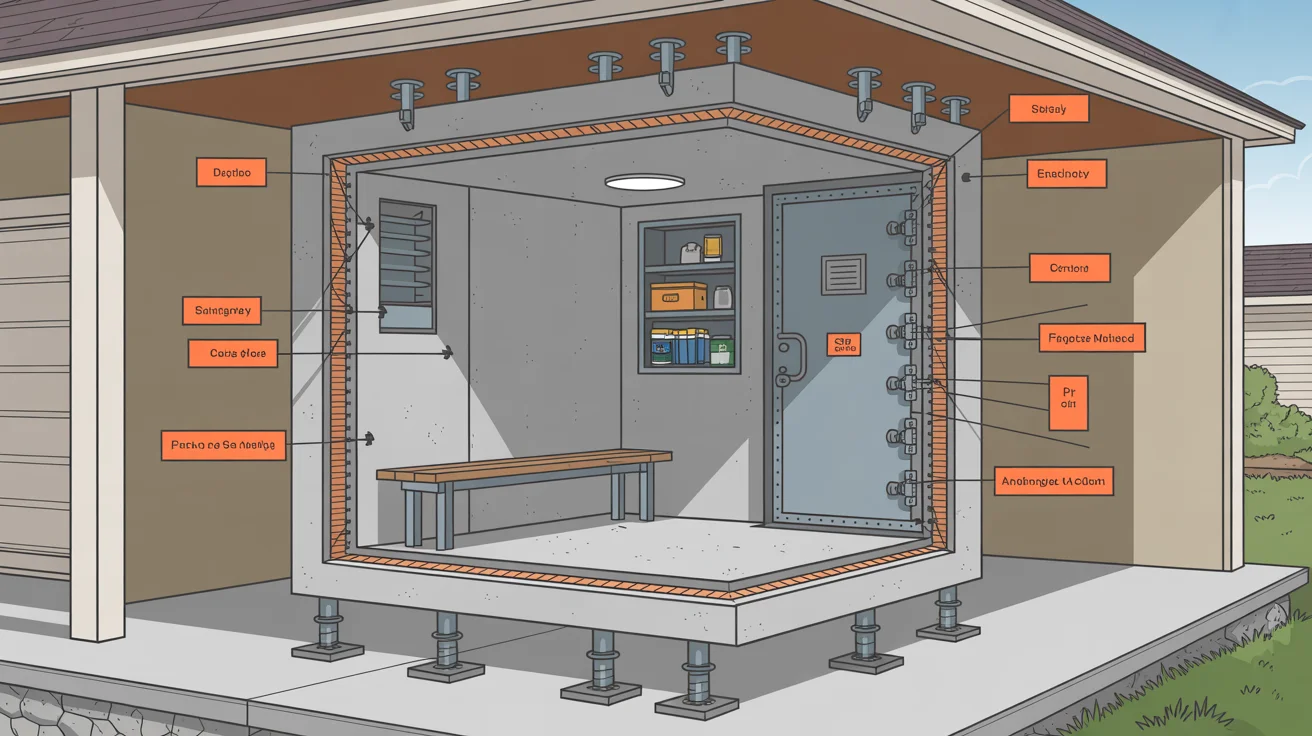
“No-Fail” Wind & Storm Safe Room Build Basics for structural assemblies
The shelter envelope resists wind pressure, suction, and debris impact. Effectiveness comes from redundancy and a continuous load path, not just heavy materials. Popular structural assemblies include:
- Cast-in-place reinforced concrete: Monolithic walls and ceiling tied into the foundation. Offers excellent debris resistance when properly reinforced and anchored.
- Concrete masonry units (CMU) fully grouted with rebar: Requires correct bar spacing, grout consolidation, and bond beams. Combine with a reinforced concrete or steel lid connected with mechanical anchors.
- Insulated concrete forms (ICF): Provides thermal benefits and robust structure when reinforced according to engineering. Requires a tested door system and careful penetrations.
- Structural steel panels or tested prefabricated units: Factory-built assemblies can simplify compliance, provided they carry evidence of testing to ICC 500 impact criteria and instructions for anchorage.
Focus on connections:
- Foundation anchorage: Use engineer-specified anchor bolts or embedded hardware. Verify slab thickness, reinforcement, and any needed footings.
- Wall-to-ceiling connection: Positive mechanical fastening. The “lid” cannot be an afterthought; many failures start at the roof/ceiling.
- Diaphragm action: When using steel or concrete lids, ensure adequate thickness, reinforcement, and edge connections so the assembly acts as one unit.
- Penetrations: Limit and harden. Use steel sleeves for necessary conduits; avoid oversized or unnecessary holes. Never notch or drill rebar.
Design for impact:
- Components (walls, doors, frames, vents) must withstand high-velocity projectiles. Compliance is demonstrated through testing or engineered equivalency.
- Eliminate conventional windows unless rated for safe-room use under ICC 500 debris criteria. Most residential windows are not appropriate.
Quality control matters:
- Use licensed professionals for engineering and code compliance.
- Demand shop drawings or installation details from prefab vendors.
- Schedule inspections at reinforcement, pre-pour, and final installation stages.
- Keep records: drawings, product approvals, and photos for insurance and resale.
Simple rule: your shelter is only as strong as its weakest detail. Don’t let penetrations, subpar anchors, or non-rated doors compromise a robust wall system.
How to anchor a safe room to a slab
Door assemblies, frames, and protected openings that don’t compromise the box
Doors are the critical interface in a safe room. They must close quickly, resist impact, and remain latched under pressure. Ordinary steel doors and deadbolts are not enough. Look for assemblies specifically tested to ICC 500 debris impact standards and installed per the manufacturer’s instructions.
Core elements of a compliant door assembly:
- Leaf and frame: Heavy-gauge steel or other tested construction with reinforced hinges and latch points. The frame anchors directly to the structural wall with specified fasteners.
- Multi-point locking: Top, side, and bottom engagement spreads load and keeps the door from bowing open. Lever sets should operate smoothly and be usable by children and adults.
- In-swing configuration: Reduces the risk of debris outside blocking egress. Confirm clear interior swing.
- Threshold and seals: Weather-stripping can help with comfort and sound, but the primary aim is structural integrity and debris resistance.
- Vision panels: If included, they must be part of a tested door assembly. Otherwise, plan for a solid door. Visibility can be provided by a small camera or peephole rated for impact, but avoid weakening the door.
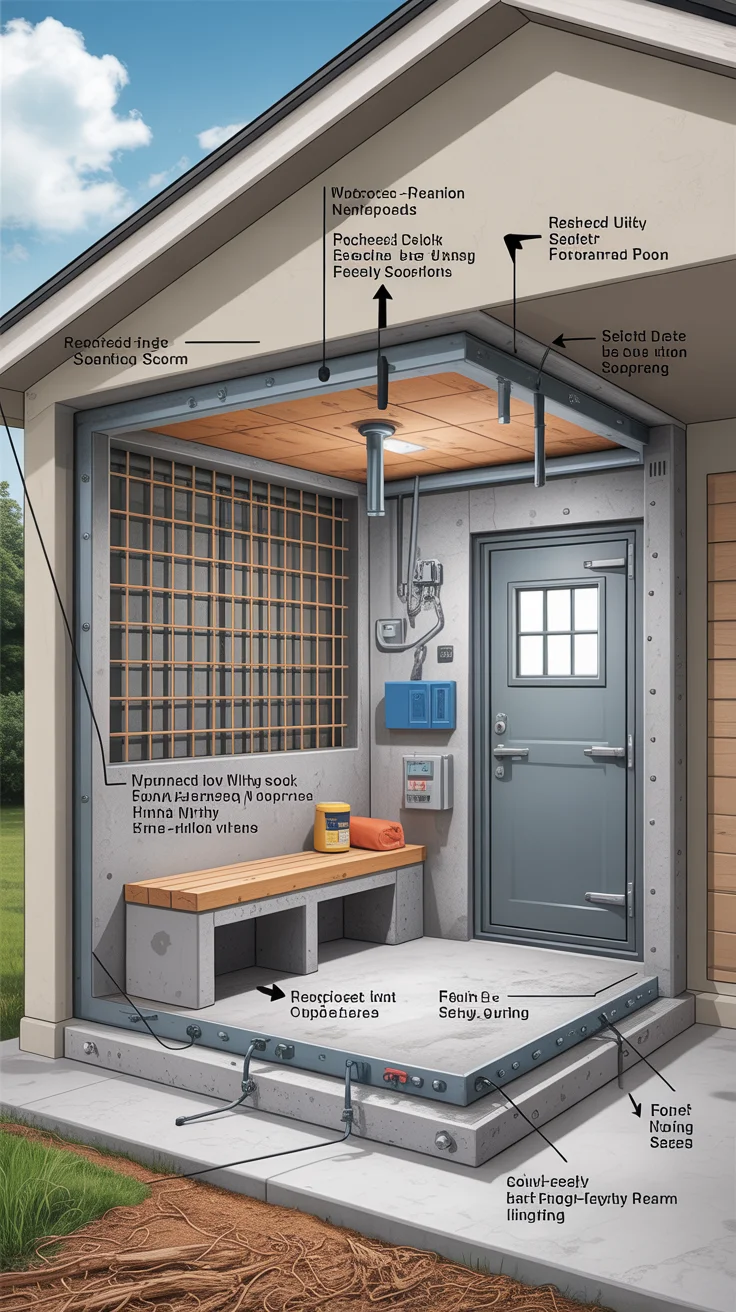
Ventilation and utility penetrations need equal attention:
- Vents: Use protected intake/exhaust covers designed to resist debris. Place high/low for pressure balance and cross-flow. Consider internal baffles or ballistic screens.
- Conduits: Run low-profile metal raceways, sealed and mechanically fastened. Avoid soft ducts through walls. Where ducts must penetrate, use short, protected sleeves and impact-rated external hoods.
Hardware strategies:
- Panic-friendly operation: A single internal action to secure multiple latches minimizes confusion during emergencies.
- Backup opening plan: Keep a non-sparking pry bar and a wrench inside. Store a second key or tool kit externally with a trusted neighbor in case of post-event extraction needs.
Finish the opening the same way you built the box—no weak links, no exceptions. A rated door properly installed is the single best investment you can make after the structural shell.
How to choose a storm-rated door
Ventilation, power, lighting, and communications under grid stress
A safe room should maintain breathable air, minimal heat buildup, and reliable light even if power fails. Good design balances passive reliability with simple, testable systems.
Ventilation:
- Use two separated vent paths to reduce noise and promote cross-flow. Locate one high and one low on opposing walls if possible.
- Protect exterior terminations with impact-resistant covers. Add insect screens on the interior side for maintenance.
- Consider manual circulation options (small hand-crank fans) in case grid power is lost and temperatures rise. Avoid gasoline-powered devices anywhere near the shelter.
Power and lighting:
- Run a dedicated circuit with surge protection. Use efficient LED fixtures with a covered lens to prevent glare and damage.
- Add battery-backed emergency lights and portable headlamps. These offer immediate illumination if power drops during entry.
- A compact, independent power source ensures charging for radios and phones. A unit like the Ultimate OFF-GRID Generator is useful for essential electricity without relying on the grid or fuel deliveries.
Water and sanitation:
- Store sealed water containers. If you want a compact purification backup that’s usable beyond the shelter, consider a gravity-fed system such as The AquaTower to turn questionable sources into potable water during extended outages.
- Prepare a simple sanitation kit: lined bucket, enzyme packs, toilet paper, wet wipes, and odor-control bags. Keep it discreet and accessible.
Communications:
- NOAA weather radio with SAME alerts, spare batteries, and an external antenna lead if the shelter’s shell blocks signals.
- Whistle and air horn for signaling rescuers if doors are blocked.
- Printed contact sheet with emergency numbers and a local map page.
Testing and maintenance:
- Test lights and radios monthly. Rotate water and batteries on a schedule.
- Keep a laminated quick-start checklist inside the door: power, vents, lock sequence, and communication steps.
When the grid falters, preparedness is the difference between anxiety and calm. Build in simple redundancies you can test on a Saturday morning.
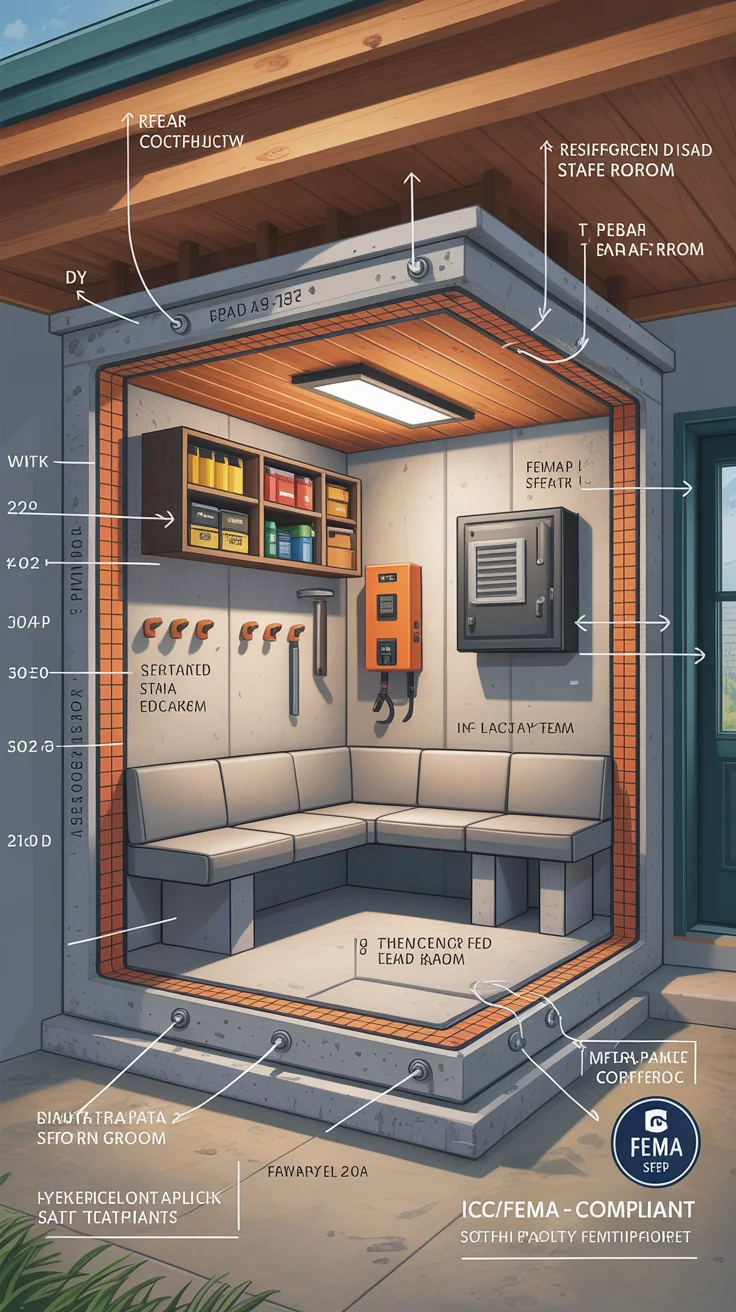
Outfitting the space for comfort, safety, and short-duration stays
A well-built safe room can still feel claustrophobic if it’s bare. Comfort increases compliance—people are more likely to use and stay in the shelter properly if it’s organized and humane.
Seating and ergonomics:
- Bench-style seating along a wall maximizes capacity. Use rounded edges and anchor to structure.
- Provide a few seat cushions or closed-cell pads. Add a small backrest or handholds for those who need support.
Lighting and sound:
- Warm-white LED strips reduce harshness and eye strain. A dim setting helps manage anxiety for children.
- Soft surfaces (a small rug, fabric panels on furring strips) modestly reduce noise without compromising structure. Ensure any additions are mechanically fastened and don’t obstruct vents.
Organization:
- Wall-mounted bins for first aid, tools, and small electronics. Label everything.
- A low, secured cabinet for sanitation gear and kids’ comfort items.
- A head-height shelf for grab-and-go items: radio, flashlights, and a binder with plans and copies of important documents.
Nutrition and hydration:
- Store simple, shelf-stable foods that don’t require cooking. A reference like The Lost Superfoods can help you build a pantry of low-fuss options with long shelf life.
- If your household focuses on homegrown resilience, the planning mindset in The Self-Sufficient Backyard can extend beyond the shelter to your property at large, supporting long-term self-reliance.
Health and accessibility:
- Keep spare eyeglasses, basic meds, a compact first aid kit, and a blanket for each person.
- Plan for pets: collapsible bowls, a small litter solution, leashes, and waste bags.
- Accessibility tools: a folding cane, a simple transfer board, or a compact commode seat can transform the space for older adults.
Morale matters:
- Include a few distractions: a deck of cards, puzzle book, and crayons.
- A small analog clock helps manage time without checking phones.
Your goal is a space people can tolerate for several hours under stress. A little thought in advance pays off when weather moves in quickly.
How to stock a 72-hour emergency kit
Permits, inspections, and project delivery that stand up to scrutiny
Compliance is part of “no-fail.” A shelter that looks strong but isn’t documented can cause problems with inspections, insurance claims, and resale.
Start with your authority having jurisdiction (AHJ):
- Ask whether the locality has adopted ICC 500 and what edition of the building code is in force.
- Clarify permit submittals: engineered drawings, product approvals, and any special inspections.
- If you’re in a mapped flood hazard area, confirm siting and elevation requirements.
Design team and vendors:
- Engage a licensed structural engineer with shelter experience. Their stamp anchors the permitting process.
- For prefabricated units, request documentation proving ICC 500 compliance and installation details for your foundation type.
- Vet contractors for similar builds. Ask about previous inspections, especially on anchorage and door installations.
Construction workflow:
- Pre-construction meeting aligns everyone on design storm assumptions, penetrations, and finish expectations.
- Inspections at steel/rebar placement, prior to wall closure, and at final hardware installation are common. Photograph reinforcement and anchors before concrete placement.
- Maintain a change log. Even small penetrations need review.
Funding and incentives:
- Check for mitigation grants (e.g., FEMA Hazard Mitigation Assistance programs administered by states or municipalities) that sometimes offset residential safe room costs.
- Ask your insurer about potential premium considerations for hardened rooms and document everything with photos, specs, and receipts.
Ownership and handover:
- Keep a shelter manual with stamped drawings, door assembly data, and maintenance schedules.
- Train the household. Conduct annual drills, including nighttime scenarios.
- Revisit capacity if your family grows or accessibility needs change.
A well-documented, inspected build isn’t just bureaucracy—it’s proof your shelter was designed to do what you think it can do when it matters.
Final integration checklist and realistic drills
Pulling the pieces together transforms a plan into a reliable shelter. Use this concise checklist to validate your design and prep:
Structural and door integrity:
- Verified structural design aligned with ICC 500/FEMA guidance.
- Continuous load path confirmed: foundation, walls, lid.
- Door assembly tested to debris standards; multipoint latch; in-swing; frame anchored per spec.
Openings and penetrations:
- Vents protected from debris; cross-vent paths established.
- Electrical conduits sealed and mechanically fastened.
- No nonessential penetrations in protected walls.
Power, light, and comms:
- Dedicated circuit with surge protection.
- Battery-backed light and portable lamps tested monthly.
- NOAA radio, phone chargers, whistles; external contact list posted.
- Portable power option like the Ultimate OFF-GRID Generator staged or cabled as planned.
Supplies and comfort:
- Water stores and an on-hand purification method like The AquaTower.
- Shelf-stable foods curated with help from The Lost Superfoods.
- Sanitation kit sealed; seating anchored; blankets, meds, pet gear stocked.
Access and drills:
- Short, unobstructed path from bedrooms and main living area.
- Night lighting cues.
- Quarterly drills—time the entry and lock sequence.
Documentation:
- Permit, inspections, photos, and product sheets compiled in a binder.
- Maintenance log for batteries, water rotation, and hardware checks.
Run at least one realistic drill in poor lighting with the TV on and kids moving around—because storms don’t wait for perfect conditions. Note any friction points and refine.
How to run a family severe-weather drill
Conclusion: bring “No-Fail” Wind & Storm Safe Room Build Basics to life
A resilient home depends on a hardened room executed without weak links. By aligning with “No-Fail” Wind & Storm Safe Room Build Basics (Layout + Key Specs)—from siting and structural assemblies to tested doors, protected vents, and thoughtful outfitting—you create a reliable, humane space that people can reach and use confidently. Pair good engineering with simple redundancies like battery lights, a NOAA radio, a compact backup power source, and a small water purification option, and you’ll be ready when warnings sound. Build it once, document it well, and practice until entry becomes second nature.
Recommended resilience helpers:
- Portable backup power: Ultimate OFF-GRID Generator
- Water purification: The AquaTower
- Long-shelf-life pantry planning: The Lost Superfoods
- Whole-property self-reliance mindset: The Self-Sufficient Backyard
FAQ
What is the difference between a safe room and a storm shelter?
A safe room is a hardened space designed to meet specific performance criteria for extreme winds and debris impact, typically guided by ICC 500 and FEMA publications. The term “storm shelter” is often used generically; some shelters are community-scale, while residential safe rooms are inside or attached to a home. The key difference isn’t the name—it’s compliance and tested performance. A residential safe room is a “box within a box” with a continuous load path, impact-rated door assembly, and protected openings, built to keep occupants safe for the duration of a tornado or hurricane passage.
Where is the safest location for a safe room in a home?
The safest spots are typically interior rooms on the lowest inhabitable level, away from exterior walls and windows, with a short, clear path from sleeping areas. In basements, choose interior corners away from glass, and evaluate flood risks. In flood-prone zones, below-grade locations may be inappropriate—elevate or place the shelter on a higher level. Accessibility matters as much as physics: the best location is the one your family can reach in seconds, day or night, without navigating stairs or obstacles.
What building-code rules apply to safe rooms?
Most jurisdictions reference the International Residential Code or International Building Code, which in turn can reference ICC 500 for storm shelters. FEMA P-320 and P-361 provide widely used design guidance and construction details for residential safe rooms. Local adoption varies, so start with your building department (the authority having jurisdiction). Expect to submit engineered drawings, product approvals for door assemblies and prefab units, and to schedule inspections for reinforcement, anchorage, and final hardware. Document everything for insurance and future buyers.
How do you make a safe room comfortable for short stays?
Comfort comes from lighting, seating, organization, and a few morale boosters. Use warm LED lighting with battery backup, anchored bench seating, labeled bins for first aid and tools, and a small sanitation kit. Stock simple, no-cook foods and sealed water. A radio, blankets, and kid-friendly items (cards, crayons) reduce stress. Ventilation should provide cross-flow without drafts; protect vents with impact-resistant covers. Many families follow “No-Fail” Wind & Storm Safe Room Build Basics (Layout + Key Specs) and then add a personal touch so the room feels familiar and easy to use during drills.