
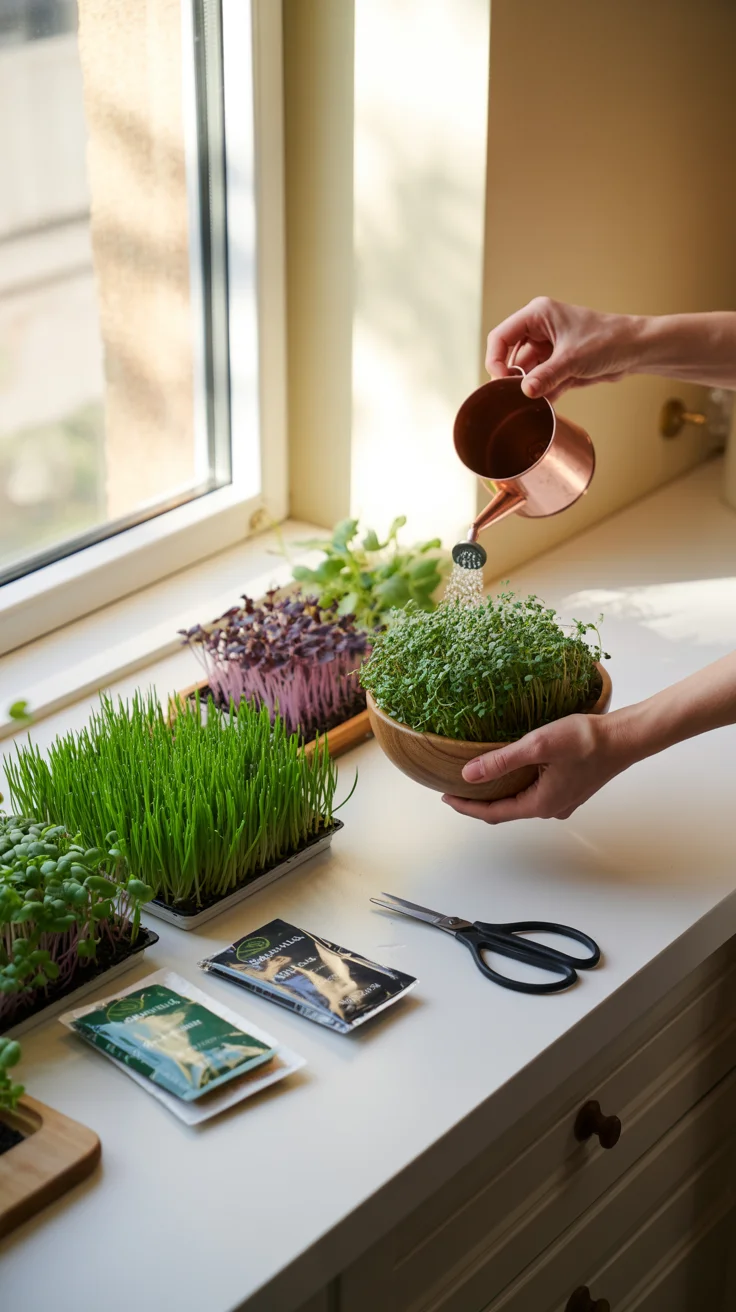
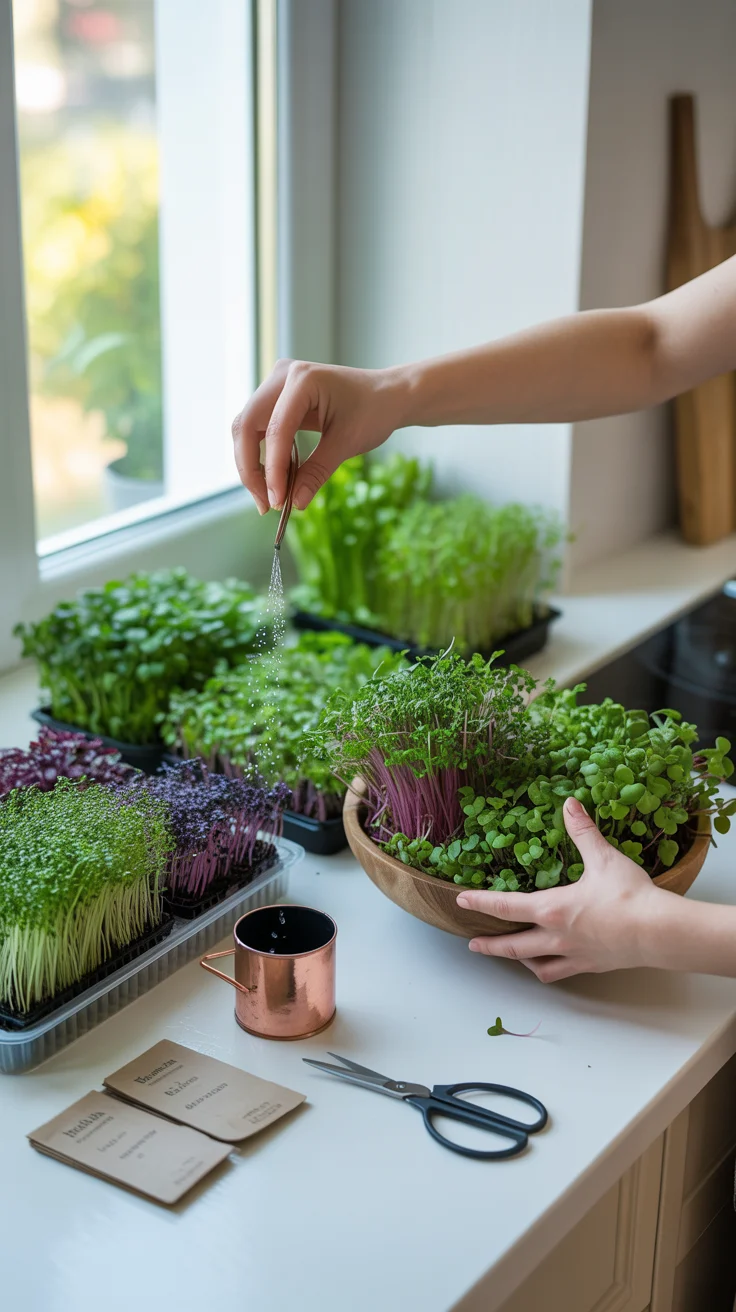
Microgreens are the fastest way to grow fresh, nutrient-dense “fast food” at home—no yard, no fuss. With a simple Microgreens + “Tabletop Veg” Setup, you can harvest crisp, flavorful greens in 7–14 days using a windowsill or a small side table. This guide shows you exactly how to set up, seed, grow, troubleshoot, harvest, and enjoy a steady rotation of microgreens year-round.
If you’re building a resilient, space-efficient food routine at home, the homestead-minded tips in The Self-Sufficient Backyard pair perfectly with an indoor microgreens routine.
Why microgreens are the ultimate tabletop veg
Microgreens are young seedlings harvested just after they unfold their first true leaves. They concentrate flavor and micronutrients into tender shoots you can sprinkle on everything—from eggs and soups to sandwiches and bowls. They’re the ultimate “tabletop veg” because they check all the boxes:
- Speed: Many varieties are ready in 7–10 days; slower herbs might take 14–21.
- Simplicity: Trays, a growing medium, water, good airflow, and optional lights.
- Small footprint: A single 10×20 tray can sit on a nightstand, shelf, or windowsill.
- Predictability: A repeatable sow-to-harvest schedule keeps greens coming weekly.
- Clean harvesting: Scissors, a cutting board, and a container are all you need.
Nutritionally, brassica microgreens (broccoli, kale, cabbage, mustard, pak choi) are celebrated for antioxidants and peppery bite; radish adds spice; pea shoots give crunchy sweetness; sunflower offers nutty heft. Because your Microgreens + “Tabletop Veg” Setup produces quickly, you can tailor flavors to meals and rotate varieties to keep things interesting.
At a glance, here’s why microgreens beat most indoor crops for beginners:
- Low risk: Quick cycles mean fast feedback and easy tweaks.
- Low cost: Starter gear is inexpensive; no pumps or complex plumbing required.
- High reward: Fresh, living produce beats store-bought clamshells on taste and texture.
Once you dial in one tray, scaling to two or four doubles output with the same routine. The key is consistency: a clean setup, even moisture, good airflow, and appropriate light.
Choosing seeds and varieties for rapid harvests
Start with easy, fast varieties so you get quick wins and learn the rhythm. Great choices for your first sowings:
- Radish (Daikon, Rambo, Sango): spicy, crisp, 7–10 days
- Broccoli: mild brassica, 8–12 days
- Kale (red Russian, dwarf): tender, 8–12 days
- Mustard: punchy heat, 8–12 days
- Cabbage, pak choi, kohlrabi, turnip: reliable brassicas, 8–12 days
- Pea shoots (speckled or green peas): sweet crunch, 10–14 days
- Sunflower: hearty, nutty, 10–14 days
- Amaranth: vibrant red, delicate, 12–16 days (a bit slower)
- Basil and cilantro: fragrant but slower and more finicky (14–21+ days)
Tips for seed selection:
- Choose “microgreens” or “sprouting” grade seed for good germination and cleanliness.
- Buy in bulk once you know your favorites; freshness matters for vigor.
- Avoid treated garden seed; look for clean, food-safe supplies.
- Begin with 1–2 varieties per tray until you master moisture control and density.
Seed density depends on seed size and your tray size. A standard 10×20 tray typically uses:
- Small seeds (broccoli, kale, mustard): 15–25 grams
- Medium seeds (radish): 25–40 grams
- Large seeds (peas, sunflower): 100–200 grams
If you’re starting with half trays or smaller countertop vessels, scale down proportionally. Over-seeding reduces airflow and invites mold; under-seeding leaves bare patches and reduces yield. Aim for an even single layer of seed, with minimal overlap and good surface contact.
Flavor strategy:
- Peppery bite: radish, mustard, arugula
- Mild and versatile: broccoli, cabbage, kale
- Substantial crunch: peas, sunflower
- Color pop: amaranth, red cabbage
- Herbaceous depth: basil, cilantro (slower but worth it)
Begin with two fast staples (e.g., broccoli and radish), then add a crunchy tray (peas or sunflower). As your confidence grows, introduce a “flair” tray (amaranth or a herb).
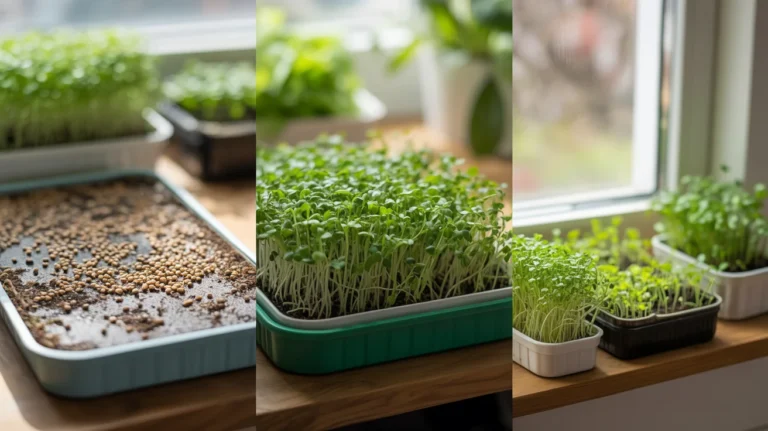
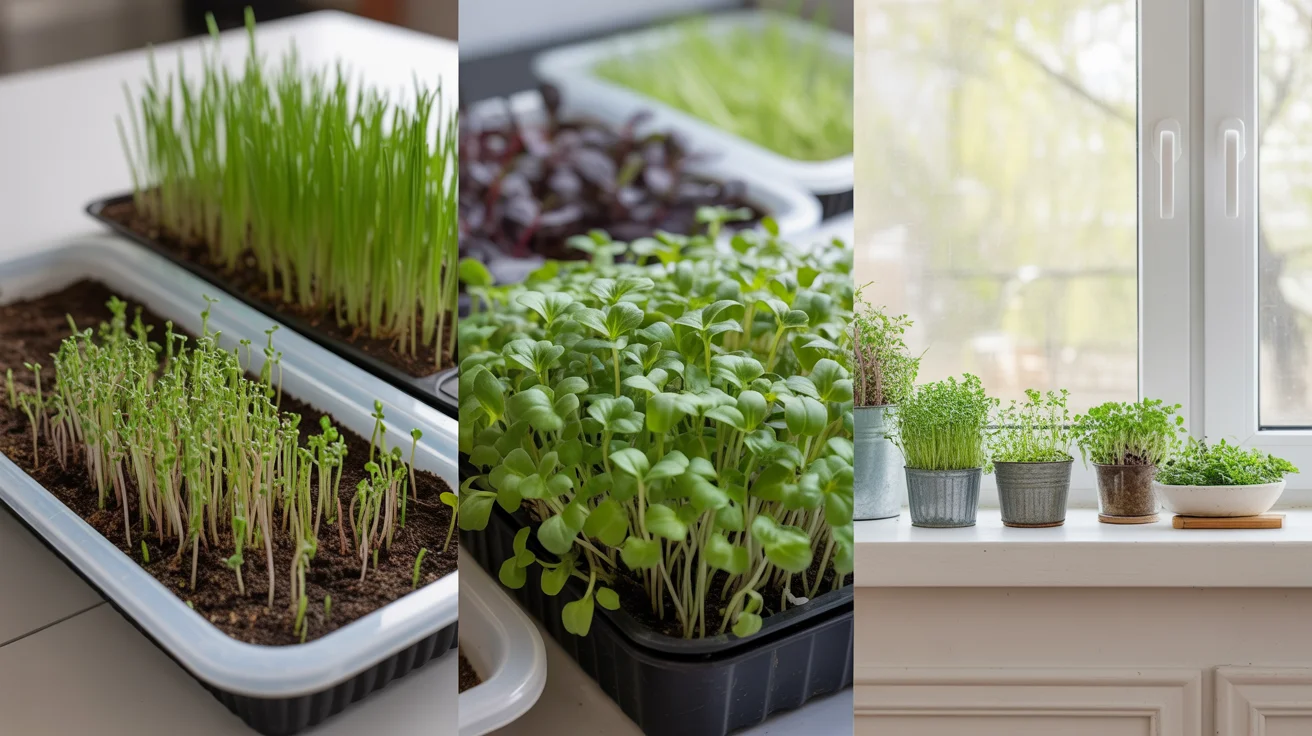
Building your Microgreens + “Tabletop Veg” setup
Your Microgreens + “Tabletop Veg” Setup can be as simple or as tidy as you like. Here’s a clean, repeatable configuration that fits on a small table or shelf.
Essential gear:
- Trays: One 10×20 tray with drainage holes (grow tray) and one 10×20 solid tray (reservoir) per crop. Half-size trays also work well.
- Medium: Coco coir, a light potting blend, or hemp/cellulose mats. Coco coir is forgiving for beginners.
- Watering tools: Fine-mist spray bottle for germination, small watering can for bottom watering.
- Blackout cover: Another tray, a rigid board, or a dome to keep seeds in darkness during germination.
- Light source: Bright window with 4–6 hours of sun, or full-spectrum LED shop lights. Lights speed growth and reduce legginess.
- Airflow: A small, quiet fan on low to keep air moving; prevents stagnation and helps stems thicken.
- Cleaning supplies: Odorless dish soap and 3% hydrogen peroxide or white vinegar for sanitation.
- Optional: Digital timer for lights, hygrometer/thermometer to monitor the microclimate.
Step-by-step layout:
- Sanitize: Wash trays with warm soapy water, rinse, then spritz with dilute peroxide. Let dry. Clean gear is your best mold prevention.
- Prepare medium: Hydrate coco coir to a fluffy, evenly moist texture (not dripping). Fill the grow tray with a 1–1.5 inch layer and level the surface. If using mats, cut to fit and hydrate thoroughly.
- Seed evenly: Weigh your seeds, then broadcast in a single, even layer. Press lightly so seeds contact the surface; do not bury.
- Mist and blackout: Mist thoroughly, cover with your blackout lid, and place a light weight (another tray or a small book). The weight encourages strong root anchoring and even germination.
- Location: Set trays on your chosen table with room for a fan. Keep out of direct furnace vents or heat sources that dry the medium unevenly.
Routine in brief:
- Blackout: 2–3 days for most brassicas and radish; 3–4 days for peas and sunflower.
- Light: After blackout, move trays under lights or to a bright window and add gentle airflow.
- Water: Bottom water by pouring into the solid tray and letting the medium wick moisture for 10–20 minutes; then drain off any excess. Keep the medium moist, never soggy.
Internal resources to help you dial in each step:
Light, water, and airflow for compact indoor growth
Light
- Window-only setups can work, but growth may stretch (leggy) and yield can drop. South or west-facing windows are best in winter; east-facing can work in summer.
- LED shop lights or dedicated grow lights give you control. “Daylight” (around 5000–6500K) strips or bars placed 6–12 inches above trays are beginner-friendly.
- Use a simple timer for 12–16 hours of light daily. If plants are pale or leaning, bring the light closer; if leaves look bleached, back it off.
Water
- For germination: Mist the surface thoroughly after sowing; check morning and evening during blackout.
- After lights on: Bottom water. Add about 1/4–1/2 inch of water to the reservoir tray and let the medium wick moisture. Dump any leftover water so roots don’t sit saturated.
- Signs of proper moisture: Stems stand upright; leaves are perky. Signs of overwatering: musty smell, slimy seed hulls, surface algae. Signs of underwatering: droop, slow growth, dry medium.
Airflow
- A gentle, constant breeze strengthens stems and discourages mold. You should barely feel airflow with your hand above the canopy.
- Open a nearby window occasionally to exchange air if the room is stuffy.
- Keep relative humidity moderate; if your space is very humid, a small dehumidifier helps.
Temperature
- Most microgreens grow well at typical room temperatures (65–75°F / 18–24°C).
- Warmer conditions accelerate growth but can magnify mold risk; cooler rooms slow growth but produce sturdier plants.
Scaling up from tabletop
If you outgrow a single table, consider a narrow vertical solution that remains compact and water-efficient. A hydroponic tower can complement your microgreens by producing continuous leafy greens and herbs. For an approachable, space-saving option, see The AquaTower—a vertical system that pairs well with small-space growing.
For more gear comparisons and placement tips:
A repeatable 7–14 day grow-along plan
Use this simple timeline to go from dry seed to crunchy greens every week. Adjust by variety, room temperature, and your specific light.
Day 0: Prep, sow, and blackout
- Sanitize trays, hydrate medium, and level it.
- Weigh seed for your tray size; broadcast evenly and press in lightly.
- Mist until the surface is evenly moist.
- Cover with the blackout lid; add a light weight; set aside on your table.
Day 1–2: Check moisture and germination
- Morning and evening, lift the blackout lid, mist if the surface looks dry, and replace the lid. Keep it dark.
- For large seeds like peas/sunflower, ensure seed hulls are moist to encourage uniform sprouting.
Day 3: Peek and decide
- Brassicas and radish: If most seeds have sprouted and are pushing against the lid, it’s time to flip the lid (so sprouts push against a slight weight) or remove it and move to light.
- Peas/sunflower: Often need an extra day in blackout. Keep the lid on if shoots are short and not yet pushing.
Day 4–6: Light, airflow, bottom water
- Move trays under lights or to your brightest window.
- Introduce gentle airflow.
- Begin bottom watering once daily or as needed. Keep the medium moist but not wet.
- Expect rapid growth; stems thicken and cotyledons open wide.
Day 7–10: First harvest window for fast varieties
- Radish, broccoli, kale, mustard, and many brassicas hit prime size: 1.5–3 inches tall with open cotyledons.
- For the sweetest flavor and best shelf life, harvest in the morning when plants are well-hydrated.
Day 10–14: Crunchy tray harvests
- Pea shoots and sunflower usually reach ideal size. Harvest when tendrils (peas) or first leaves (sunflower) are open and stems are crisp.
- Slower herbs or color crops (amaranth, basil, cilantro) may need more time; don’t rush them.
Reseeding rhythm
- To maintain weekly harvests, sow a new tray every 3–4 days. Two trays staggered per week can give a household constant supply.
- Keep a simple log: sow date, variety, blackout duration, first light day, harvest day, notes. You’ll quickly dial in your exact microclimate.
Flavor and blending
- Mix radish with broccoli for a balanced peppery/mild combo.
- Combine peas (bulk and crunch) with sunflower (nutty) for hearty sandwiches.
- Use color accents like amaranth on top for visual appeal.
Troubleshooting mold, damping-off, and weak growth
A clean, evenly hydrated, well-aerated setup prevents 90% of problems. If issues arise, use this checklist.
Excess moisture and poor airflow
- Symptoms: musty smell, fuzzy growth at the base, slimy seed hulls, collapsing stems.
- Fixes: Increase airflow, reduce watering volume, ensure trays drain fully after bottom watering, thin over-seeded areas, sanitize more often.
Mold vs. root hairs
- Root hairs look like fine, white fuzz directly on the roots, especially visible during early growth or when watering. They vanish after watering.
- Mold typically spreads like cottony patches across the medium surface and doesn’t recede after watering.
- If unsure, increase airflow and reduce surface wetness; mold will persist, root hairs will not.
Sanitation
- Wash trays, tools, and surfaces with warm soapy water between cycles. Rinse and spray a light mist of 3% hydrogen peroxide or white vinegar. Let dry.
- Clean your fan grills and dust lights regularly.
Seed issues
- Old or low-quality seed can lead to spotty germination and more contamination.
- Store seed cool and dry in airtight containers. Buy from reputable suppliers labeled for sprouting/microgreens.
Light and leggy growth
- If stems stretch and flop, bring lights closer (but not hot), increase light hours up to 16, or move to a brighter window. Ensure steady airflow.
Medium matters
- Coco coir drains well and is forgiving. If using soil, choose a sterile, fine-textured mix.
- With grow mats, hydrate fully and keep evenly moist; uneven wetting leads to patchy growth.
Temperature swings
- Hot rooms encourage pathogens. Keep your space in a comfortable, steady range.
When you need a reset
- If a tray develops persistent mold, compost it and start fresh. It’s better to learn from a clean restart than to salvage a risky crop.
For deeper fixes and photos of common issues:
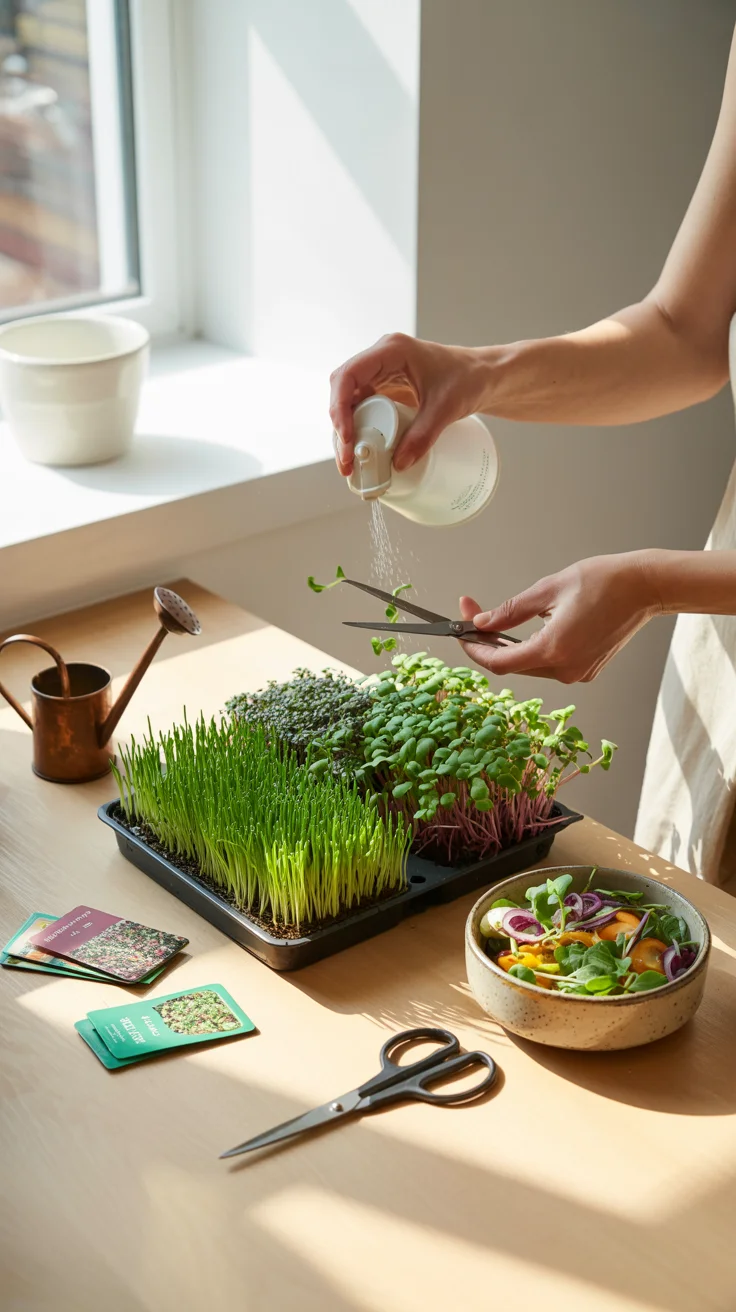
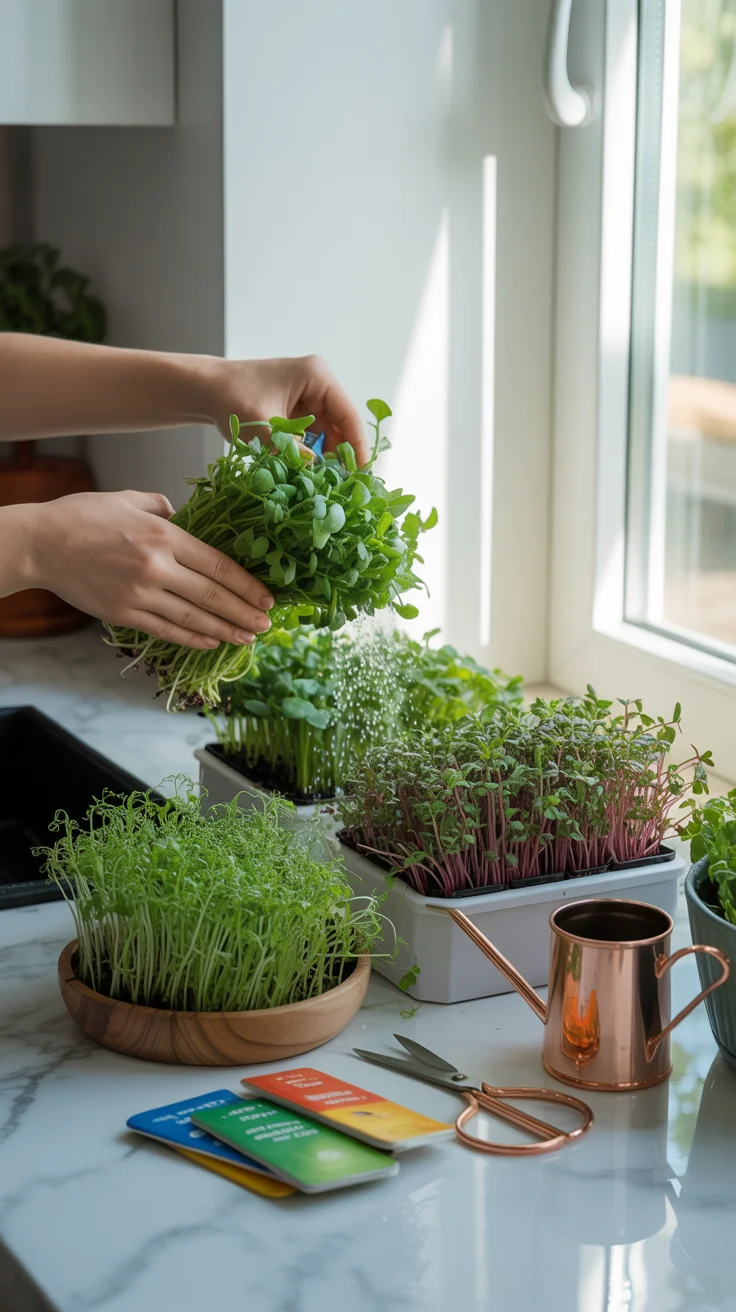
Harvesting, storing, and meal ideas for fast food greens
Harvest timing
- Cut when the canopy is full, cotyledons are open, and flavor is balanced. For radish and brassicas, this is often 7–10 days. For peas and sunflower, 10–14 days.
- You can “graze” a tray over 2–3 days, harvesting what you need fresh. For maximal shelf life, harvest the whole tray at once.
Harvest technique
- Don’t water right before harvesting; a drier canopy reduces moisture on leaves.
- Lift the canopy slightly and snip just above the medium with clean, sharp scissors or a knife.
- Avoid pulling roots; you want clean shoots only.
- Shake gently to release seed hulls, especially with sunflower.
Washing and drying
- If your setup is clean and you harvested dry, washing isn’t strictly necessary. If you prefer to rinse, do so gently in cold water, then spin or pat dry thoroughly.
- Excess moisture shortens shelf life. Aim for crisp, dry leaves.
Storage
- Place in a breathable or slightly vented container lined with a paper towel.
- Refrigerate promptly. Most microgreens keep 5–7 days; peas and sunflower often last a bit longer when dry and cool.
- Don’t pack tight; gentle airflow in the container reduces condensation.
Meal ideas
- Breakfast: Top eggs or avocado toast with a radish/broccoli mix.
- Lunch: Fill wraps and sandwiches with pea shoots and sunflower for crunch.
- Dinner: Add a handful to grain bowls, stir-fries (off heat at the end), or soups as garnish.
- Snacks: Blend into green smoothies or pair with hummus and flatbread.
- Special: Use amaranth and purple radish to finish plates with color and peppery zip.
Flavor pairing
- Peppery (radish, mustard) pairs with creamy (egg, avocado, yogurt sauce).
- Mild brassicas suit citrus dressings and olive oil.
- Peas and sunflower love lemon, tahini, and nuts.
Building a kitchen habit
- Harvest on meal-prep day; store in labeled containers by variety.
- Keep a “chef’s mix” tub to quickly add to dishes.
- Rotate flavors each week to keep your palate engaged.
Recommended resources for small-space growers
- For compact, continuous growing that complements microgreens, explore The AquaTower—a vertical, space-savvy way to add herbs and leafy greens without expanding your footprint.
- For homestead-level planning (even in urban spaces), The Self-Sufficient Backyard offers strategies to integrate microgreens into a broader year-round food plan.
- To round out pantry resilience with shelf-stable staples that pair well with fresh microgreens, see The Lost Superfoods.
Cost, yield, and scaling your tabletop micro-farm
Starting costs are modest and pay back quickly in freshness and convenience. While exact numbers vary by location and suppliers, here’s what to expect in principle.
Starter gear
- Trays: Two nested 10×20 trays per crop (one with holes, one solid).
- Medium: A brick of coco coir or a pack of hemp mats.
- Lights: A basic LED bar or shop light with a timer; optional if you have a bright window.
- Fan: Small and quiet for continuous low airflow.
- Misc: Spray bottle, scissors, cleaning supplies.
Seed and yield rhythms
- A 10×20 tray of radish or broccoli typically yields enough for several generous meals for a couple of people each week.
- Pea shoots and sunflower produce bulk and can replace lettuce in many dishes.
- As you learn your household’s consumption, you can stagger sowings so a fresh tray is ready when the current one is half used.
Scaling strategy
- Two-tray cycle: Sow one tray on Monday, another on Thursday. Harvest through the week.
- Four-tray cycle: Run two fast trays (radish, broccoli) and two bulk trays (peas, sunflower); stagger sowings every 3–4 days.
- Vertical expansion: Add a narrow shelf with two tiers of lights or incorporate a compact tower system to diversify crops without losing floor space.
Systems mindset
- Keep a simple log: sowing weights, blackout days, light hours, harvest yields. Adjust seed density and watering frequency based on results.
- Standardize your cleanup and reset process after each harvest; clean routine = consistent crops.
Resilience notes
- Short cycles mean fast recovery from any mistake. If a tray goes off, compost and re-sow the same day; you’re only a week away from fresh greens again.
- If grid power is unreliable and you rely on lights, consider a backup plan for short outages, or choose window placements that still provide acceptable light.
Safety, cleanliness, and food quality at home
Food safety begins with clean inputs and ends with clean handling. Keep it simple and consistent.
Before you grow
- Source clean, reputable seed labeled for sprouting/microgreens.
- Store seed cool and dry; label with purchase dates.
- Clean trays and tools thoroughly before the first use and between cycles.
During growth
- Wash hands before handling trays; avoid touching the canopy unnecessarily.
- Maintain airflow and avoid overwatering to discourage pathogens.
- Remove any obviously off patches promptly.
At harvest
- Harvest onto a clean cutting board with sanitized scissors or a knife.
- Keep harvested greens cold and dry.
- Label containers with the harvest date so you use them at peak quality.
Allergies and sensitivities
- Brassica microgreens have a gentle heat; try small amounts if sensitive.
- Sunflower microgreens are from sunflower seeds—rarely an issue, but note if you have seed sensitivities.
- If you’re new to raw greens, start with moderate portions and see how you feel.
Composting and disposal
- Used medium and roots are great for compost—close the loop and return nutrients to houseplants or garden beds.
- If you encounter mold in a tray, bag and discard or hot-compost to be safe; clean your gear and reset.
The Microgreens + “Tabletop Veg” setup blueprint in practice
Put this guide to work with a single weekend project:
- Saturday morning: Gather trays, medium, seeds, and a light if needed. Set up your table and fan. Clean everything.
- Saturday afternoon: Fill trays, sow broccoli and radish (or your chosen starter pair), mist, blackout, and set on your table.
- Sunday evening: Quick mist check; replace blackout.
- Tuesday: Move to light, start bottom watering, set fan to low.
- Next weekend: Harvest the radish/brassica tray; sow peas or sunflower for crunch next.
- Keep the cycle going: Sow every 3–4 days to ensure a fresh harvest every week.
In two weeks, you’ll have a rhythm that feels almost automatic. Your table becomes a compact, living salad bar, and your kitchen benefits from a steady stream of color, crunch, and nutrition—exactly what “fast food” should mean at home.
If you want to broaden your home food security playbook beyond fresh greens, the pantry and preservation insights in The Lost Superfoods complement this daily-fresh approach.
Conclusion
A Microgreens + “Tabletop Veg” Setup delivers fast, flavorful greens in just 7–14 days, right on a windowsill or side table. With clean trays, a forgiving medium, even moisture, steady airflow, and simple lighting, you can harvest consistently and scale easily. Start with fast brassicas and radish, add crunchy peas and sunflower, and refine your cadence with a simple sow-to-harvest log. In a small space, you’ll build a reliable, resilient habit of growing and eating fresh—one tray at a time.
FAQ
What microgreens are easiest to grow at home?
- Radish, broccoli, kale, mustard, and cabbage are among the easiest and fastest, often ready in 7–10 days. Pea shoots and sunflower are also beginner-friendly, harvesting in about 10–14 days with a bit more seed density.
Do microgreens need grow lights indoors?
- Not strictly, but lights help. A bright south- or west-facing window can work; however, LED lights provide consistent intensity, reduce legginess, and improve yield—especially in winter or darker rooms.
How long do microgreens take from seed to harvest?
- Most brassicas and radish are ready in 7–10 days. Pea shoots and sunflower usually take 10–14 days. Herbs like basil and cilantro can take 14–21+ days. Your room temperature and light quality affect timing.
How do you keep microgreens from getting moldy?
- Focus on cleanliness and airflow: sanitize trays, avoid over-seeding, bottom water to keep foliage dry, drain excess water, and run a gentle fan. Keep your blackout stage short and your room at moderate humidity. If a tray smells musty or shows cottony patches that don’t recede, compost and restart.