
Flat-pack cabin kits have turned weekend-warrior dreams into real, buildable projects you can plan, budget, and assemble without a full-time contractor. In this guide, we’ll walk through exactly what you get in a flat-pack cabin kit, a realistic build timeline from delivery to move-in, and a costs breakdown you can adapt to your site and goals. Whether you’re building a tiny retreat or a compact off-grid home base, this flat-pack cabin kit: what you get + real build timeline + costs breakdown framework will help you scope the project with clear expectations.
If you’re aiming for a simple off-grid start, pairing your cabin plan with a backup power solution can ease your first season. See the compact Ultimate OFF-GRID Generator for ideas on bridging power gaps while you design your long-term system.
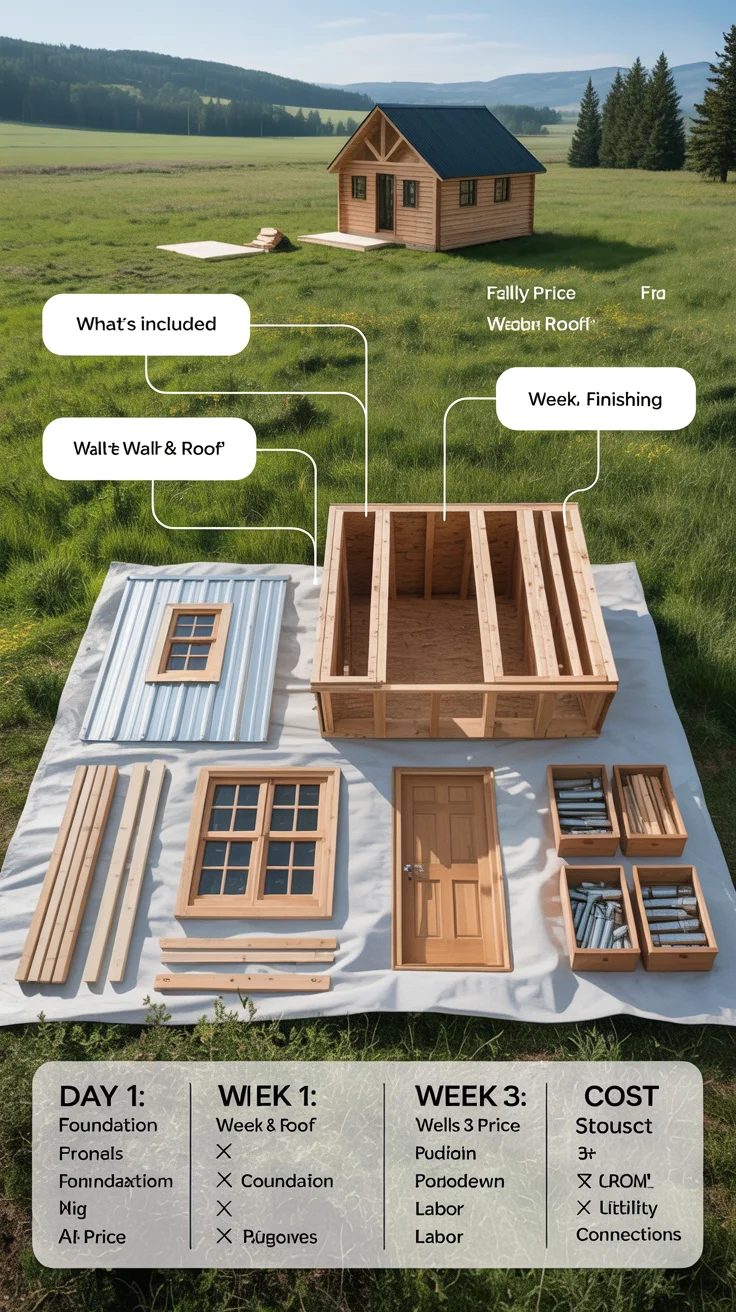
What’s included in a flat-pack cabin kit
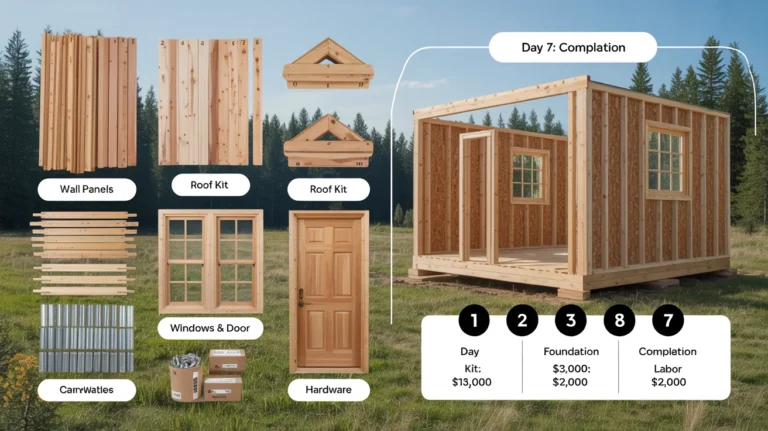
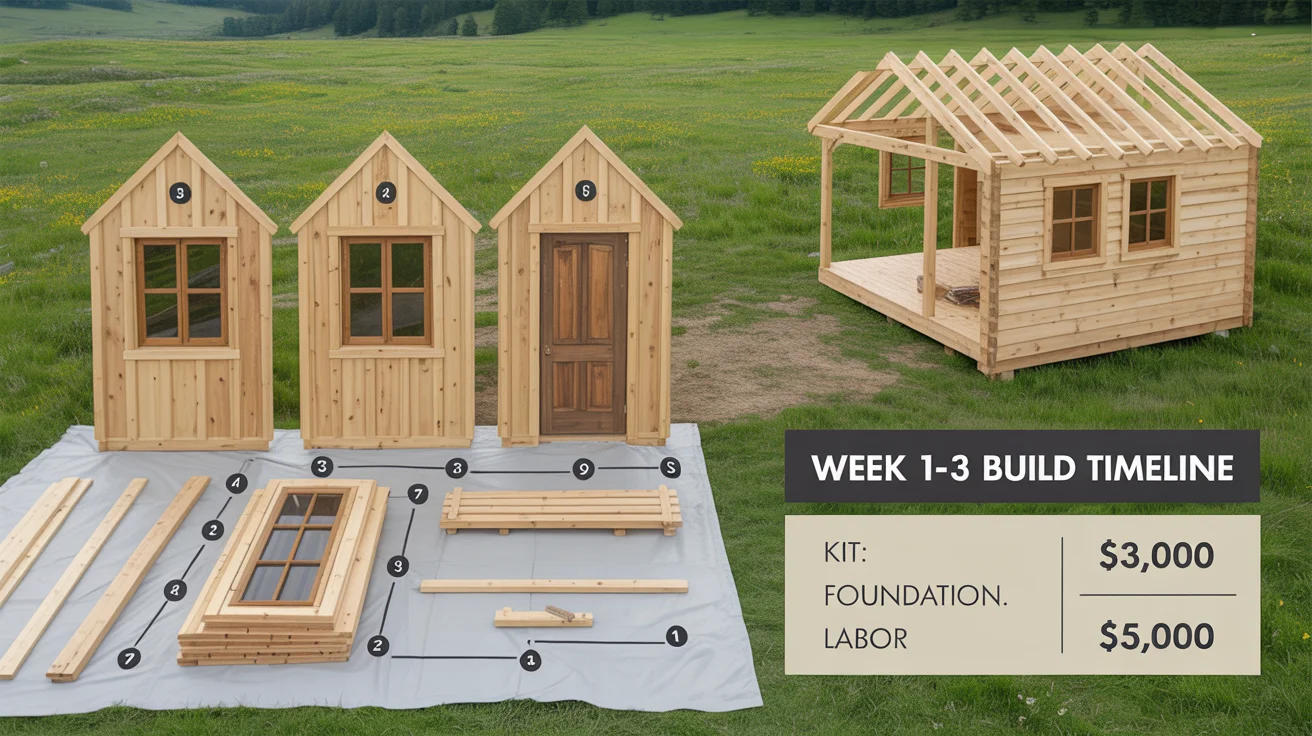
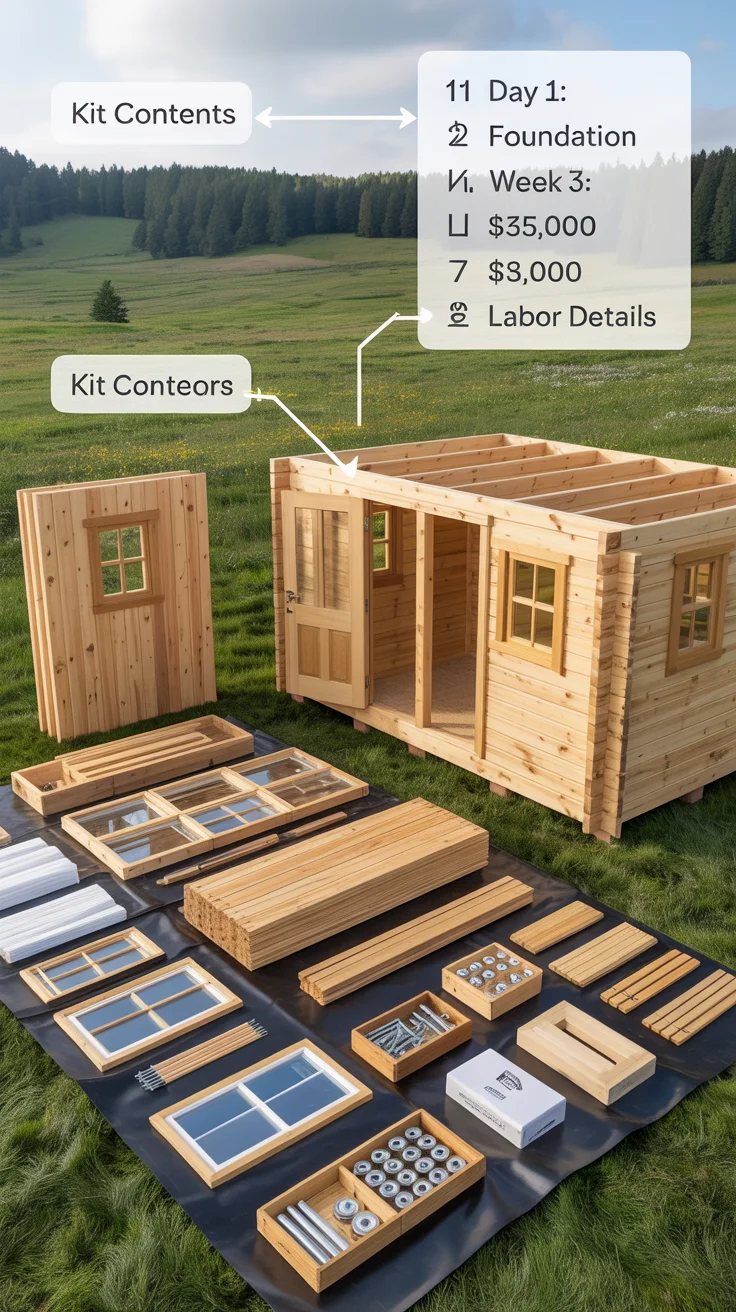
A “flat-pack” cabin kit is a pre-engineered package that ships on pallets or in crates, with components precut or panelized to speed installation. The exact contents vary by manufacturer, but most kits include core structural and enclosure materials plus detailed plans. A typical kit often contains:
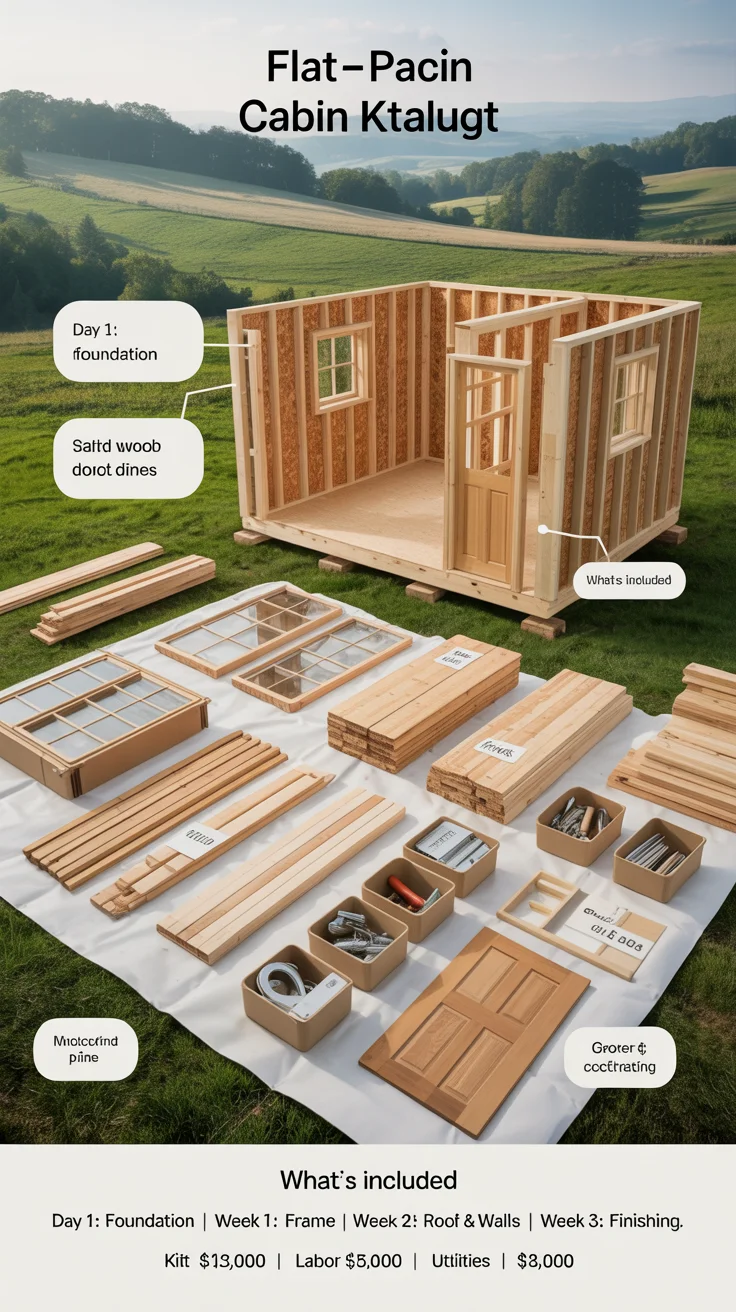
- Architectural drawings and assembly manual: Plans, elevations, connection details, and build sequence. This is your roadmap and helps your building department interpret the project.
- Framing or panel system: Either stick-framed lumber cut to length and labeled, or structural insulated panels (SIPs) for walls and roof. Panelized systems can reduce build time, while stick-framing offers flexibility and easy field modifications.
- Floor system components: Rim joists, joists, blocking, and subfloor panels (often OSB or plywood) unless the design is slab-on-grade.
- Exterior sheathing and weather-resistive barrier: Wall/roof sheathing and a WRB like housewrap to control bulk water and air leakage.
- Roofing materials: Some kits include roof framing only; others bundle underlayment and shingles/metal panels. Verify what’s standard vs optional.
- Fasteners, hardware, and connectors: Hangers, straps, structural screws, nails, bolts, and hurricane ties specified for the design’s wind/snow loads.
- Windows and doors: Frequently optional. Many buyers source windows locally to match climate and lead times. If included, you’ll get manufacturer specs and flashing details.
- Trim and siding: Kits may offer cladding packages (cedar, fiber cement, metal) or leave exterior finishes up to you.
- Interior finishes: Typically not included. Expect to choose insulation, drywall/wood paneling, flooring, cabinetry, and fixtures separately.
- Flashing and sealants: Essential for water management—sill pans, drip edges, tapes, and sealants that integrate with your WRB.
What you don’t get is just as important. Most kits do not include foundation materials, utilities, appliances, or code-required inspections. They also don’t include tools, heavy equipment rental, or labor. Plan to handle or hire for:
- Foundation: Slab, pier, helical pile, or crawlspace components and excavation.
- MEP trades: Electrical, plumbing, and HVAC materials and labor.
- Sitework: Clearing, grading, driveway, and drainage.
- Logistics: Delivery beyond curbside, offloading, and staging.
Pro tip: Before buying, request the “inclusions/exclusions” list and a sample bill of materials. Compare it with your local code requirements and climate needs. If you’re new to homesteading, a practical guide like The Self-Sufficient Backyard can help you plan water, food, and waste systems alongside your cabin.
Codes, permits, and site prep that save time and money
Permits determine your start date—and guard against costly rework. Even “temporary” or small flat-pack structures may require permits, zoning checks, or HOA approvals. Expect to address:
- Zoning: Minimum lot size, setbacks, height limits, and whether accessory dwellings are allowed.
- Use classification: Seasonal vs year-round occupancy. “Habitable space” triggers different codes than “storage” or “studio.”
- Structural design loads: Snow, wind, seismic. Your jurisdiction may request engineered specs for connections and foundations.
- Energy code: Insulation R-values, air sealing, and window performance. SIP kits often help meet airtightness targets with fewer steps.
- Sanitation and water: Well, cistern, septic, composting toilet, or municipal tie-ins. Health departments typically review these plans.
- Fire and egress: Window sizes, smoke/CO alarms, ember-resistant construction in wildfire zones.
Permitting timelines vary—simple reviews can take 1–3 weeks; engineered or watershed-adjacent sites can take longer. Start early and bring your assembly manual, load calculations (if available), and foundation details to your building department.
Solid site prep increases safety and speed. Key steps:
- Access: A delivery truck and any crane/telehandler will need room to maneuver. Plan staging for pallets on flat, drainable ground.
- Clearing and grading: Remove stumps and organic matter from the building pad; maintain positive drainage away from the foundation.
- Soil and drainage: In wet or frost-prone zones, plan for sub-base, perimeter drains, or helical piles to avoid frost heave.
- Erosion control: Silt fencing or straw wattles—often required with the permit.
- Layout: Snap lines or set batter boards to mark footings and anchor locations per the kit drawings.
Helpful deep dives to explore before you break ground:
Foundation choices and utility preplanning before the kit arrives
Your foundation is the interface between plans and reality. Flat-pack cabin kits can sit on several foundation types, each with trade-offs:
- Concrete slab-on-grade: Durable, good for radiant heat, but needs precise sub-base prep and correct vapor barriers. Harder to modify after the pour.
- Pier and beam: Faster in rocky or sloped sites; creates an accessible crawlspace for plumbing and wiring. Requires bracing and careful moisture control.
- Helical piles: Minimal excavation, great for remote builds, cold climates, and sensitive soils. Requires a certified installer and careful layout.
- Block piers: Common for small cabins and sheds; confirm load-bearing and bracing requirements with your building department.
Plan utilities around foundation decisions:
- Electrical: Choose service type (off-grid, grid-tied, generator backup). Rough-in conduits, service mast location, panel placement, and grounding. Off-grid? A compact system such as the Ultimate OFF-GRID Generator can bridge power until your permanent solar is live.
- Water: Options include well, shared line, hauled water with cistern, or a rainwater system. For compact water independence, a modular system like The AquaTower can supplement seasonal supply while you refine your long-term plan.
- Waste: Traditional septic, small package treatment systems, or composting toilets where permitted. Coordinate penetrations and clearances before framing.
- Heating and ventilation: Flue or vent locations, mini-split line sets, HRV/ERV ducting, or passive stack vents. Preplanning avoids after-the-fact patching.
Mark penetrations on the slab or subfloor before framing begins. On pier foundations, preplan insulation and air sealing beneath the floor to avoid cold, drafty interiors. If you’re weighing foundation options or climate strategies, see How to choose the right off-grid solar size and How to choose the right off-grid solar size for deeper context.
Flat-pack cabin kit timeline from delivery to move-in
“Realistic” means allowing for weather, inspections, and everyday life. The stages below reflect a small-to-mid-size kit with a DIY primary crew and occasional pro help. Larger, fully panelized kits can go faster; fully DIY stick builds can take longer.
- Delivery and inventory (Day 0–1): Confirm all pallets/crates, inspect for damage, and stage materials close to the build pad. Flag any missing items immediately. Review the assembly manual and safety notes with your helpers.
- Foundation complete, anchor points set (Day 2–7+): Timeline varies by type and inspection cycle. Slabs require sub-base, forms, reinforcement, vapor barrier, and a cure window. Piers or helical piles often move faster but need precise layout.
- Floor system (1–2 days): Install beams/joists or start wall sill plates on slab. Square and level are everything—measure diagonals, use a laser, and lock in accuracy now.
- Wall and roof shell (3–7 days): Panelized walls tilt up quickly with fewer cuts; stick-framed walls add time but are easier to tweak. Roof trusses or SIP roof panels follow. Temporary bracing keeps the shell true.
- Windows, doors, WRB, and flashing (2–4 days): Weatherproofing starts as soon as openings are cut. Follow the manual’s flashing sequence to avoid “behind the WRB” leaks.
- Roofing (2–4 days): Underlayment, drip edges, and shingles/metal panels. Weather exposure risk drops dramatically once the roof is on.
- Rough-in MEP (1–2 weeks): Electrical circuits, plumbing supply/drain, and HVAC/venting. Schedule inspections as required.
- Insulation, air sealing, and drywall or paneling (1–2 weeks): SIP walls reduce this step; stick frames will need cavity insulation, vapor control (as required by climate zone), and careful air sealing.
- Interior finishes and trim (1–3 weeks): Flooring, cabinetry, fixtures, paint, and final electrical/plumbing set. Prioritize comfort-critical items first: heating, hot water, lights, and a functional kitchen/bath.
Expect total active build time for a simple small cabin to run 6–10 weeks with a consistent 2–3 person DIY crew and occasional pro subs. Weather delays, inspection schedules, custom choices, and change orders can lengthen timelines. If you’re remote or working only on weekends, spread the same task list over a season.
A small, reliable backup power source helps keep tools and lights running during early stages before permanent power is set. The Ultimate OFF-GRID Generator is a practical bridge while trenching and final hookups catch up to the build.
Flat-pack cabin kit costs breakdown you can actually budget
Because kits vary, the most honest way to budget is by category percentages rather than guessing exact line-item prices. Use the ranges below to build a realistic “total project” view; then plug in local quotes.
- Kit package (structure and enclosure): 35–60% of total budget. The more complete the kit (windows/doors/roofing included), the higher this share.
- Foundation and sitework: 10–25%. Soil conditions, access, and drainage drive the range. Helical piles can be cost-effective in rocky or frost zones but need a pro.
- Delivery, offload, and equipment: 3–8%. Remote sites or crane/telehandler rentals increase this line.
- Permits, design, and inspections: 1–5%. Engineered foundation or wildfire/energy compliance can push to the higher end.
- Utilities (power, water, waste): 10–30%. Off-grid setups (solar, battery, water storage, composting or advanced treatment) may front-load costs but lower ongoing bills.
- Interior finishes and cabinetry: 10–20%. Trim choices and kitchen/bath complexity make a big difference.
- Tools, consumables, and safety gear: 1–3%. If you’re starting from scratch, this can be higher the first time.
Cost multipliers to plan for:
- Access and distance: Long driveways, steep grades, ferries, or difficult terrain can add equipment and delivery surcharges.
- Climate loads: High snow/wind/seismic regions often need beefier connections and insulation.
- DIY vs pro labor: Swapping pro labor for your sweat equity can reduce cash outlay but extend schedule. Some tasks (service connections, gas lines, septic) are best left to licensed trades for safety and code compliance.
- Change orders: Design tweaks after the kit is ordered ripple through schedule and cost. Lock specs early.
How to build your number:
- Request a detailed inclusions list from the kit vendor.
- Collect 2–3 quotes each for foundation, utilities, and delivery/offload.
- Add a contingency of 10–15% for unknowns, 20% if remote or winter build.
For your pantry and logistics—especially if you’re building off-grid—having shelf-stable, no-refrigeration staples on hand keeps crews energized without constant trips to town. Resources like The Lost Superfoods can spark practical ideas for stocking a resilient, build-season pantry.
Tools, crew, and logistics for a smooth assembly
A flat-pack kit reduces cutting and guesswork, but it’s still a construction job. The right tools and a small, organized crew are the difference between efficient days and frustrating ones.
Core tool kit:
- Layout: Tape measures, speed squares, string lines, laser level, and chalk.
- Cutting/fastening: Circular saw with framing blade, impact driver, framing nailer or structural screws per spec, multi-tool for fine cuts, and a jigsaw for openings.
- Lifting and safety: Ladders, pump jacks or scaffolding, harnesses, eye/hearing protection, gloves, and dust masks or respirators when cutting engineered materials.
- Air/water sealing: Rollers for flashing tape, sealant guns, and a quality stapler for WRB/insulation.
Equipment decisions:
- Telehandler vs. crane: A small crane can fly panelized walls/roof panels into place quickly but requires setup and skilled rigging. A telehandler offers more flexible day-to-day lifting. Check site access, ground bearing, and rental availability.
- Delivery offload: Coordinate with the vendor—curbside only is common. If you need the truck to the pad, confirm road widths, turning radii, and any bridge limits.
Crew composition:
- Two to three people who show up consistently beat a rotating crowd. Assign roles: a layout lead, a cutting/fastening lead, and a runner for staging, fasteners, and WRB/flashing.
- Brief the day’s sequence every morning, including safety notes. Keep the assembly manual handy.
Logistics tips that pay off:
- Stage materials by sequence: floor, walls, then roof—reduce rehandling.
- Keep WRB and flashing near openings; install as soon as practical to protect the shell.
- Waste management: Set up separate bins for burnable scraps (if local rules allow), metal fasteners, and landfill waste to keep a clean, safe site.
If you’re setting up your cabin as a self-reliant retreat, resources like The Self-Sufficient Backyard help you integrate gardens, composting, and small livestock into your layout from day one, so your site plan serves both the build and the lifestyle.
Also helpful: Best budget tools for cabin builds
Envelope, energy, and upgrade choices that compound comfort
Choices you make at the envelope stage dictate long-term comfort and operating costs. Flat-pack kits make these decisions easier because details are repeatable and documented.

Insulation and air sealing:
- SIP kits: Insulation is integral; you’ll focus on sealing panel joints and penetrations. Airtightness is a strength if you follow the manual.
- Stick-framed kits: Choose cavity insulation (batts, blown-in, dense-pack cellulose, or spray foam) plus continuous exterior insulation where required by code/climate. Pay special attention to air/vapor control layers to avoid condensation.
- Floors over open air: Insulate and air seal the underside meticulously. Install pest screens and robust rodent protection.
Windows and doors:
- Performance: In cold or hot climates, step up to better U-values and low-e coatings to reduce loads and improve comfort.
- Installation: Use manufacturer-provided sill pans and flashing sequences. Correct tape application and shingle-lapped WRB are non-negotiable.
Roofing and moisture management:
- Metal roofing sheds snow and lasts; shingles can be budget-friendly and easy to repair. Either way, install proper underlayment and ventilation.
- Venting: A vented roof with baffles keeps insulation dry in cold climates; unvented assemblies require specific insulation strategies—follow your kit’s details and local code.
- Water control: Generous overhangs, gutters, and thoughtful grading keep water off the structure and away from the foundation.
Interior systems:
- Heating: Mini-splits, wood stoves, or direct-vent heaters. Plan clearances and flues early.
- Ventilation: Even tiny cabins benefit from a small HRV/ERV or at least trickle vents to keep indoor air healthy in tight envelopes.
- Finishes: Durable, low-maintenance materials reduce lifetime cost—vinyl plank or tile floors, wipeable wall finishes in wet zones, and porch coverings at entrances.
If your goal is food and water resilience, pairing your cabin with a simple water solution like The AquaTower and a planning guide such as The Self-Sufficient Backyard can accelerate your setup while you fine-tune permanent infrastructure.
Helpful off-grid add-ons for cabin kit owners
- Reliable backup power to run tools and essentials: Ultimate OFF-GRID Generator
- Compact water security and filtration: The AquaTower
- Practical homestead planning from garden to graywater: The Self-Sufficient Backyard
- Shelf-stable pantry strategies for remote builds: The Lost Superfoods
Putting it all together for your flat-pack cabin kit
A successful flat-pack build hinges on three things: clarity on what’s in the box, a realistic timeline that respects inspections and weather, and a budget organized by categories rather than wishful line items. Start permits early, lock foundation decisions before ordering, and stage your delivery so the crew can work in sequence without moving pallets twice. Think of your utilities and envelope choices as compounding decisions—well-sealed shells, right-sized windows, and simple, robust systems make small cabins feel bigger, quieter, and cheaper to operate.
If your vision includes off-grid independence, shore up the essentials early: temporary power via the Ultimate OFF-GRID Generator, reliable water with The AquaTower, and a site plan informed by The Self-Sufficient Backyard. With those pillars in place, the rest of your flat-pack cabin kit: what you get + real build timeline + costs breakdown will unfold with fewer surprises and a lot more satisfaction.
FAQ
How long does it take to assemble a cabin kit?
The shell of a small, well-planned flat-pack cabin kit can go up in days once the foundation is ready—think a week or two for walls, roof, windows, and weatherproofing with a steady 2–3 person crew. Total project time to move-in varies with inspections, utilities, and finishes. Many DIYers spread the work over 6–10 weeks of active build time, longer if working weekends or in remote locations.
What’s included in a flat-pack cabin kit?
Most kits include the core structure: framing or SIP panels, sheathing, fasteners/hardware, a weather-resistive barrier, and detailed plans. Roofing materials, windows, and doors may be included or optional. Foundations, utilities, and interior finishes are generally not included. Always request the vendor’s inclusions/exclusions list so your budget and schedule reflect the full scope.
Do you need permits for a cabin kit?
In most jurisdictions, yes. Even small cabins often require building permits, inspections, and zoning compliance. You may also need separate approvals for septic/composting toilets, wells or cisterns, and electrical service. Start with your local building department; bring your kit’s assembly manual and structural details. Securing permits early keeps your flat-pack cabin kit: what you get + real build timeline + costs breakdown on track.
How much does a cabin kit cost all-in (foundation, delivery, etc.)?
Total cost varies by size, climate loads, foundation type, finishes, and whether you DIY or hire trades. A practical way to plan is by category shares: the kit might account for 35–60% of your total, foundation/sitework 10–25%, utilities 10–30%, delivery/equipment 3–8%, permits 1–5%, with the remainder in interior finishes and tools. Gather local quotes, then add a 10–15% contingency (20% if remote or winter build) to create a realistic all-in number for your project.