
There are nights when you want comfort without the chaos. You’ve worked late, the sink is full, and everyone’s hungry. This is where a smart chicken pot pie filling canning recipe earns its keep.
Helpful resource: Build out a reliable, shelf-stable pantry that complements this recipe with the step-by-step projects in The Lost Superfoods—perfect for “dinner in a jar” nights.
You batch-cook a savory base once with this chicken pot pie filling canning recipe, preserve it safely with pressure canning, and months later turn that jar into a golden, bubbling pie in about half an hour—real food, real flavor, dinner in a jar that tastes like Sunday without spending your Sunday.
What You’re Making (and Why It Works)
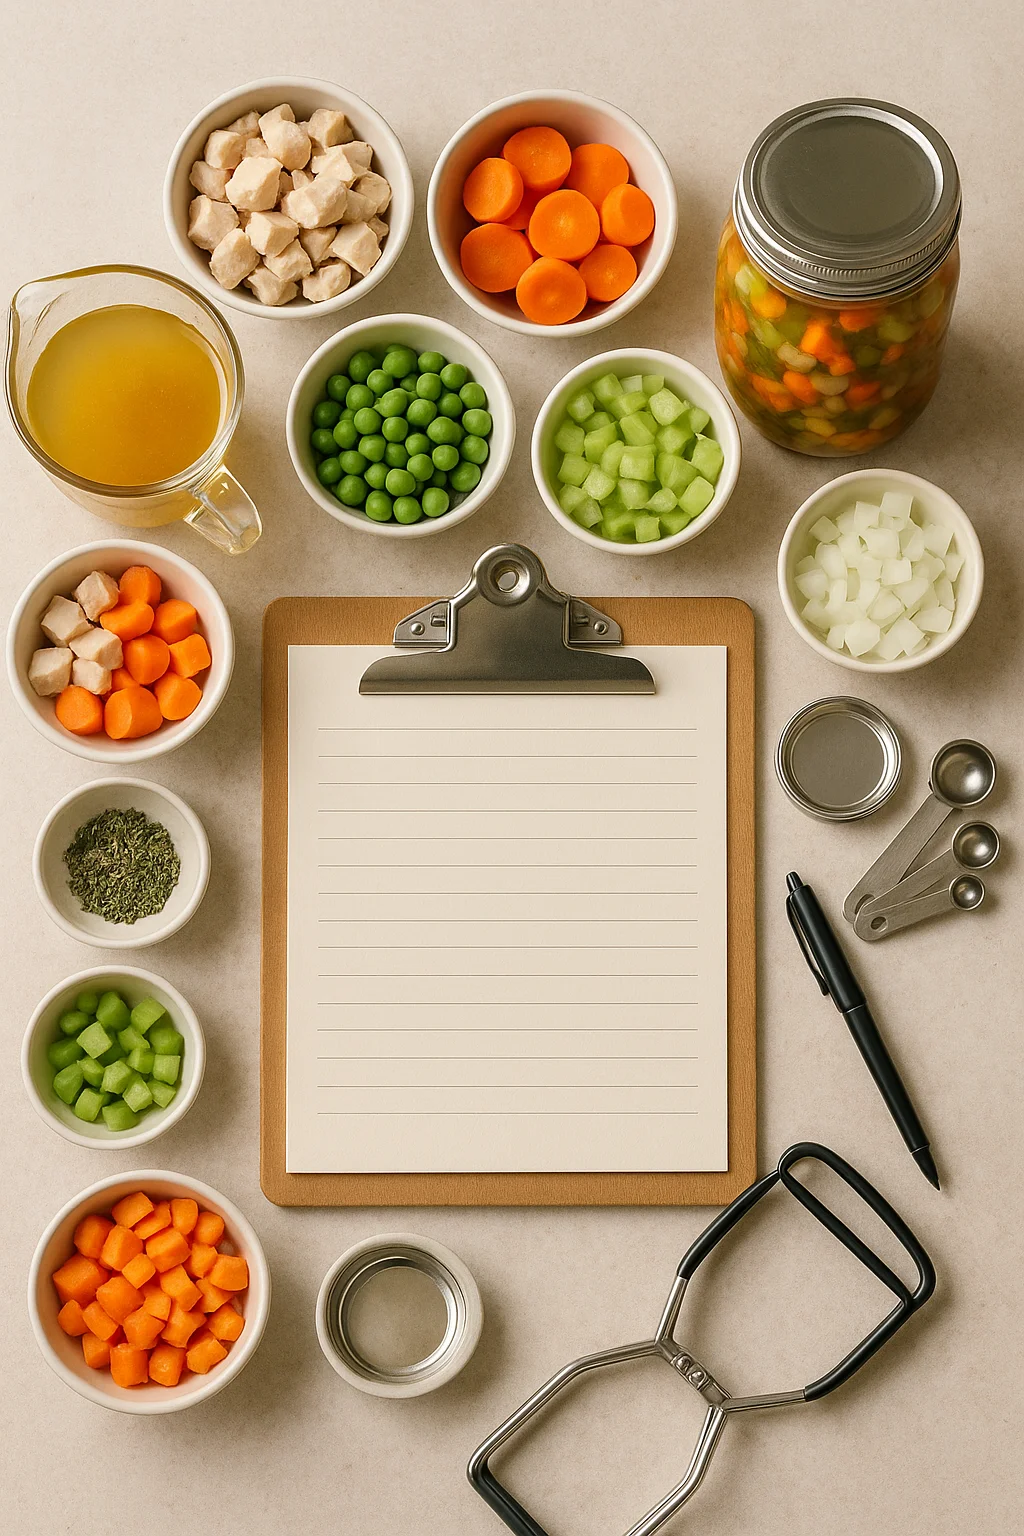
You’re preserving a loose, soup-style filling—chicken, carrots, celery, peas/corn, onions, herbs—covered in seasoned stock. The jar contains only the base. When it’s time to eat, you open the jar, thicken on the stove, and bake under pastry, puff, or biscuits.
Why you’ll love this method
-
Speed later: open → thicken → bake → done.
-
Consistent flavor: pre-seasoned and ready for add-ins.
-
Budget control: batch once, stretch across many dinners.
-
Pantry power: shelf-stable, not freezer-dependent.
SEO focus you’ll find woven naturally: chicken pot pie filling canning recipe, dinner in a jar, pressure canning chicken, long-term meal starter.
Safety First (Read Before You Start)
Low-Acid Foods = Pressure Canning Only
-
Poultry + mixed vegetables are low-acid. They must be pressure canned.
-
Never water-bath can this recipe.
-
No dairy and no thickeners (flour, cornstarch, roux) in the jar. Add those after opening.
Jar Size, Headspace, Time & Altitude
-
Use pints or quarts only if supported by a current, tested process.
-
Respect the tested headspace (often 1″ for mixed meat/veg).
-
Adjust pressure for altitude (weighted vs. dial gauge).
-
Always vent steam for 10 minutes before pressurizing, and allow a full natural cool-down.
For exact times/pressures, follow a current, tested source (e.g., USDA NCHFP/Extension/Ball). Times vary with jar size, altitude, and food density.
Ingredients You’ll Use (No Thickener in the Jar)
Aim for even cuts and a loose mixture so hot liquid flows between solids during processing.
Ingredient Plan per Jar
| Ingredient | Per Pint (approx.) | Per Quart (approx.) | Prep Notes | Safe Ideas & Swaps |
|---|---|---|---|---|
| Chicken, cubed, trimmed | ¾–1 cup | 1½–2 cups | ¾–1″ cubes; trim fat well | Turkey cubes |
| Carrots, diced | ⅓–½ cup | ¾–1 cup | ½–¾″ dice | Parsnips (same size) |
| Celery, sliced | ¼–⅓ cup | ½–¾ cup | ½″ slices | Leeks (light parts) |
| Peas or corn | ¼–⅓ cup | ½–¾ cup | Frozen OK | Diced green beans (1″) |
| Onion, diced | 3–4 tbsp | ½ cup | ½″ dice | Shallots |
| Hot chicken stock | To fill | To fill | Defatted; keep mixture loose | Stock + water blend |
| Salt (optional) | ⅛–¼ tsp | ¼–½ tsp | Light seasoning only | Dried thyme/parsley, pepper |
Seasoning note: Stick to dried herbs and light salt in the jar. You’ll adjust at serving.
Tools & Gear (Must-Haves vs Nice-to-Haves)
Must-Haves
-
Pressure canner (dial or weighted gauge)
-
Mason jars (pints/quarts), new lids, sound rings
-
Jar lifter, canning funnel, bubble remover/headspace tool
-
Large stockpot, ladle, slotted spoon, clean towels
-
Marker + labels (date, batch, contents)
Nice-to-Haves
-
Kitchen scale (consistent fills)
-
Fat separator (clear stock = better seals)
-
Extra rack (reduces siphoning)
-
ClearJel for post-opening thickening (if desired)
Batch Planning & Yield
Work in full canner loads to save time and fuel.
Sample Batch Planner
| Target Jars | Chicken (lb) | Mixed Veg (lb) | Stock (qt) | Expected Yield |
|---|---|---|---|---|
| 7 quarts | ~6–7 | ~5–6 | ~5–6 | ~7 quarts |
| 14 pints | ~6–7 | ~5–6 | ~5–6 | ~14 pints |
Tip: Keep an extra 10% hot stock on hand to top off jars. Yield varies with dice size and packing density.
Step-by-Step: From Chopping Board to Sealed Jars
Mise en Place
-
Trim and cube chicken evenly; blot excess moisture.
-
Dice vegetables to uniform ½–¾″ pieces for even heat penetration.
-
Defat stock thoroughly so lids seal cleanly and jars store well.
Build the Base (No Thickener)
-
In a large pot, simmer chicken and veg briefly in hot stock—just until hot through (don’t fully cook soft).
-
Season lightly with salt, pepper, dried thyme/parsley.
-
Keep the mixture loose and brothy.
Hot Pack & Process
Fill Jars
-
Heat jars; keep lids/rings ready.
-
Ladle solids first, then hot stock to tested headspace (often 1″).
-
Debubble thoroughly; top up with stock if needed.
-
Wipe rims, apply lids, and set rings fingertip tight.
Into the Canner
-
Load jars; lock canner lid.
-
Vent steam 10 minutes (critical).
-
Bring to the tested pressure and hold for the tested time (varies with pints/quarts & altitude).
-
At finish, turn off heat and let pressure fall naturally to zero; rest 5–10 minutes before opening lid away from you.
-
Lift jars straight up; cool 12–24 hours undisturbed.
-
Check seals, remove rings, wash jars if needed.
Altitude adjustment is mandatory. Follow the chart from your tested source for weighted/dial gauge pressures at your elevation.
Label, Store & Shelf Life
-
Label each jar with contents, date, and batch.
-
Store cool, dark, and dry (about 50–70°F / 10–21°C).
-
For best quality, use within a year. Always inspect before opening (no bulging, leaking, spurting, or off-odors).
Turn Jars into Dinner (Thicken After Opening)
Quick Stovetop Finish
Method A: Classic Roux
-
Open a jar; pour liquid into a saucepan and bring to a simmer.
-
In a skillet, melt butter; whisk in flour to make a blond roux (1–2 minutes).
-
Whisk simmering liquid into the roux until smooth and creamy.
-
Stir jar solids into the sauce; simmer 2–3 minutes.
-
Optional: stir in a splash of cream or milk now. Season to taste.
Method B: ClearJel Slurry (Glossy, Freezer-Friendly)
-
Simmer jar liquid in a saucepan.
-
Whisk ClearJel with cool water to make a slurry; stream into the simmering liquid.
-
Cook until glossy and thick. Fold in jar solids; finish with cream if you like.
Bake the Pot Pie
Pie Dish
-
Pour thickened filling into a pie dish; top with pastry or puff.
-
Vent the crust; bake at 425°F / 220°C until deep golden and bubbling (about 20–30 minutes, oven-dependent).
Ramekins with Biscuit Tops
-
Ladle filling into ramekins; top with drop biscuits.
-
Bake until biscuits are cooked through and browned.
Not in a Pie Mood?
-
Spoon over buttered toast or mashed potatoes.
-
Serve with noodles or rice.
-
Fold in sautéed mushrooms or a quick splash of sherry at the finish.
Variations & Smart Substitutions (Stay Within Safe Frameworks)
-
Turkey Swap: Use cubed cooked turkey instead of chicken; process the same way.
-
Veg-Forward: Heavier on carrots/celery/peas; add sautéed mushrooms after opening.
-
Gluten-Free Finish: Skip roux; use ClearJel slurry or reduce the sauce; choose a GF crust.
-
Herb Profiles: Dried thyme/parsley are classic; a pinch of dried tarragon adds a French note.
Keep the jar free of dairy and thickeners. Add those at serving time only.
Troubleshooting & Quality Checks
-
Siphoning (lost liquid): Often caused by rushing cool-down, pressure swings, or overfilling. Vent fully, hold steady pressure, cool naturally, respect headspace.
-
Greasy lids/seals: Trim fat well and defat stock.
-
Vegetables too soft: Dice a little larger; shorten pre-simmer.
-
Floating solids: Normal—gently shake before opening or stir after heating.
Nutrition & Portions (Estimates)
Actual macros depend on your cuts and stock. Typical per pint (before thickening):
-
Protein: ~20–30g (with ~1 cup chicken)
-
Carbs: ~15–30g (from veg and stock)
-
Fat: ~4–8g (mostly from chicken; stock should be defatted)
-
Sodium: varies—salt lightly in jar, finish to taste later
Serving guidance: a pint yields 1–2 hearty servings; a quart serves ~3–4 once baked with crust and sides.
Pantry-Ready Recipe Card (Print This)
Chicken Pot Pie Filling (Canning Base, No Thickener in Jar)
Yield: One full canner load (7 quarts or 14 pints) — scale as needed
Ingredients
-
6–7 lb chicken, trimmed and cubed (¾–1″)
-
5–6 lb mixed vegetables (carrots, celery, peas/corn, onions), ½–¾″ dice
-
5–6 qt defatted chicken stock, kept hot
-
Seasoning: Light salt, black pepper, dried thyme/parsley
Method (Hot Pack)
-
Lightly simmer chicken and vegetables in hot stock; season lightly.
-
Load hot jars with solids, then hot stock to tested headspace (often 1″).
-
Debubble, adjust liquid, wipe rims, apply lids/rings fingertip tight.
-
Pressure can using a current, tested time/pressure for your jar size and altitude.
-
Cool, check seals, remove rings, label, and store cool/dark/dry.
To Serve Later
-
Simmer jar liquid; thicken with roux or ClearJel slurry.
-
Fold in jar solids; finish with cream if desired.
-
Bake under pastry/puff at 425°F / 220°C until golden and bubbling.
Always follow a current, tested process for times/pressures. Low-acid recipes must not be guessed.
Frequently Asked Questions — Chicken Pot Pie Filling Canning Recipe
Can I add cream or butter to the chicken pot pie filling canning recipe before sealing?
No. Dairy is not safe for home-canned low-acid foods. Add butter/cream after opening during the reheat/thickening step.
Can I thicken the dinner in a jar before canning?
No. Skip flour, cornstarch, or roux in sealed jars. Thicken after opening. For a glossy finish, use a ClearJel slurry at serving.
Pints vs. quarts—what’s better for this chicken pot pie filling canning recipe?
Both can work if supported by a tested procedure. Pints reheat faster and portion easily; quarts fit family pies. Use jar-size-specific time/pressure and adjust for altitude.
Can I use frozen vegetables in my chicken pot pie filling canning recipe?
Yes—if they’re part of a tested framework (peas/corn commonly are). Keep cuts uniform, avoid dense purées, and maintain a loose mixture for safe heat flow.
How long does this dinner in a jar keep?
For best quality, plan to use within a year. Store cool, dark, and dry. Inspect seals and appearance before serving.
My jars lost liquid (siphoning). Did I ruin the batch?
Not necessarily. If seals are sound and food remains safely covered enough for quality, it may still be fine. To prevent next time: vent 10 minutes, hold steady pressure, avoid overfilling, and cool naturally.
Want more “dinner in a jar” options alongside this pot pie base?
Build a dependable shelf-stable menu with The Lost Superfoods →
Recommended Resources
- The Lost Superfoods — long-lasting pantry mains and sides that pair perfectly with jarred pot-pie filling.
- The Self-Sufficient Backyard — small-space homestead plans to keep your canning calendar—and stockpot—full.
- The Lost Generator — keep canning day on schedule during outages with a sensible backup-power plan (optional but handy).
Conclusion: Cozy on Call—The Smart Way to Can
You don’t need spare hours to eat like you do. With this chicken pot pie filling canning recipe, you’ll stock genuine comfort in tidy glass jars—no dairy or thickeners in the jar, all the richness at serving. On a busy night, you whisk the liquid, fold in the solids, top with crust, and pull a bubbling pie from the oven. That’s dinner in a jar that respects your time and your taste.
Your next step: Plan one full canner load (7 quarts or 14 pints). Gather jars, lids, and a current time/pressure chart for your altitude. If you’d like, tell me your household size and preferred jar size—I’ll generate a printable batch planner, shopping list, and labeling set tailored to you.