
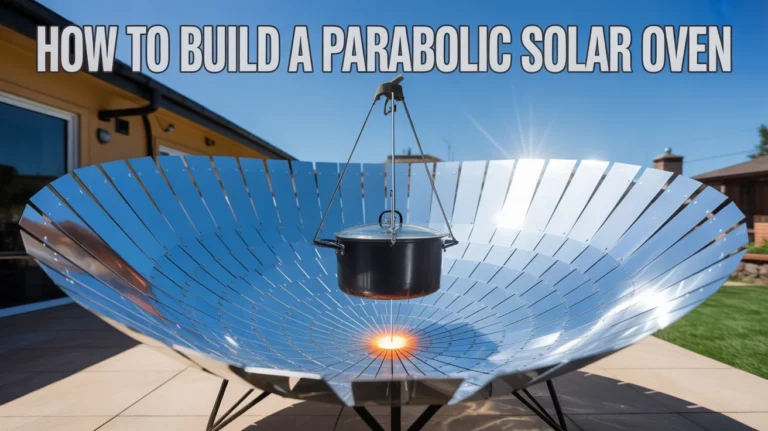
Introduction
Learning how to build a parabolic solar oven – your projects guide is one of the most powerful ways to explore renewable energy, hands-on engineering, and sustainable living at the same time. A parabolic solar oven uses the natural geometry of a parabola to concentrate sunlight into a single focal point, generating enough heat to cook food, boil water, or demonstrate scientific principles in a classroom setting.
For anyone interested in off-grid living or self-reliance, mastering how to build a parabolic solar oven – your projects approach also opens the door to energy independence. Many homesteaders pair solar cooking with broader sustainability systems like food growing and outdoor efficiency methods. If you’re interested in expanding beyond this build, resources like The Self-Sufficient Backyard provide practical ideas that complement solar oven projects naturally.
In this guide, you’ll learn exactly how to build a parabolic solar oven – your projects step by step, understand the science behind it, and adapt the design for science fairs, DIY experiments, or real-world off-grid cooking.
Introduction to Parabolic Solar Ovens
Understanding how to build a parabolic solar oven – your projects starts with knowing what makes this type of solar cooker different from other designs. Unlike box-style solar ovens that trap heat, parabolic solar ovens actively concentrate sunlight.
What Is a Parabolic Solar Oven?
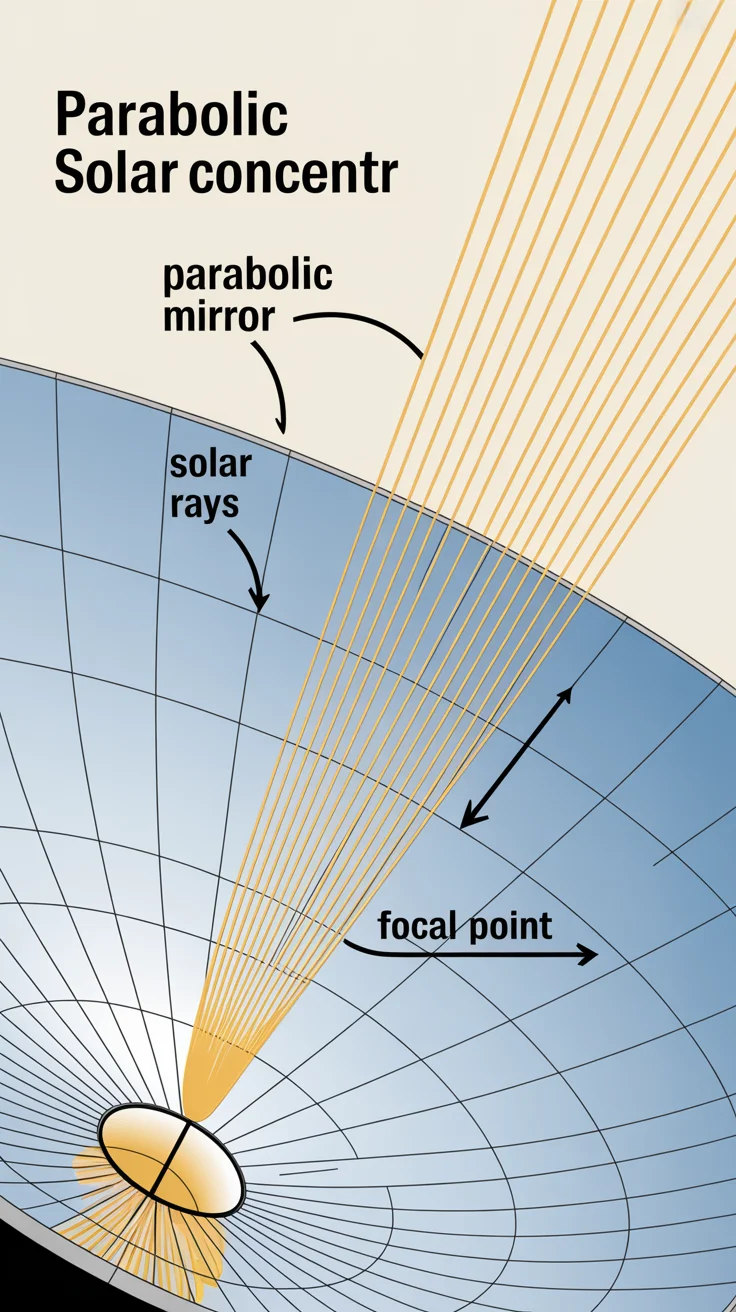
A parabolic solar oven is a reflective cooker shaped like a parabola. This shape has a unique property: all incoming parallel rays of sunlight are reflected to a single focal point. When you place a cooking pot or absorber at that focus, temperatures rise rapidly.
This is why how to build a parabolic solar oven – your projects tutorials often outperform flat or box ovens when it comes to speed and maximum heat.
Why the Parabolic Shape Matters
The parabolic curve is not just aesthetic—it’s mathematical. Every point on the reflective surface follows a precise curve that redirects sunlight inward. Even a small error in shape can reduce efficiency, which is why accurate design is essential when learning how to build a parabolic solar oven – your projects for science or real use.
Key benefits of the parabolic shape include:
-
Faster heating times
-
Higher achievable temperatures
-
Ability to cook foods like rice, vegetables, or boil water
Parabolic Solar Ovens vs. Other Solar Cookers
When comparing methods, how to build a parabolic solar oven – your projects stands out because:
| Type | Heat Speed | Max Temp | Complexity |
|---|---|---|---|
| Box Solar Oven | Slow | Medium | Easy |
| Panel Cooker | Medium | Medium | Easy |
| Parabolic Solar Oven | Fast | High | Moderate |
This makes parabolic solar ovens ideal for:
-
Science projects that need measurable results
-
Off-grid cooking demonstrations
-
Renewable energy experiments
If you’re exploring off-grid systems more broadly, combining solar cooking with backup power sources can be helpful. Later in this guide, we’ll also touch on emergency preparedness solutions like portable off-grid power options that work alongside solar cooking setups.
What You’ll Learn Next
In the next section, we’ll break down how a parabolic solar oven works, including:
-
Solar concentration physics
-
Heat transfer basics
-
Why black surfaces are critical
This foundational knowledge will make the actual build process much easier and more accurate.
How a Parabolic Solar Oven Works
To truly master how to build a parabolic solar oven – your projects, you need a clear understanding of the science behind it. This section explains why the design works, not just how to assemble it—crucial for science projects, performance tuning, and safety.
Solar Concentration Explained
Sunlight reaches Earth in nearly parallel rays. A parabolic surface reflects those rays inward so they converge at a single point called the focus. When you place a dark, heat-absorbing object (like a black pot) at that focus, energy that would normally spread out becomes intensely concentrated.
This concentration effect is the core principle behind how to build a parabolic solar oven – your projects efficiently:
-
More light at one point = higher temperature
-
Less heat loss than flat reflectors
-
Faster cooking times than box ovens
In strong sun, well-built parabolic ovens can reach temperatures hot enough to boil water quickly—an impressive demonstration of renewable energy in action.
Why the Parabolic Shape Is Critical
Not all curves are equal. A true parabola ensures reflected rays meet at the same focal point. If the surface is too shallow or uneven, light scatters and performance drops.
When following how to build a parabolic solar oven – your projects instructions, accuracy matters most in:
-
The curve geometry
-
Smoothness of the reflective surface
-
Alignment of the cooker toward the sun
Even DIY builds benefit greatly from careful shaping and alignment checks.
Heat Transfer: From Light to Cooking
Once sunlight is focused, three heat processes take over:
-
Radiation – concentrated sunlight heats the pot
-
Conduction – heat spreads through the cooking vessel
-
Convection – hot air circulates around the food
Using dark-colored cookware dramatically improves efficiency. This is why many how to build a parabolic solar oven – your projects designs specify black or dark pots—it maximizes absorption instead of reflection.
For deeper renewable-energy theory and classroom explanations, reputable educational sources like national solar research organizations are excellent references.
Why Black Surfaces Increase Efficiency
Black surfaces absorb nearly all wavelengths of visible light. Lighter or shiny surfaces reflect light away, wasting energy.
That’s why:
-
Pots are painted or chosen black
-
Absorber plates use dark materials
-
Black paper is often used in science project versions
This principle directly answers one of the most common questions related to how to build a parabolic solar oven – your projects and prepares you for the materials section next.
Connecting Science to Real Projects
Whether this is a school experiment or an off-grid build, understanding how it works helps you:
-
Explain results clearly
-
Troubleshoot weak heating
-
Improve efficiency with small tweaks
If you’re building multiple DIY projects or publishing experiments, you may find additional inspiration by browsing related project tutorials on your site, such as other hands-on builds listed in your project archive:
👉 https://successformulalab.com/post-sitemap.xml
Materials Needed to Build a Parabolic Solar Oven
Before starting the actual construction, gathering the right materials is essential when learning how to build a parabolic solar oven – your projects successfully. The quality and choice of materials directly affect efficiency, safety, and durability—especially for science projects where performance is measured.
Reflective Materials
The reflective surface is the heart of your parabolic solar oven. Its job is to redirect as much sunlight as possible toward the focal point.
Common options include:
-
Aluminum foil (easy and affordable for science projects)
-
Reflective Mylar sheets (higher efficiency, more durable)
-
Polished aluminum flashing (best performance for long-term use)
When following how to build a parabolic solar oven – your projects, smoother surfaces always perform better than wrinkled or uneven ones. Even small imperfections scatter light and reduce heat.
Frame and Structural Materials
The frame holds the parabolic shape steady and allows you to aim the cooker at the sun.
Typical frame materials:
-
Cardboard or foam board (science fair builds)
-
Wood strips or plywood (DIY backyard builds)
-
Lightweight metal rods (durable outdoor use)
Accuracy matters here. A strong frame ensures the reflective surface maintains the correct parabolic curve—one of the most important steps in how to build a parabolic solar oven – your projects properly.
Cooking Vessel and Absorbers
At the focal point, you’ll need:
-
A black pot or pan (absorbs heat efficiently)
-
Dark metal or cast iron cookware
-
Black-painted steel cans (for experiments)
Avoid shiny or silver cookware, as it reflects sunlight instead of absorbing it—reducing the effectiveness of your how to build a parabolic solar oven – your projects build.
Safety and Support Items
Parabolic solar ovens can get extremely hot. Safety is part of the materials list:
-
Heat-resistant gloves
-
Sunglasses (to protect eyes from glare)
-
A stable base or stand
-
Thermometer (optional but recommended)
If you’re planning to use your solar oven as part of an off-grid setup, these materials integrate well with other sustainability systems. Many DIY builders combine solar cooking with backyard self-reliance strategies like food production, water efficiency, and outdoor energy use—concepts explored in guides such as The Self-Sufficient Backyard.
Material Checklist Summary
✔ Reflective surface
✔ Parabolic frame
✔ Black absorber or pot
✔ Safety equipment
Once these items are ready, you’re prepared to move into the most exciting stage of how to build a parabolic solar oven – your projects: shaping the parabola and assembling the cooker.
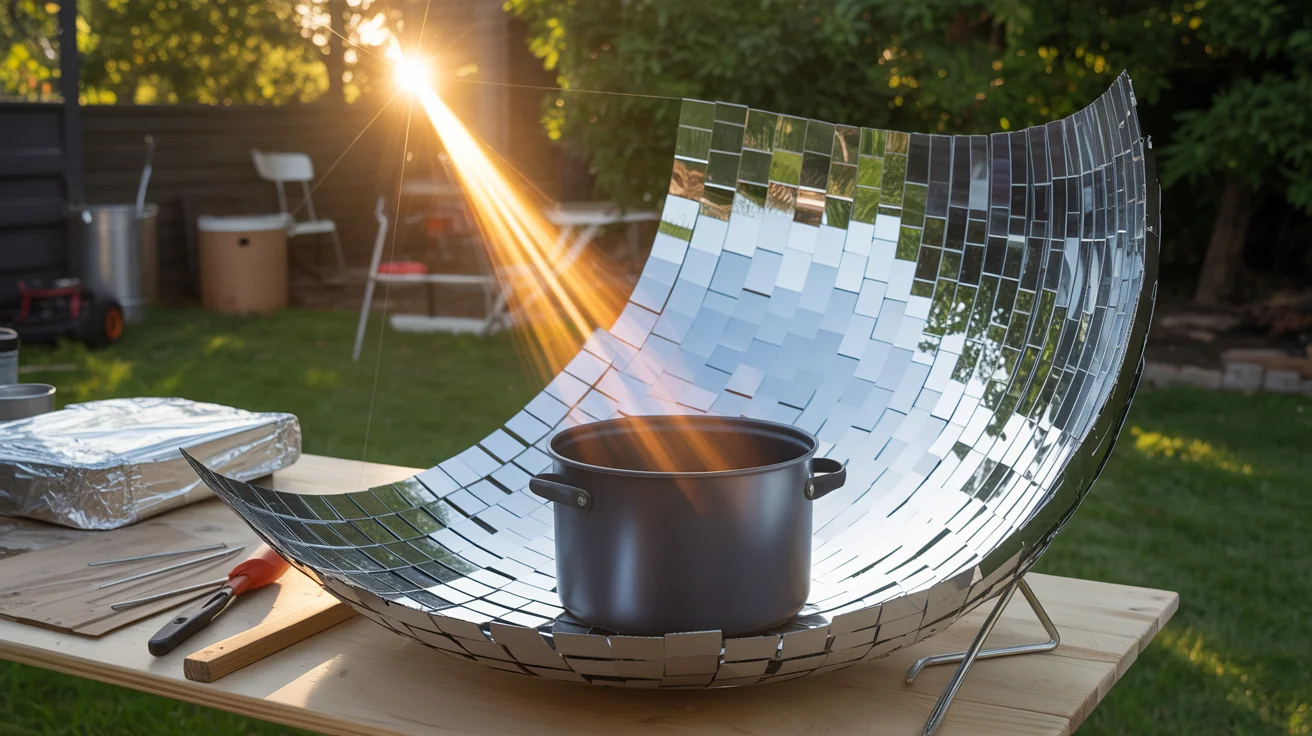
Step-by-Step — How to Build a Parabolic Solar Oven
This is the core of how to build a parabolic solar oven – your projects. Follow these steps carefully to ensure proper focus, maximum heat, and safe operation. Whether you’re building for a science project or real-world use, precision matters.
Step 1: Designing the Parabolic Curve
A parabola can be created using a simple geometric method:
-
Decide the diameter of your oven (e.g., 60–90 cm for projects)
-
Choose a depth (deeper curves concentrate more heat)
-
Mark points evenly and connect them smoothly
Many how to build a parabolic solar oven – your projects builds use printed templates or string-and-nail methods to maintain accuracy. Even spacing ensures all sunlight converges at the same focal point.
Step 2: Building the Frame
Once the curve is defined:
-
Cut cardboard, wood, or metal ribs
-
Attach them symmetrically
-
Reinforce the center for strength
The frame must hold the parabolic shape firmly. Any warping will shift the focal point and reduce efficiency—a common mistake when learning how to build a parabolic solar oven – your projects for the first time.
Step 3: Adding the Reflective Surface
Carefully apply your reflective material:
-
Start from the center and work outward
-
Keep surfaces smooth and wrinkle-free
-
Overlap slightly to avoid gaps
Smooth reflection is critical. Wrinkles scatter light and lower temperatures, weakening the results of your how to build a parabolic solar oven – your projects build.
Step 4: Locating the Focal Point
To find the focus:
-
Aim the oven at the sun
-
Hold a small piece of wood or paper in front
-
Move it until light converges at the brightest point
Mark this location clearly. This is where your cooking pot or absorber must sit for how to build a parabolic solar oven – your projects to work effectively.
Step 5: Aligning the Oven With the Sun
Parabolic solar ovens require active alignment:
-
Face the oven directly toward the sun
-
Adjust every 15–30 minutes
-
Keep the focal point centered
Unlike box ovens, parabolic designs reward attention. Proper alignment is what makes how to build a parabolic solar oven – your projects so effective compared to simpler solar cookers.
Performance Tips
-
Use black cookware only
-
Cook during peak sun hours (10 a.m.–2 p.m.)
-
Avoid windy conditions
For off-grid users, solar cooking pairs well with backup energy systems. Many preparedness enthusiasts combine solar ovens with portable power solutions for cloudy days. Resources like Ultimate OFF-GRID Generator often appeal to those building resilient, self-reliant setups.
What Comes Next
Now that the oven is built, the next section focuses on adapting how to build a parabolic solar oven – your projects specifically for science projects, including experiments, measurements, and presentation tips.
How to Build a Solar Oven for a Science Project
Adapting how to build a parabolic solar oven – your projects for a science project means simplifying construction while maximizing measurable results. Judges and teachers care about clear variables, repeatable experiments, and solid explanations—this section shows you how to deliver all three.
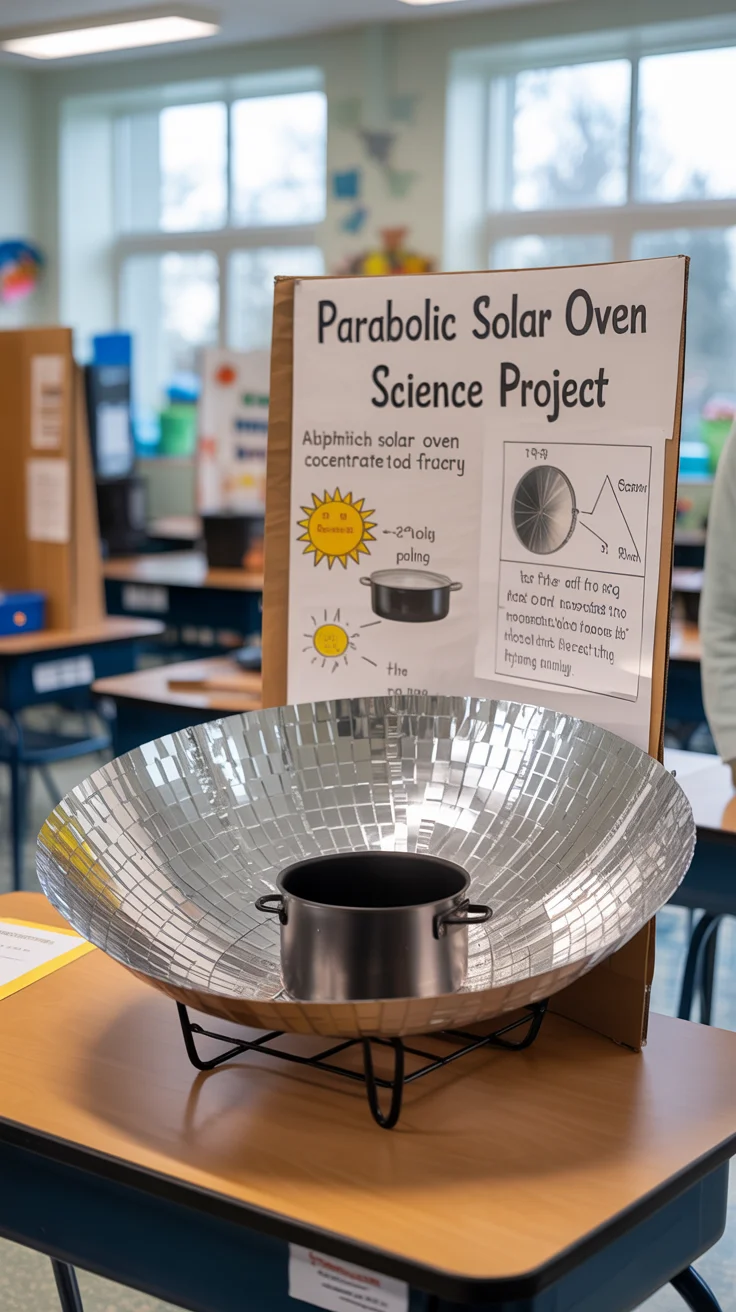
Simplified Classroom-Friendly Design
For science fairs, scale matters. A smaller parabolic solar oven is:
-
Easier to transport
-
Faster to assemble
-
Safer to demonstrate
Recommended adjustments:
-
Diameter: 40–60 cm
-
Cardboard or foam board frame
-
Aluminum foil or Mylar for reflection
These materials still demonstrate the core physics behind how to build a parabolic solar oven – your projects without excessive complexity.
Experiment Ideas You Can Measure
Strong science projects answer a clear question. Here are proven experiment ideas tied directly to how to build a parabolic solar oven – your projects:
-
Temperature vs. Time:
Measure how fast water heats at the focal point. -
Angle of Sunlight:
Compare temperatures at different sun angles. -
Surface Color Test:
Black pot vs. silver pot (same size). -
Material Efficiency:
Foil vs. Mylar reflectivity comparison.
Each experiment highlights the principles behind how to build a parabolic solar oven – your projects and produces easy-to-graph data.
Data Collection Tips
For clean results:
-
Use the same pot and water volume each test
-
Record temperature every 2–5 minutes
-
Perform tests at similar times of day
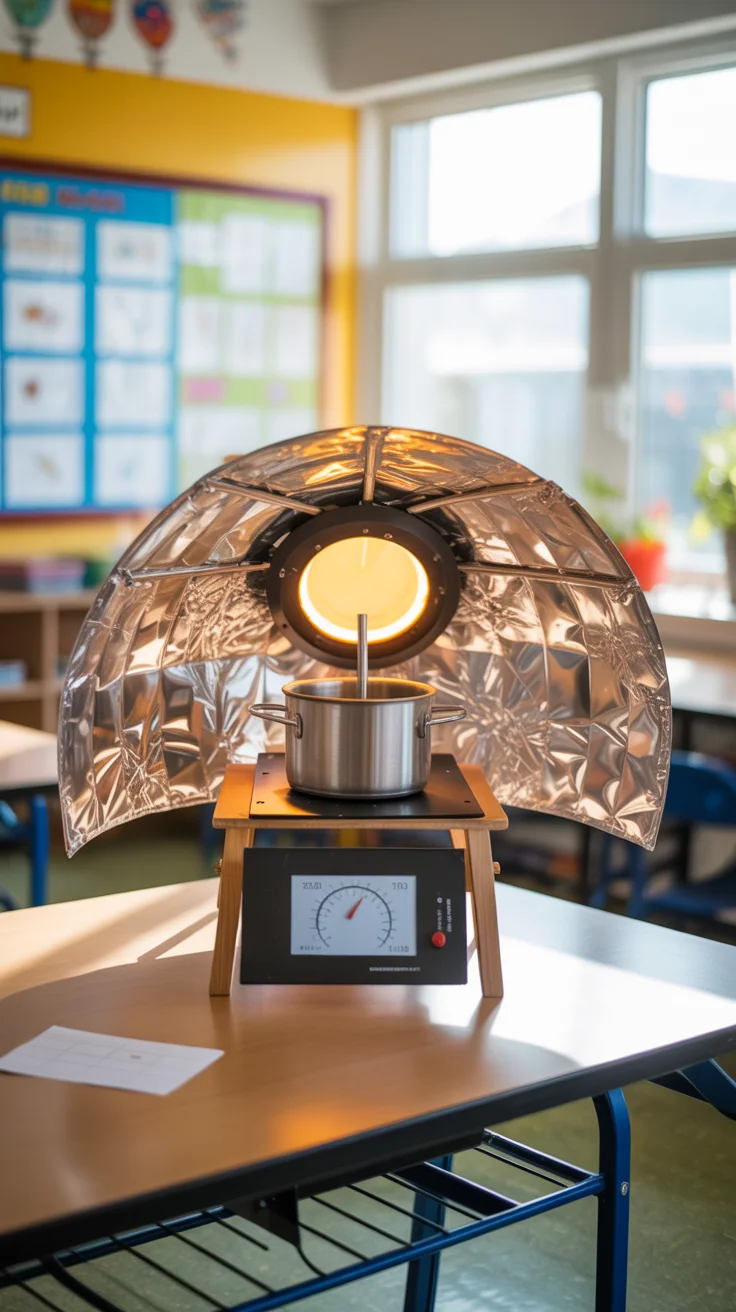
Adding a simple thermometer turns how to build a parabolic solar oven – your projects into a strong data-driven experiment instead of a simple craft.
Explaining the Science (Judges Love This)
When presenting:
-
Explain how the parabolic shape focuses light
-
Describe why black absorbs heat better
-
Connect results to renewable energy
Clear explanations transform how to build a parabolic solar oven – your projects into a standout STEM demonstration.
You can also reference broader sustainability concepts—like how solar cooking fits into off-grid and self-reliant lifestyles—to show real-world relevance beyond the classroom.
Display & Presentation Tips
-
Include a labeled diagram of the parabola
-
Show graphs of temperature increase
-
Add safety notes (eye and heat protection)
This elevates how to build a parabolic solar oven – your projects from a basic build to a polished science presentation.
Coming Up Next
In the next section, we’ll answer one of the most common questions directly:
Why do you put black paper at the bottom of a solar oven?
This ties color theory, heat absorption, and efficiency together in a simple explanation.
Why Do You Put Black Paper at the Bottom of a Solar Oven?
One of the most frequently asked questions when learning how to build a parabolic solar oven – your projects is why black paper (or black surfaces) are used at the bottom or at the focal point. The answer is rooted in basic physics and plays a major role in efficiency.
Black Surfaces Absorb More Heat
Black materials absorb nearly all wavelengths of visible light, converting that light into heat. Lighter or reflective surfaces bounce much of that energy away.
In the context of how to build a parabolic solar oven – your projects:
-
Black paper absorbs sunlight efficiently
-
Reflected rays are converted directly into heat
-
Temperatures rise faster and higher
This is why black pots, pans, or absorber plates are always recommended in parabolic solar oven designs.
Color Theory and Thermal Efficiency
When sunlight hits a surface:
-
White or shiny surfaces → reflect most light
-
Dark surfaces → absorb most light
Using black paper at the bottom of a solar oven or at the focal point ensures that the concentrated sunlight doesn’t bounce away. Instead, it stays where it’s needed most.
This principle is especially important for science experiments based on how to build a parabolic solar oven – your projects, because it produces clearer, more dramatic results.
Black Paper vs. Black Metal
For different build types:
-
Science projects: Black construction paper works well
-
DIY backyard builds: Black-painted metal or cast iron is better
-
Long-term use: Heat-resistant black cookware is ideal
Black paper is popular in classrooms because it’s:
-
Cheap
-
Easy to replace
-
Safe for demonstrations
It visually reinforces one of the key lessons behind how to build a parabolic solar oven – your projects—that material choice directly affects energy efficiency.
Simple Experiment You Can Try
To prove the point:
-
Place black paper at the focal point
-
Measure temperature after 10 minutes
-
Replace it with white paper
-
Measure again
The temperature difference clearly demonstrates why black paper is used in how to build a parabolic solar oven – your projects and strengthens any science presentation.
Why This Matters for Real-World Use
In off-grid or emergency cooking, efficiency isn’t just academic—it’s practical. Faster heating means:
-
Less time tracking the sun
-
More reliable cooking
-
Better performance with limited sunlight
That’s why serious DIY builders often combine solar cooking knowledge with broader preparedness systems. Solar ovens work best as part of a complete self-reliance approach rather than as a standalone solution.
Next Section Preview
Up next, we’ll cover another critical question:
What is the biggest disadvantage of parabolic cookers?
This section will honestly address safety, limitations, and how to manage them effectively.
What Is the Biggest Disadvantage of Parabolic Cookers?
While learning how to build a parabolic solar oven – your projects highlights many advantages, it’s just as important to understand the limitations. Parabolic cookers are powerful—but that power comes with trade-offs.
1. Safety Risks From Intense Heat and Glare
The biggest disadvantage of parabolic cookers is safety. Because they concentrate sunlight so effectively:
-
The focal point can reach very high temperatures
-
Reflected glare can strain or damage eyes
-
Accidental contact may cause burns
This doesn’t mean parabolic solar ovens are dangerous when used responsibly—but it does mean safety awareness is essential when applying how to build a parabolic solar oven – your projects in real conditions.
Safety tips:
-
Never look directly at the reflective surface
-
Always wear sunglasses
-
Use heat-resistant gloves
-
Keep children supervised
2. Constant Sun Tracking Required
Unlike box-style solar ovens, parabolic cookers must be frequently adjusted to follow the sun. This is a common frustration for beginners experimenting with how to build a parabolic solar oven – your projects.
Drawbacks include:
-
Manual repositioning every 15–30 minutes
-
Reduced performance if misaligned
-
Less “set-it-and-forget-it” convenience
However, for science projects, this tracking requirement actually reinforces learning by demonstrating the relationship between sun angle and energy concentration.
3. Weather Dependency
Parabolic solar ovens perform best in:
-
Clear skies
-
Direct sunlight
-
Low wind conditions
Clouds or shade dramatically reduce effectiveness. That’s why off-grid users often combine solar cooking with alternative systems for cloudy days. Pairing solar cooking knowledge from how to build a parabolic solar oven – your projects with backup solutions—such as stored power or alternative cooking methods—creates a more reliable setup.
4. Precision Matters More Than Other Designs
Parabolic cookers demand accuracy:
-
Small shape errors reduce focus
-
Wrinkles scatter light
-
Poor alignment lowers heat
This makes how to build a parabolic solar oven – your projects slightly more complex than simpler solar ovens—but also far more educational and rewarding.
Turning Disadvantages Into Learning Opportunities
For science projects and DIY learners, these disadvantages actually add value:
-
Safety teaches responsibility
-
Sun tracking teaches solar geometry
-
Weather variability teaches energy limits
Understanding both pros and cons makes how to build a parabolic solar oven – your projects a well-rounded educational experience.
Next Up
In the next section, we’ll go deeper into performance upgrades and answer:
How to make a parabolic solar concentrator—including tips for higher efficiency and advanced builds.
How to Make a Parabolic Solar Concentrator
Once you understand how to build a parabolic solar oven – your projects, the next step is upgrading it into a parabolic solar concentrator. A concentrator focuses purely on maximizing heat and energy density, often reaching higher temperatures than cooking-only designs.
Parabolic Solar Concentrator vs. Solar Oven
While closely related, there are important differences:
| Feature | Solar Oven | Solar Concentrator |
|---|---|---|
| Purpose | Cooking & experiments | Maximum heat focus |
| Pot location | Fixed at focal point | Adjustable absorber |
| Temperature | High | Very high |
| Precision required | Moderate | High |
Knowing this difference helps refine how to build a parabolic solar oven – your projects for advanced experimentation or off-grid applications.
Step-by-Step: Making a Solar Concentrator
To convert your oven into a concentrator:
-
Improve Reflectivity
Upgrade from foil to Mylar or polished aluminum. -
Refine the Parabolic Curve
Sharper curves focus light more tightly. -
Reduce Surface Imperfections
Smooth surfaces dramatically increase efficiency. -
Use a Dedicated Absorber Plate
Thick black metal holds heat longer than cookware alone.
Each improvement builds directly on the foundation of how to build a parabolic solar oven – your projects.
Temperature and Performance Expectations
With good alignment and strong sun:
-
Water can boil rapidly
-
Metal heats quickly
-
Demonstrations are visually impressive
These results make concentrators excellent for:
-
Advanced science projects
-
Renewable energy demonstrations
-
Off-grid experimentation
Safety Considerations Increase With Power
Higher concentration = higher risk. When working beyond basic how to build a parabolic solar oven – your projects, always:
-
Keep flammable materials away
-
Never leave unattended
-
Use eye and hand protection
These systems are powerful educational tools, not toys.
Real-World Applications
Parabolic concentrators are used globally for:
-
Solar thermal research
-
Water purification experiments
-
Off-grid heat generation
When combined with broader preparedness strategies, solar concentrators complement energy resilience systems. Many off-grid builders pair solar cooking and heating with backup power options to maintain functionality during cloudy periods.
What’s Next
The next section explores real-world uses of parabolic solar ovens, especially for off-grid living and emergency preparedness—where these projects go from educational to practical.
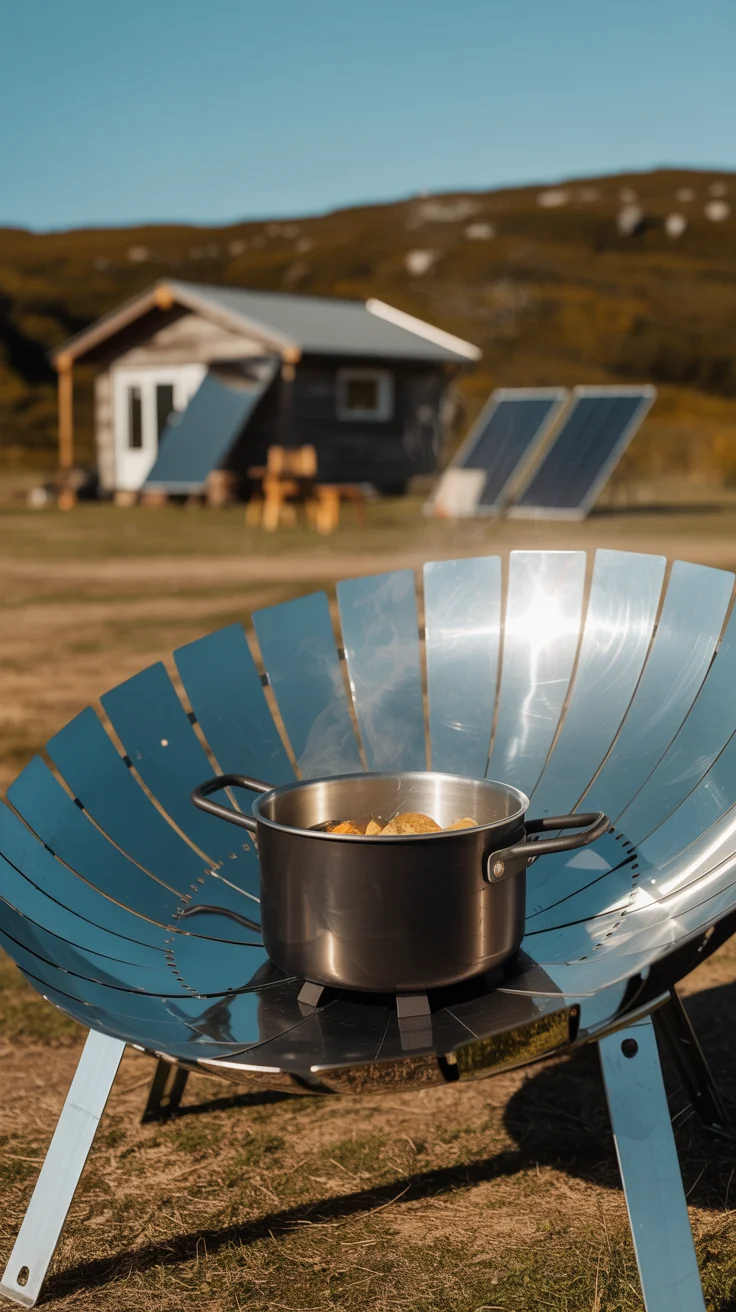
Real-World Uses — Off-Grid & Emergency Cooking
Understanding how to build a parabolic solar oven – your projects isn’t just about science experiments. In real-world situations, this knowledge becomes a valuable survival and self-reliance skill—especially in off-grid or emergency scenarios.
Off-Grid Living Applications
For homesteaders and off-grid households, parabolic solar ovens offer:
-
Fuel-free cooking
-
Reduced reliance on gas or electricity
-
A sustainable way to prepare food
When paired with gardens, water conservation, and energy systems, solar cooking becomes part of a holistic lifestyle. Many off-grid enthusiasts expand their skills beyond how to build a parabolic solar oven – your projects by learning full-system approaches to self-sufficiency.
This is where guides like The Self-Sufficient Backyard naturally fit—they help integrate solar cooking into a broader self-reliant setup.
Emergency & Disaster Preparedness
During power outages or disasters:
-
Fuel may be unavailable
-
Electric stoves may not work
-
Open fires may be unsafe
A parabolic solar oven solves these problems using only sunlight. That makes how to build a parabolic solar oven – your projects especially relevant for preparedness-minded households.
However, sunlight isn’t always guaranteed. Many preparedness plans include backup power solutions for cloudy days or nighttime use. In those cases, a compact system like Ultimate OFF-GRID Generator can complement solar cooking by powering small appliances and emergency devices.
Educational Community Demonstrations
Solar ovens are often used in:
-
Community workshops
-
School demonstrations
-
Sustainability fairs
Demonstrating how to build a parabolic solar oven – your projects helps raise awareness of renewable energy while offering a practical, hands-on learning experience.
Limitations in Real Use
Even in real-world settings, it’s important to remember:
-
Requires direct sunlight
-
Needs frequent alignment
-
Works best during midday hours
These limits don’t reduce its value—they simply emphasize that solar ovens work best as part of a system, not a single solution.
Coming Up: Safety & Final Tips
The next section will focus entirely on safety tips when using a parabolic solar oven, followed by the conclusion and FAQ section to wrap everything together.
Safety Tips When Using a Parabolic Solar Oven
Before wrapping up how to build a parabolic solar oven – your projects, it’s critical to clearly understand safe operation. Parabolic solar ovens are powerful tools, and using them responsibly ensures they remain educational and practical rather than risky.
Eye and Skin Protection
Because parabolic cookers concentrate sunlight:
-
Never look directly at the reflective surface
-
Always wear sunglasses or protective eyewear
-
Avoid placing your face near the focal point
This is one of the most important rules when demonstrating how to build a parabolic solar oven – your projects, especially around others.
Heat and Burn Safety
Temperatures at the focal point can become extremely high.
-
Use heat-resistant gloves
-
Handle cookware carefully
-
Allow metal parts to cool before touching
Treat a parabolic solar oven with the same respect you would a hot stove.
Fire Prevention
To reduce fire risk:
-
Keep flammable materials away
-
Never leave the oven unattended
-
Use it only outdoors in open areas
Responsible handling is a core lesson embedded in how to build a parabolic solar oven – your projects, particularly for science and educational use.
Supervision for Students
If used in classrooms or fairs:
-
Adult supervision is essential
-
Demonstrate safety rules clearly
-
Limit hands-on access near the focal point
Safety awareness strengthens the educational value of how to build a parabolic solar oven – your projects rather than limiting it.
Why This Project Matters
Learning how to build a parabolic solar oven – your projects is more than just a DIY task—it’s a hands-on lesson in renewable energy, physics, sustainability, and self-reliance.
This project:
-
Demonstrates solar concentration principles
-
Encourages critical thinking and experimentation
-
Offers real-world applications for off-grid and emergency use
Whether you’re building it for a science fair, a classroom, or personal exploration, how to build a parabolic solar oven – your projects delivers long-term educational and practical value.
For readers interested in expanding beyond a single project, combining solar cooking with broader preparedness and sustainability systems creates a more resilient lifestyle. Solar ovens work best when integrated into a bigger plan rather than standing alone.
Frequently Asked Questions (FAQ)
How to build a solar oven for a science project?
Use a smaller parabolic design with cardboard or foam board, aluminum foil, and a black absorber. Focus on measuring temperature changes to clearly demonstrate how to build a parabolic solar oven – your projects scientifically.
What is the biggest disadvantage of parabolic cookers?
The biggest disadvantage is safety and the need for constant sun tracking. However, these challenges also make how to build a parabolic solar oven – your projects a strong learning experience.
How to make a parabolic solar concentrator?
Improve reflectivity, refine the parabolic curve, and use a dedicated black metal absorber. These upgrades build directly on how to build a parabolic solar oven – your projects basics.
Why do you put black paper in the bottom of the solar oven?
Black paper absorbs sunlight efficiently, converting light into heat. This principle is central to how to build a parabolic solar oven – your projects and solar energy efficiency.
Is a parabolic solar oven practical for real cooking?
Yes, in sunny conditions. It works best as part of an off-grid or emergency system rather than a standalone solution.