
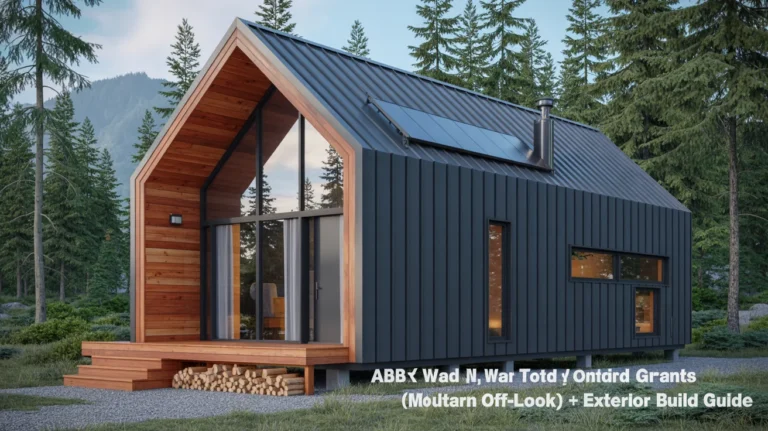
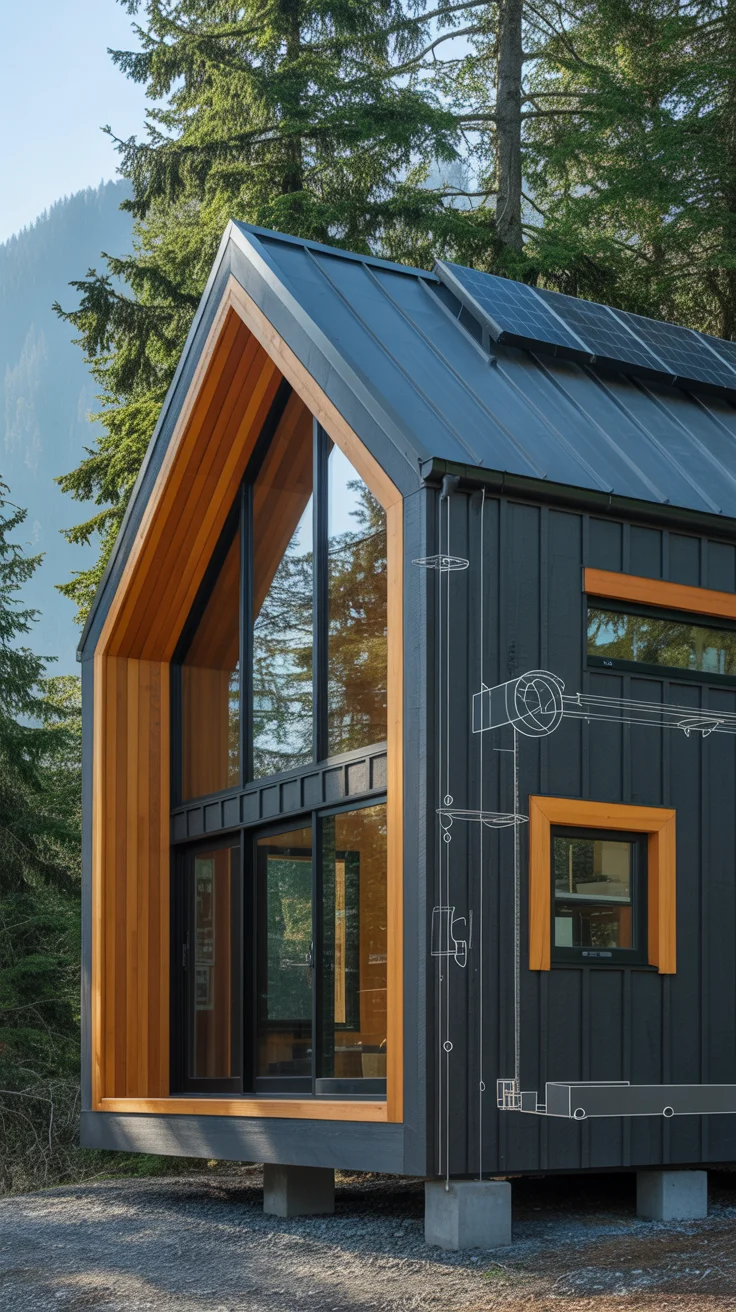
A black cabin with warm wood accents is one of the cleanest, most modern ways to blend into a forest or mountain setting while standing out with intentional design. This exterior build guide shows you how to choose durable materials, assemble a moisture-safe wall system, detail wood features that last, and tie in off-grid systems without compromising the minimalist aesthetic.
If your end goal is a cabin that’s self-reliant as well as beautiful, plan your site, envelope, and exterior finishes alongside your water and power strategies. A strong, layered assembly will keep your walls dry; smart color and material choices will defend against UV, wind, and snow; and purposeful detailing will keep your wood accents glowing for years.

After you sketch your vision, it helps to think through homestead systems early. For a practical blueprint to food, water, and energy at the cabin scale, see The Self-Sufficient Backyard (it’s written for small properties and off-grid goals). The Self-Sufficient Backyard
Design vision for a black modern cabin with warm timber accents
A black exterior emphasizes shadow lines, simplifies the silhouette, and lets natural surroundings become the “color.” Wood accents introduce warmth and grain that soften the modern edge and keep the cabin feeling alive.
Key design moves:
- Keep the massing simple. A compact rectangle or L-shape with a steep gable or single-slope roof looks clean and sheds weather well.
- Limit materials to two or three: black cladding as the field (e.g., standing-seam metal or fiber cement), warm wood accents (porch soffits, fascia, window trim, entry wall), and a metal roof.
- Layer texture. Pair a smooth large-format field material with vertical wood slats or timber posts. The contrast reads intentional.
- Emphasize shadow. Use vertical battens, deep window jambs, and exposed rafters or purlins to create crisp lines that the black finish will accentuate.
Color and finish strategy:
- True black vs. near-black. True black looks bold but absorbs more heat; near-black charcoal reads “black” from a distance but manages temperature better.
- Consistency across elements. Decide if trim should vanish (black-on-black) or frame the building (black body, natural wood trim). Avoid mixing too many tones of wood; pick a species and finish, then use it consistently across soffits, screens, and posts.
- Fire and region. In wildfire-prone zones, consider non-combustible field cladding (metal, fiber cement) and limit exposed wood to protected zones like covered porches.
Designing with the black-and-wood palette:
- Wood accents are strongest where the hand touches: front door, entry ceiling, bench, porch posts, stair rails, window boxes, and privacy screens. Keep them under deep eaves whenever possible.
- Showcase craft in a few places instead of everywhere: a slatted cedar entry wall, a chunky oak or larch threshold, a thermally modified ash soffit with tight parallel lines. Fewer, better moments will anchor the style.
Remember that the “off-grid look” isn’t just style; it’s function. The same overhangs that protect wood also shade glazing. The same simple roofline that looks modern sheds snow and hosts solar. That cohesion is how a black cabin with wood accents stays beautiful and low-maintenance.
Siting, climate, and orientation for durability and comfort
Before you choose materials, map your microclimate. An exterior that lasts is matched to wind, sun, snow, and rain on your site.
Climate-aware principles:
- Snow and freeze: Steeper roof pitches (8:12 to 12:12 for high snow loads) reduce drift, while snow guards control shedding over egress points. Protect entry doors with generous overhangs.
- Rain and humidity: Prioritize a ventilated rainscreen behind cladding, robust flashing at every penetration, and a continuous, taped weather-resistive barrier (WRB).
- Wind: Use screw-fastened cladding systems (standing-seam metal, fiber cement with proper anchors) rated for your gust zone. Consider windbreak plantings.
- UV exposure: High sun + dark finishes equals heat. Choose UV-stable coatings and allow for thermal expansion gaps on siding and metal. Near-black paints hold up better than true black in intense sun.
Solar orientation and comfort:
- Face glazing toward views and winter sun, then shade with overhangs sized for your latitude. Place service spaces (mudroom, storage) on the windward side to buffer the living zones.
- Use dark cladding strategically: it warms in winter; in hot climates, ventilate the cladding cavity generously and consider near-black instead of pure black.
Water and ground interface:
- Elevate the cabin at least 8 inches above finished grade with clear gravel around the base to discourage splash-back. Keep organic mulch well away from the siding.
- Carry water away: plan roof drainage early. Gutters into a cistern or rain garden reduce erosion and keep the foundation dry.
Construction logistics:
- Build a weather management “box” first: foundation, floor, walls sheathed and WRB applied, roof dried-in. Prefinish cladding and wood accents off-site to control quality and avoid weather delays.
- Decide the service core location (mechanical, water, power) during layout to keep penetrations grouped and easy to flash.
This upfront planning ties the modern off-grid look to real performance: a dry, quiet cabin that breathes correctly, captures sun and water, and shields wood accents from the worst weather.
Exterior material choices that hold up on a black cabin with wood accents
Your field cladding does most of the weather work; your wood accents carry the tactile beauty. Choose each with longevity, fire resistance, and maintenance in mind.
Durable field cladding options:
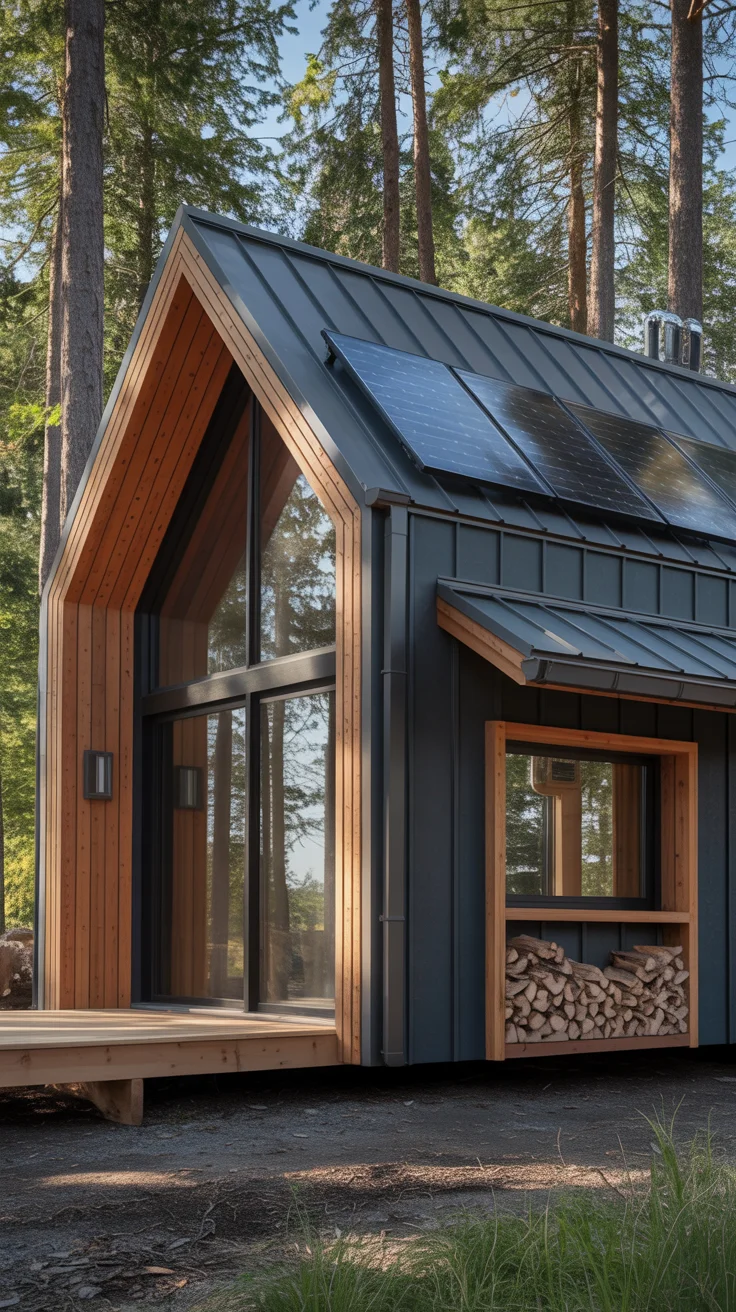
- Standing-seam metal (pre-finished steel or aluminum): Non-combustible, extremely durable, and sleek. Vertical seams echo cabin gables and suit the modern aesthetic. Expect 30–50+ years with minimal maintenance. Pair with concealed fasteners and compatible underlayment.
- Fiber cement siding or panels: Non-combustible, stable, available in smooth or textured finishes, and factory-coated in deep charcoals and blacks. Use over a rainscreen and follow cut-edge sealing instructions.
- Engineered wood siding: Lighter than fiber cement and more workable. Look for factory-coated products rated for your climate. Install over a ventilated cavity and maintain finish.
- Charred wood (shou sugi ban): Naturally striking. In dry climates or protected areas, it can perform well when properly installed. In wet freeze-thaw zones, use thoughtfully: char as accents or under overhangs, and still include a rainscreen.
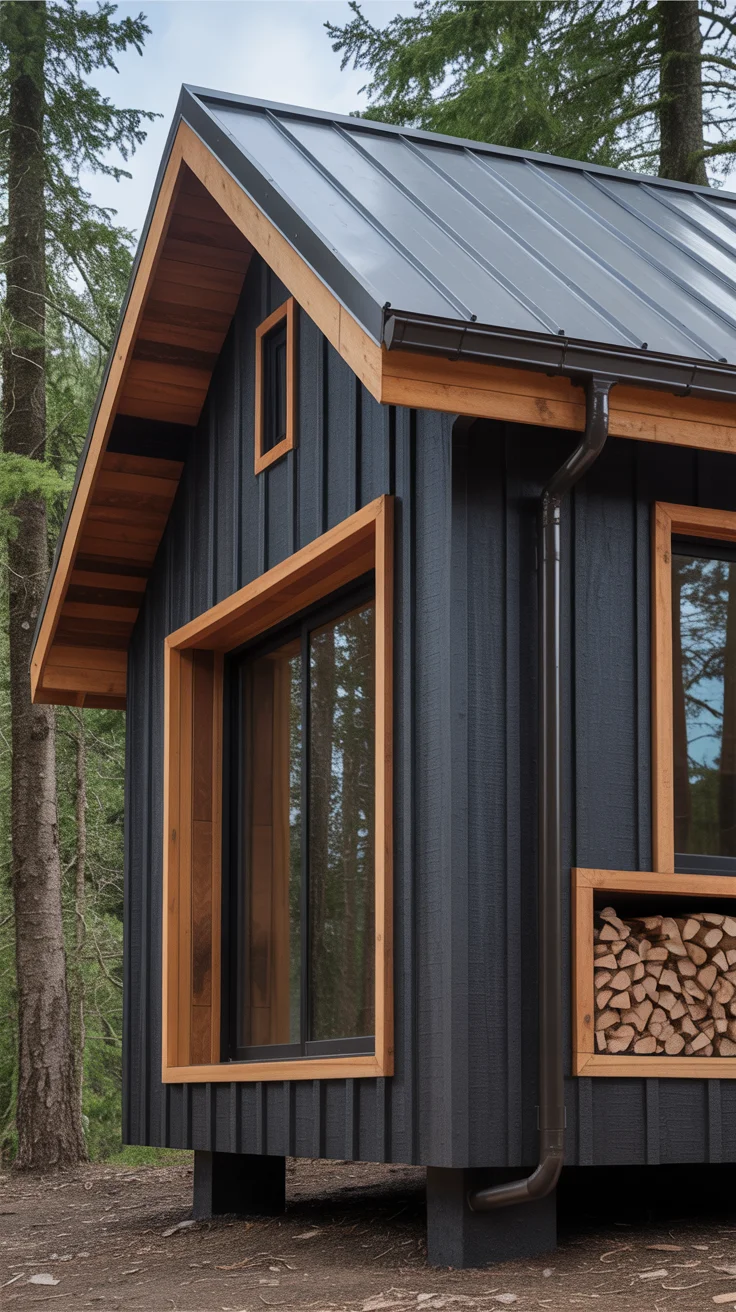
Where wood accents shine:
- Protected zones: soffits, under porch roofs, entry walls, and interior-facing balcony ceilings. These locations minimize UV and rain, greatly extending finish life.
- Durable species: Western red cedar, Alaskan yellow cedar, larch, white oak (for trim, not ground-contact), black locust (for decks and steps), and thermally modified ash or pine.
- Prefinished components: Factory oils or penetrating stains provide uniform coverage and better end-grain sealing. Choose tones that contrast gently with black—silvered cedar, warm honey oak, or toasted brown thermally modified wood.
Hardware and fasteners:
- Go stainless or coated for black exterior systems. Black-painted trim screws can disappear visually; always use fasteners recommended by the cladding manufacturer.
- Back-prime wood trim and seal all end cuts during installation to lock out moisture.
Finish longevity and color choice:
- Paint vs. stain: For black field cladding, prefer factory finishes on metal or fiber cement. For wood accents, a high-quality UV-resistant penetrating oil or semi-transparent stain usually outlasts film-forming finishes because it won’t peel—just recoat as it weathers.
- Near-black durability: Deep charcoal often outperforms true black in UV and thermal cycling while looking just as bold in situ.
A balanced palette might be: standing-seam black metal as field cladding, cedar soffits and slatted screen at the entry, chunky larch posts, and a black metal roof. This pairing is tough, clean, and timeless.
Wall assembly, rainscreen ventilation, and moisture protection
A beautiful exterior fails if the wall can’t dry. The core of a long-lived black cabin with wood accents is a layered wall assembly that sheds bulk water, stops air leaks, and allows vapor to diffuse.
Proven wall stack (exterior to interior):
- Cladding (metal, fiber cement, or engineered wood)
- Ventilated rainscreen cavity (3/8″ to 3/4″ furring strips or panelized battens)
- Continuous WRB (self-adhered or mechanically fastened; taped seams and integrated flashing)
- Exterior sheathing (plywood/OSB)
- Framing with cavity insulation (mineral wool or fiberglass; consider exterior continuous insulation in cold climates)
- Interior air/vapor control (painted drywall with airtight detailing, or smart vapor retarder as needed by climate)
- Interior finish
Why this works:
- The rainscreen cavity decouples the cladding from the WRB, ventilates away moisture, and equalizes pressure during wind-driven rain.
- A taped WRB is your primary drainage plane; treat it like a roof for your walls, with all laps and penetrations properly detailed.
- A continuous air barrier is the cheapest performance upgrade: it reduces drafts, controls moisture transfer, and makes the cabin more comfortable and efficient.
Critical details:
- Kickout flashing at roof-to-wall transitions to prevent cascades into the siding.
- Sloped head flashings (“z-flashings”) over windows and horizontal trim. Always shingle-lap the WRB layers.
- Bug screens at the top and bottom of the rainscreen cavity to allow airflow while keeping insects out.
- Clearances: maintain 6–8 inches from grade to the bottom of cladding and at least 1/2 inch from horizontal surfaces like decks. Use metal or stone at high-splash zones.
Condensation risk management:
- In cold climates, add exterior continuous insulation to keep the sheathing warm and reduce condensation risk. Follow your local code’s ratio for cavity vs. exterior insulation.
- In humid climates, avoid interior polyethylene; use smart vapor retarders and allow drying to the interior with dehumidification as needed.
If you’ve struggled with moisture issues before, this is your cure. A ventilated rainscreen plus disciplined flashing will prevent the bulk of siding failures and paint or stain problems on any black cabin exterior.
How to design a rainscreen gap
Detailing and protecting the wood accents
Wood accents are the soul of the composition. They deserve species selection, joinery, and finishing that respect their exposure.
Best-practice choices:
- Species: Cedar and larch handle exterior use well; thermally modified ash or pine provides extra stability; black locust excels for ground-contact elements like stair treads and deck boards.
- Prefinish: Apply penetrating oil or semi-transparent stain to all faces, with extra attention to end-grain. Factory finishing offers superior consistency and coverage.
- Profiles: Use vertical grain boards for stability. Choose profiles that shed water (chamfered edges, drip kerfs) and avoid horizontal ledges where water can sit.
Detailing for longevity:
- Deep overhangs: Design 18–36-inch eaves at entries, porches, and key wood features. Shade preserves finish and reduces maintenance cycles dramatically.
- Back-ventilate: Separate wood accent cladding or slats from the WRB with thin furring to allow airflow and drying.
- End-grain sealing: Every cut end should be sealed immediately on-site. Unsealed end grain is the primary failure point.
- Hidden fasteners: Where possible, use concealed clips or screw from the backside of slats for cleaner lines. If face-screwing, align and pre-drill; use color-matched stainless hardware.
Finish selection and upkeep:
- Penetrating oils: Soak into the wood, don’t peel, and are easier to refresh. Look for UV blockers and mildew-resistant formulas.
- Film-forming finishes: Beautiful but higher risk—once UV and water breach the film, peeling can start. Reserve for protected areas.
- Maintenance rhythm: Expect to refresh penetrating finishes every 1–3 years in full sun, every 3–5 years in protected zones. Clean with mild soap, then recoat. Keep a small kit of the exact finish for seasonal touch-ups.
Designing the showcase moments:
- Entry: A slatted cedar screen wall and solid wood door give tactile warmth to the first touchpoint.
- Soffits: Continuous wood soffits down long eaves create a glowing ribbon at dusk. Integrate slender, warm-temperature LED lighting to celebrate the grain.
- Fascia and beams: A stout wood fascia can frame the thinness of metal cladding, emphasizing the cabin’s geometry.
Protecting wood accents from weather is mostly about good design—shade, shed, and separation—and a finish that’s easy to renew. Do that, and your wood will stay rich and inviting against the black backdrop.
Best black exterior stains compared
Roofing, drainage, decks, and foundation transitions
The roof is the primary defense in harsh climates and a major visual element in modern cabin design. Done right, it caps the composition and controls water with authority.
Roofing that fits the look and lasts:
- Standing-seam metal roof in matte black or graphite ties the field cladding together. Its clean lines and concealed fasteners reinforce the modern profile.
- In snow country, add snow guards over entrances and along walkway eaves to prevent sudden slides.
- Underlayment matters: high-temperature, self-adhered membranes at eaves and valleys reduce ice dam risks.
Drip edges, gutters, and downspouts:
- Use color-matched metal drip edges and fascia. Align the reveal for crisp shadow lines.
- Gutters feed water management: connect downspouts to a dry well, rain garden, or cistern. Protect the foundation by directing outlets away from the structure with splash blocks or underground piping.
Decks and thresholds:
- Float a small landing or deck away from the cabin wall by at least 1 inch to keep the siding ventilated and easy to inspect. Flash ledger boards meticulously or use free-standing frames to avoid deck-ledger leak risks.
- Choose rot-resistant deck boards: black locust, thermally modified wood, or composite. For a modern look, use hidden fasteners and minimal guard profiles.
Foundation transitions:
- Flash the bottom termination: many black cladding systems use a perforated ventilation strip and starter track to ensure a clean line and airflow at the base.
- Protect perimeters with a durable base: stone, metal wainscot, or fiber cement trim around the first 12 inches helps resist weed trimmers, splash-back, and snow shovels.
Wildfire and ember resistance:
- In high-risk areas, enclose soffits with tight-mesh vents rated for ember intrusion or use solid soffit panels with vent baffles.
- Keep combustible landscaping at least 5 feet from the building. Replace bark mulch near walls with crushed stone.
This is where off-grid living and modern design intersect: a simple, continuous roof plane with generous eaves protects your wood accents, manages water for your site, and offers a quiet platform for solar or rain capture.
For off-grid water capture and storage options that integrate with a modern cabin profile, consider modular systems that can tie into gutter downspouts and gravity-feed gardens. A compact, purpose-built unit like The AquaTower can help you organize rain capture and water access with small-footprint efficiency. The AquaTower
Off-grid power, water, and heat that match the modern exterior
A modern black cabin should look clean outside—and function cleanly inside. Plan your off-grid systems to keep penetrations minimal, serviceable, and aligned with the exterior aesthetic.
Power:
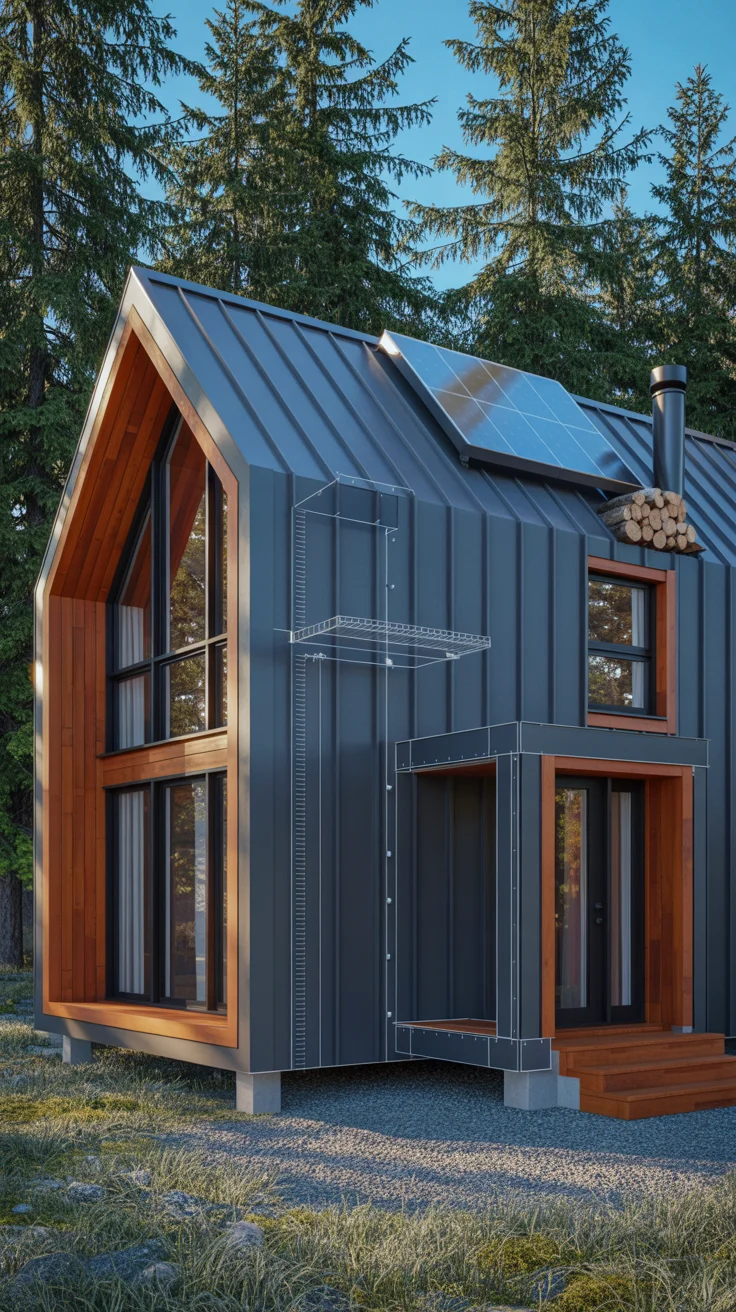
- Primary: photovoltaic array with ground or roof mount; roof mounts should pair with standing-seam clips (no roof penetrations). In shaded sites or high-latitude winters, plan for supplementary power.
- Backup: a compact generator sized to your essential loads provides resilience during storms or peak usage. Look for quiet operation, clean output, and easy maintenance access. If you want an all-in-one guide to an independent backup power setup that complements solar, see the Ultimate OFF-GRID Generator. Ultimate OFF-GRID Generator
Water:
- Rain capture: Seamless gutters, first-flush diverters, leaf guards, and a UV-resistant cistern. Paint or screen tanks to match the palette or tuck them behind slatted wood screens.
- On-site treatment: Pair sediment filters with carbon or UV treatment for potable supply. Keep filter housings accessible in a mechanical closet.
- Distribution: Gravity where possible; insulated lines in cold climates. Consider a simple, compact tower or modular system that consolidates storage and access points to stay tidy on the exterior—again, units like The AquaTower can simplify planning and space.
Heat:
- Passive gains: south-facing glazing with overhangs sized to your latitude. A dark exterior can add modest shoulder-season warmth.
- Primary systems: high-efficiency wood stove, air-source heat pump (cold-climate rated), or hydronic radiant in a super-insulated envelope.
- Ventilation: balanced heat-recovery or energy-recovery ventilation (HRV/ERV) to keep the cabin dry and fresh without big energy penalties.
Penetrations and aesthetic control:
- Group mechanical penetrations on the least-visible elevation and flash each with color-matched boots and hoods.
- Use a dedicated service panel with a clean metal door painted to match the cladding for meter, disconnects, and filter access.
- Keep roof penetrations to a minimum; use gaskets and boots designed for your roofing profile.
Food and storage:
- The aesthetics extend to what you store. Keep propane tanks, wood piles, and bins behind wood slat screens that echo your accent details.
- If you want to make your cabin more self-reliant with long-shelf-life staples, meal planning, and preservation, The Lost Superfoods offers techniques for building a resilient pantry without special equipment. The Lost Superfoods
Off-grid solar power sizing guide
DIY cistern and greywater basics
Step-by-step exterior build sequence for a black cabin with wood accents
Use this field-tested order to keep your exterior dry, straight, and sharp. Prefinish as many elements as practical before they go up.
- Foundation and drainage
- Install footing drains, capillary break at the top of foundation walls, and a compacted, sloped perimeter with washed stone.
- Pour slabs or set piers. Keep anchors plumb and ready for straight sill plates.
- Framing and sheathing
- Frame the simple, modern form first; keep window and door openings plumb, level, and square.
- Sheath walls and roof quickly to stiffen the structure. Tape sheathing seams if using as part of the air barrier.
- Weather barrier and flashing
- Apply your WRB and tape all seams; integrate pan and head flashing at openings. Install kickout flashings at roof-wall intersections now.
- Pre-flash ledger zones or plan for free-standing decks.
- Roofing dry-in
- Install ice and water membranes at eaves and valleys, then roof underlayment. Fit roof penetrations with matched boots.
- Install standing-seam panels with clip systems, then ridge and eave trim.
- Windows and doors
- Set units plumb and square, shimmed evenly, bedded in sealant at the sill pan. Tape or flash to the WRB in shingle fashion.
- Use black or dark bronze frames to complement the exterior palette.
- Rainscreen battens and accessories
- Install vertical furring strips over studs for siding attachment and ventilation. Include insect screens at top and bottom.
- Add corner profiles, starter strips, and z-flashings to control water at transitions.
- Field cladding
- Install the chosen black cladding (metal, fiber cement, engineered wood). Maintain manufacturer clearances and cut-edge sealing.
- Keep fastener lines straight and reveals consistent; small errors are obvious on a dark, minimalist exterior.
- Wood accents
- Prefinished soffits, fascia, and screens go in next. Maintain back-ventilation and seal all end-grain on site.
- Protect accents under overhangs where possible and use drip kerfs on exposed edges.
- Gutters, downspouts, and site water
- Fit color-matched gutters and direct downspouts to cisterns or dispersion. Check slope and leak-test.
- Decks, stairs, and final trims
- Build free-standing decks or flash ledger correctly. Install hidden-fastener systems for clean lines.
- Align all trims, light fixtures, and house numbers to keep the minimalist geometry intact.
- Final coat and touch-ups
- Wash construction dust, then apply final touch-up coats to wood accents. Caulk minimally and only where required by the system.
- Maintenance plan
- Set reminders: a spring wash and inspection, a fall gutter clean, and a wood finish check every 1–3 years.
When the sequence is clean, the outcome reads calm and intentional—your black cabin becomes a weather-tight sculpture with welcoming wood touchpoints.
Budget, maintenance, and common mistakes to avoid
Budgeting smartly:
- Spend where it counts: roof, WRB, flashings, and windows. These safeguard the structure and comfort.
- Simplify the geometry: fewer corners, cleaner roofs, and minimal exterior transitions cut labor and leak risk.
- Prefinished materials reduce jobsite time and weather risk, often repaying the premium with durability.
Maintenance made manageable:
- Annual rinse: low-pressure hose, soft brush, and mild soap. Avoid pressure washers on wood accents.
- Inspect flashings, paint/stain, and fasteners at the change of seasons. Small fixes now prevent larger repairs.
- Track finish cycles: keep a record of products and application dates for wood accents.
Common mistakes:
- Skipping the rainscreen. This leads to trapped moisture, paint/stain failure, and siding rot—especially with dark cladding.
- No overhangs over wood. Unprotected horizontal surfaces weather and crack rapidly in sun and rain.
- Under-flashed penetrations. Every vent, light, or hose bib must be flashed and sealed to the WRB, not just caulked to cladding.
- Mixing too many wood tones. The modern composition gets noisy fast; commit to one or two related tones.
A final thought on resilience: off-grid comfort depends on redundancy. Solar plus backup generation, rain capture plus treatment, and a well-insulated envelope give you graceful fallback options in any season.
For a holistic plan that ties exterior systems to homestead outcomes—gardens, water, energy, and storage—bookmark The Self-Sufficient Backyard for reference as you build and maintain your cabin. The Self-Sufficient Backyard
Recommended resources that align with this build
These resources complement the modern off-grid exterior without pushing any single product spec. They’re planning tools to support your decisions.
- The Self-Sufficient Backyard: Practical, small-footprint strategies for food, water, and energy that align with cabin living. The Self-Sufficient Backyard
- Ultimate OFF-GRID Generator: A guide to building reliable backup power that dovetails with solar and protects your essentials. Ultimate OFF-GRID Generator
- The AquaTower: A compact approach to organizing rain capture and water access, helpful when space and aesthetics matter. The AquaTower
- The Lost Superfoods: Methods for creating a resilient pantry and food strategies that support remote living. The Lost Superfoods
Conclusion: a black cabin with wood accents that looks modern, lasts decades, and lives off-grid
When you put performance first—tight envelope, ventilated rainscreen, robust flashing, and a clean roofline—the modern look becomes the byproduct of good building. A black cabin with wood accents is more than a style; it’s a strategy: dark field cladding that disappears into the treeline, warm wood where hands touch, and systems tucked neatly behind slatted screens. Plan the site, choose materials that match your climate, and protect wood with shade and breathable finishes. Tie in power, water, and heat with minimal penetrations and clean routing.
Build it once, then enjoy the quiet confidence of a cabin that stays dry, strong, and welcoming through every season—and every dawn when the black silhouette glows against a cedar soffit and the first coffee steams in your off-grid kitchen.
How to detail window flashings like a pro
FAQ
- What exterior materials hold up best on a cabin?
Durable, low-maintenance field claddings like standing-seam metal and fiber cement hold up exceptionally well, especially in harsh climates or wildfire zones. For accents, cedar, larch, thermally modified wood, and black locust perform well when back-ventilated and kept under generous overhangs. Pair any cladding with a ventilated rainscreen, a continuous WRB, and disciplined flashing for long-term durability. - How do you protect wood accents from weather?
Design protection first: deep overhangs, sloped tops, drip kerfs, and no horizontal ledges. Back-ventilate wood accents with thin furring to allow drying. Prefinish on all sides with a UV-resistant penetrating oil or semi-transparent stain and seal all end-grain. Clean annually and recoat as needed (typically every 1–3 years in sun, longer in shade). - What color paint/stain lasts longest outdoors?
Near-black charcoals tend to outlast true black because they absorb slightly less heat and stress. For field cladding, factory finishes on metal or fiber cement are best for black tones. For wood accents, penetrating oils or semi-transparent stains last longer than film-forming finishes because they don’t peel—when they weather, you simply clean and recoat. - How do you prevent moisture problems on cabin siding?
Build a ventilated rainscreen behind your cladding, use a continuous taped WRB as the drainage plane, and flash every transition and penetration in shingle fashion. Keep cladding 6–8 inches above grade, use bug-screened vents at the top and bottom of the rainscreen, and manage roof water with gutters and downspouts that discharge away from the foundation. In cold climates, consider exterior continuous insulation to keep sheathing warm and reduce condensation risk.