

A 4-season off-grid shelter lives or dies by its building envelope. In a super-insulated micro cabin, your “fuel” is the heat you keep, not the heat you make. Get the envelope right—continuous insulation, airtight layers, smart moisture control—and you’ll sleep warm with minimal firewood and near-zero electricity. This guide deconstructs the full super-insulated “micro cabin” envelope (walls, roof, floor, openings, and details), so you can achieve warmth without power and real 4-season comfort.
If you’re building a micro cabin as part of a homestead, it helps to plan for resilience beyond the envelope. For step-by-step off-grid systems, food, and site planning, see The Self-Sufficient Backyard.
Passive solar cabin orientation
How to choose a wood stove size
DIY rainwater harvesting system
Climate-first design that drives every envelope choice
High performance begins with climate mapping and load minimization. Your micro cabin’s heating demand is a math problem you can win before you build.
- Climate data and design temps: Pull local 99% design winter temperature (from ASHRAE or regional building resources). This gives the delta T—indoor setpoint minus outdoor design temp—that determines heat loss.
- Right-size the volume: Smaller volume means less air to heat. Keep the footprint tight, clear interior clutter, and simplify geometry. Cubic forms with compact roofs have less exterior surface area per square foot of floor—lower area reduces conductive losses.
- Surface-to-volume ratio: A 10×12 rectangle has a higher perimeter than a 12×12; that extra perimeter increases linear thermal bridging at plates, floors, and roof edges. A near-square plan and a simple gable or shed roof are envelope-friendly.
- Passive solar gains: On cold, sunny sites, place more glazing on the south (northern hemisphere), size overhangs for summer shading, and use a slab or dense interior surfaces for thermal mass. This is free heat if you maintain airtightness and insulation continuity.
- Air changes control: In small spaces, one leaky outlet can blow your entire heat budget. Target very low infiltration (ideally ≤1.0 ACH50 on a blower-door test). Your envelope—particularly your air barrier—becomes your “furnace.”
- Heat-loss math snapshot: Total heat loss = conductive losses through assemblies + infiltration losses. When you make assemblies thick and airtight, the latter dominates. That’s why airtightness, detailing, and ventilation are non-negotiable.
Decide early where layers live:
- Air barrier: A continuous plane (interior or exterior) uninterrupted by framing and penetrations.
- Thermal layer: Continuous insulation outside studs/rafters minimizes thermal bridges.
- Vapor control: A smart vapor retarder on the warm-in-winter side, tuned to your climate.
A climate-first strategy gives you a super-insulated micro cabin envelope that stores heat like a thermos and dries safely all year.
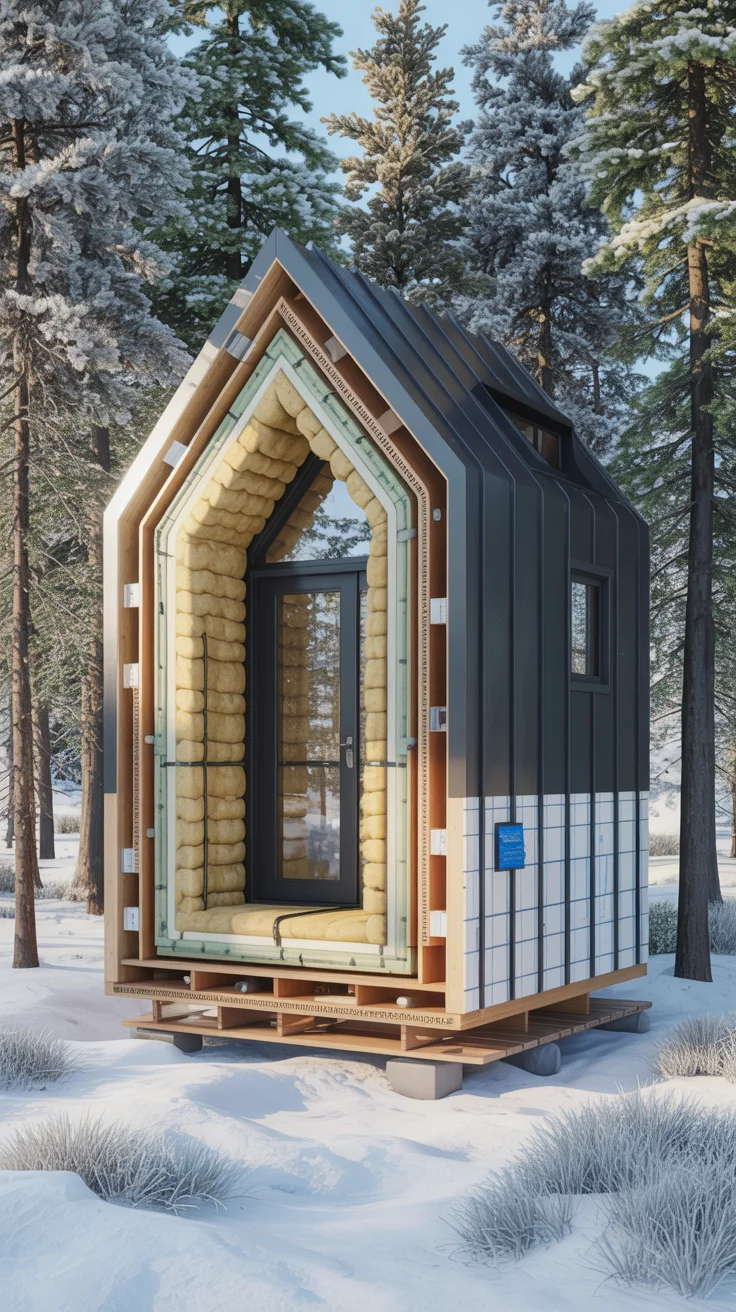
Robust wall, roof, and floor assemblies for 4-season performance
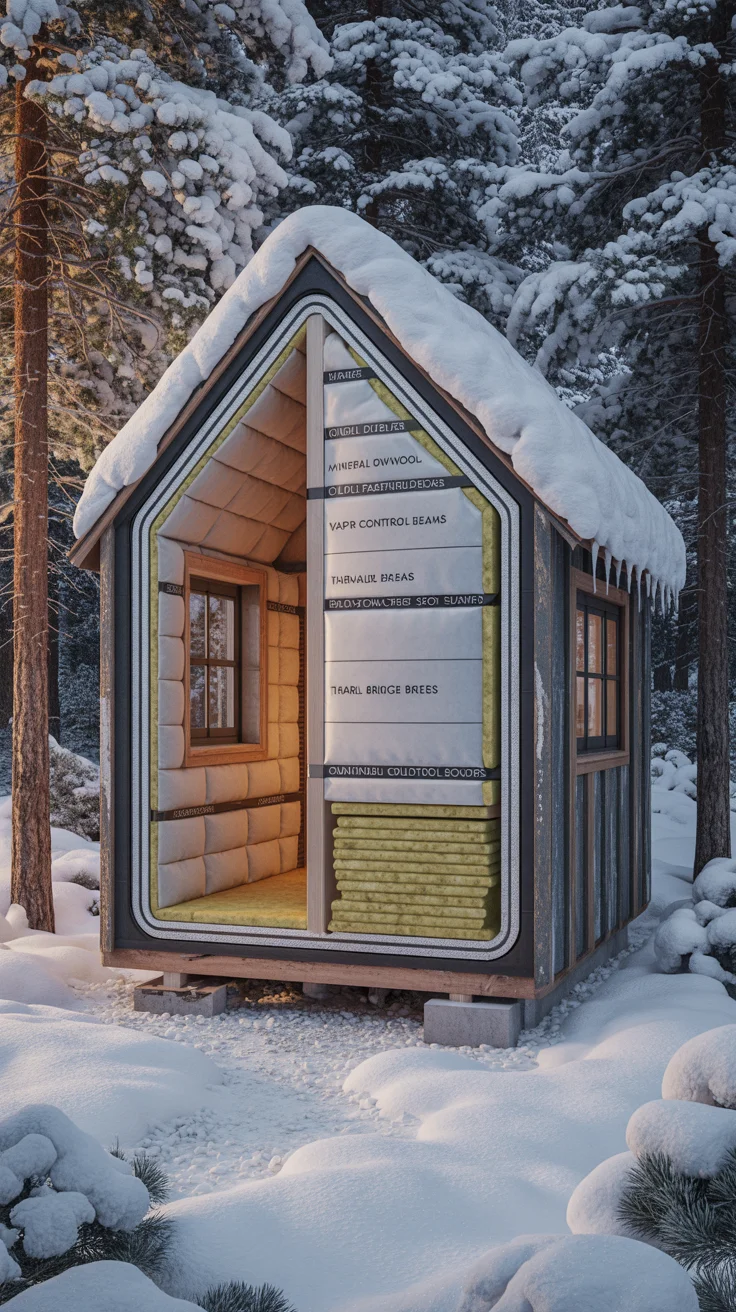
Your assemblies should deliver three things: high R-value per inch, continuity at transitions, and predictable drying. Here are proven cold-climate assemblies that work at micro cabin scale.
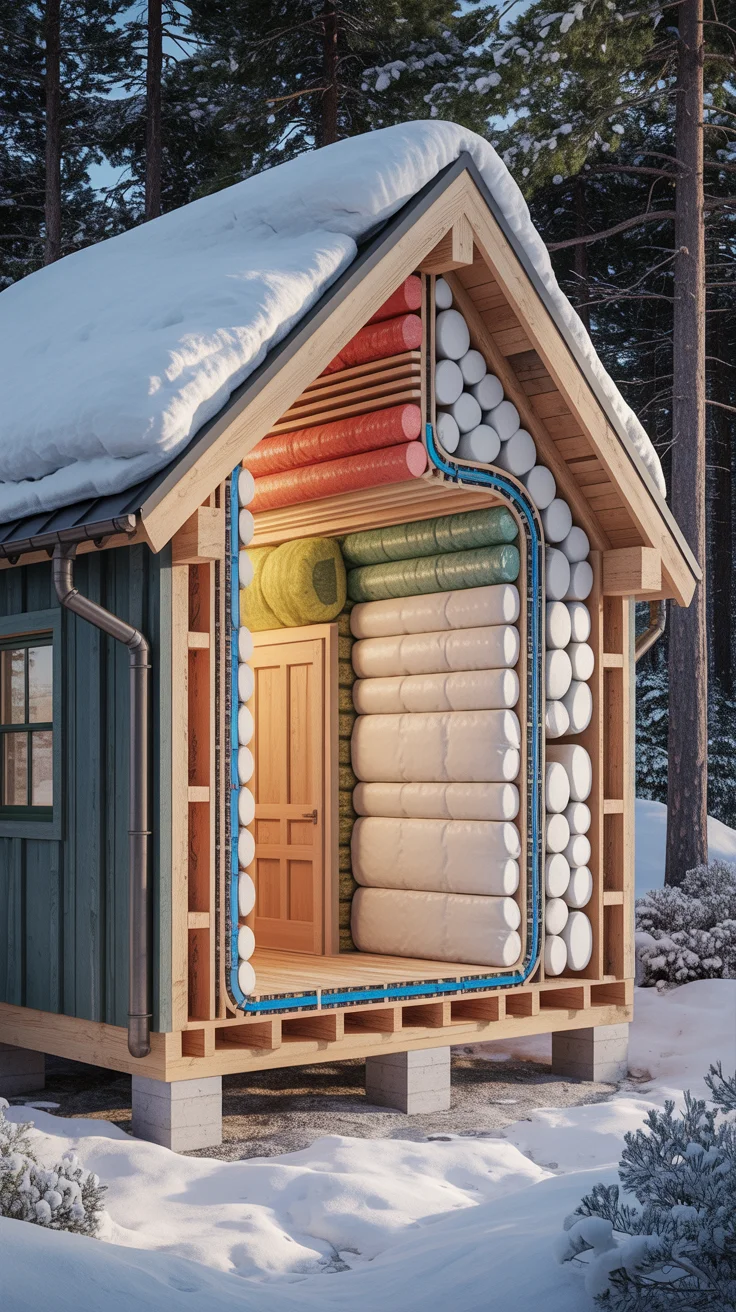
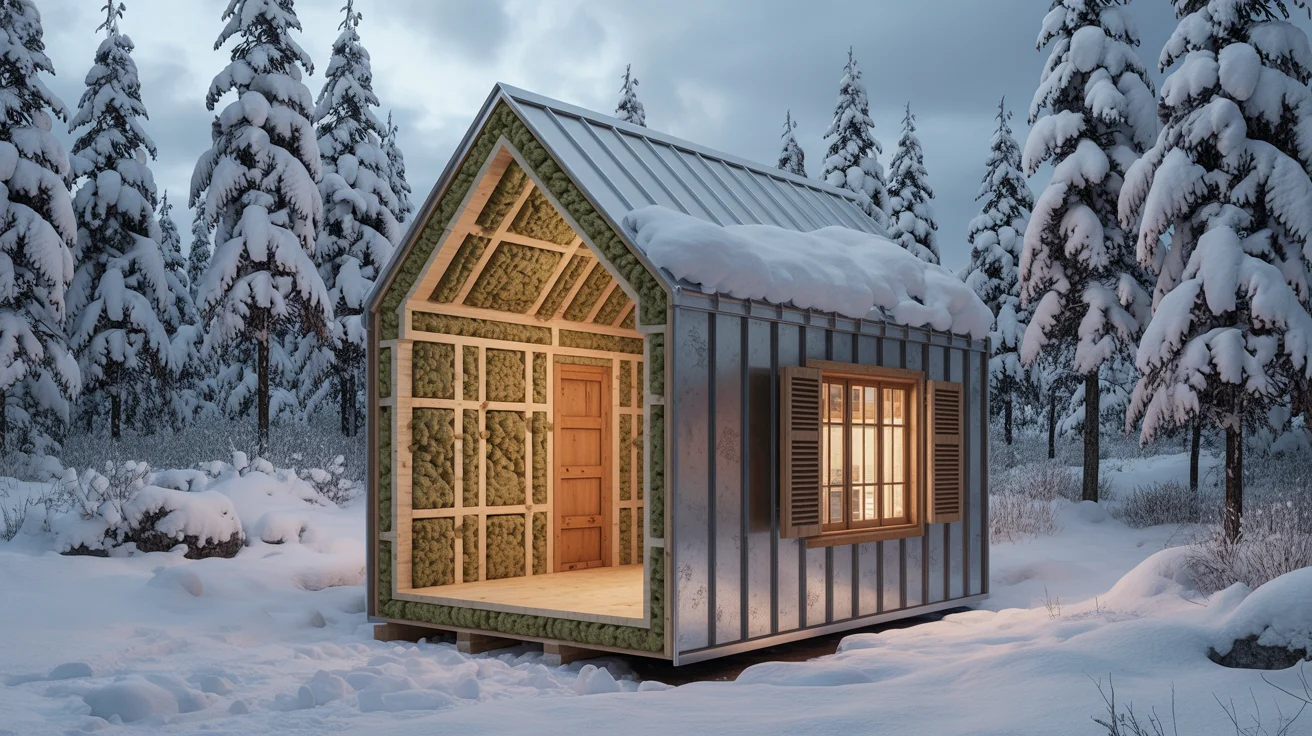
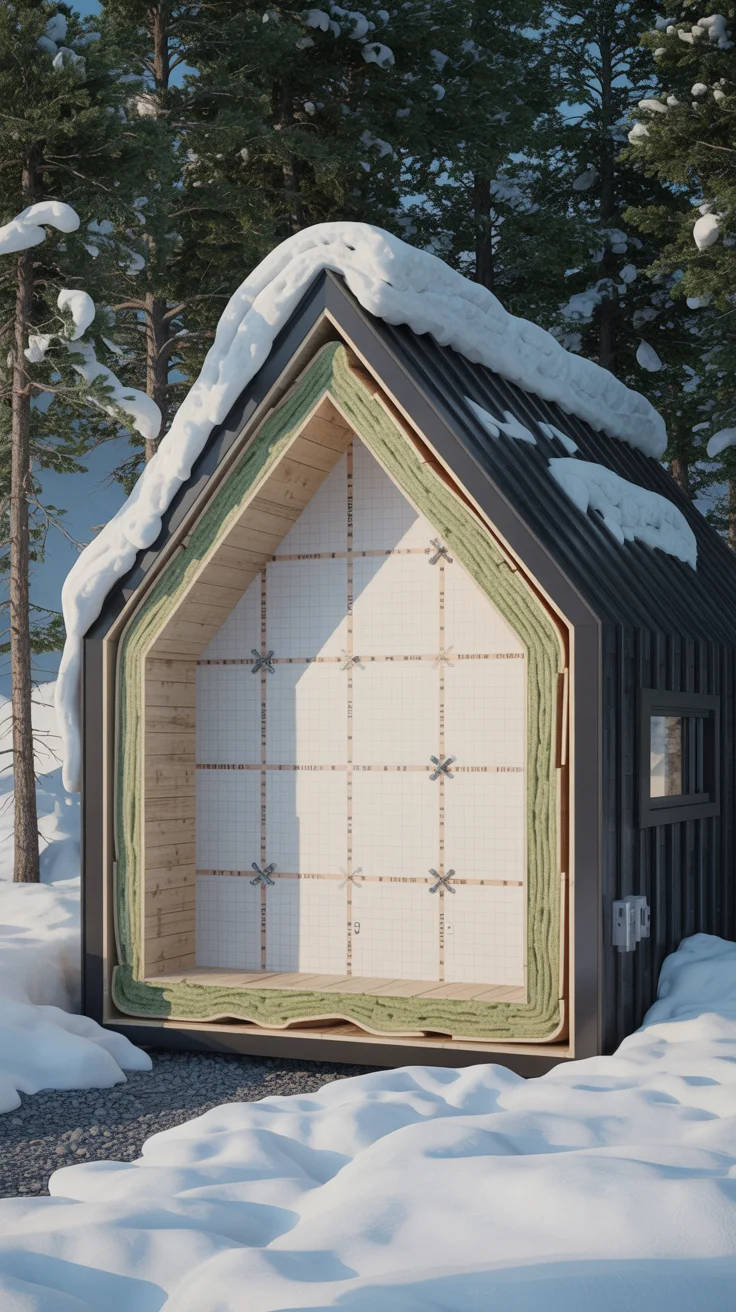
- Walls: Consider a 2×4 or 2×6 service cavity with dense-pack cellulose or mineral wool (rockwool), plus continuous exterior insulation (wood fiber, EPS, GPS, or polyiso adjusted for cold performance). The exterior rigid layer breaks thermal bridges at studs, plates, and rim joists. Add a ventilated rainscreen (furring strips) behind cladding to drain and dry.
- Double-stud walls: For owner-builders with more framing experience, a 10–12-inch double-stud wall dense-packed with cellulose delivers deep R-values and excellent sound/comfort. Use a smart vapor retarder on the interior and a robust water-resistive barrier (WRB) outside with meticulous flashing.
- Roofs: Heat rises, so roofs demand the highest R-values. Two good paths:
- “Cold roof” with vented baffles over dense-pack or batt insulation between rafters, plus a continuous interior air barrier.
- Unvented “compact roof” with exterior rigid insulation above the deck (minimum ratios per climate to keep sheathing warm), then standard roof cladding. Avoid condensation by meeting the required exterior-to-interior R-value ratio for your climate.
- Floors: In pier foundations, wind strips heat from floors. Box out the joist cavities and pack them full (cellulose/mineral wool), then add a rigid continuous layer (EPS/XPS/wood fiber) under the joists with a wind-tight underside layer. For slabs, use continuous subslab and edge insulation. Frost-protected shallow foundations (FPSF) work well for small cabins and reduce excavation.
- Transitions: Corners, eaves, and rim joists are leak hotspots. Maintain alignment—air barrier to air barrier, insulation to insulation, WRB to WRB—so each layer connects without gaps.
Material notes:
- Cellulose: Cost-effective, high density, good hygric buffering; great for double-stud walls.
- Mineral wool: Fire-resistant, water-tolerant, easy to cut for owner-builders.
- Wood fiberboard: Exterior continuous insulation that’s vapor-open; pairs well with interior smart membranes.
- Rigid foams: High R per inch; ensure proper ratios for dew-point control and detail to block insects.
The payoff: A compact, continuous, and ventilated envelope that blunts heat loss, sheds bulk water, and dries predictably—exactly what a 4-season off-grid shelter needs.
Insulation choices for tiny spaces: what to use and where
Insulation must be matched to location, climate, and your build workflow.
- Dense-pack cellulose (walls/roofs): Excellent for double-stud or Larsen truss walls; conforms to cavities, reduces convective looping, and buffers moisture around the dew point. Requires netting and a blower.
- Mineral wool batts (walls/roofs/floors): DIY-friendly, dimensionally stable, and fire-resistant. Pair with airtight sheathing and tapes for draft control.
- Rigid board continuous layers (exterior walls/roofs/floor undersides): Wood fiber, EPS, GPS, or polyiso improve whole-assembly R by suppressing thermal bridging. Wood fiber remains vapor-open; EPS/GPS can be balanced with a smart interior membrane.
- Spray foam (targeted use only): Closed-cell spray foam is great for difficult penetrations, rim joists, and compact unvented roofs where exterior rigid is impractical. Use sparingly in small spaces to avoid trapping moisture and for indoor air quality considerations.
- Natural fibers (hemp, wool): Vapor-open, pleasant to work with. Ensure proper density and pair with reliable air/vapor control.
Layering strategy for micro cabins:
- Exterior: Rainscreen + cladding, WRB with taped seams, continuous insulation with staggered joints, and bug screens at vents. This stack-up manages bulk water and provides drying capacity.
- Structure: Studs/rafters with cavity insulation. Keep wiring/plumbing in an interior service cavity when possible so your air barrier isn’t Swiss-cheesed.
- Interior: Smart vapor retarder (variable perm membrane) or airtight drywall approach with gaskets and tapes.
Don’t forget foundation and floor:
- Pier/beam: Add a wind-tight “belly” and continuous rigid board under joists. Seal all penetrations for plumbing/electrical with gaskets and tapes.
- Slab: 2–4 inches of subslab rigid insulation and thermal breaks at edges/footings are crucial. High-density EPS under the slab is common.
Optimize install quality:
- Cut batts oversize to friction-fit without compression.
- Back dams and netting keep blown insulation from settling into voids.
- Mark studs/rafters for accurate fastener placement through exterior insulation and furring.
Insulation works only as well as the detailing around it. The right product, in the right location, installed without gaps, is what delivers that “warmth without power” performance.
Airtightness and draft control as your primary heater
In a tiny cabin, uncontrolled air leaks can double your heat demand. Airtightness is the most cost-effective “heating system” you will ever build.
Air barrier strategy:
- Choose the plane: Interior (smart membrane or airtight drywall) or exterior (taped sheathing like plywood/OSB). Either can work—consistency is everything.
- Connect the dots: Draw the air barrier on your plans in one continuous loop. Wherever your pen lifts (rim joists, eaves, window bucks), you’ve found a leak risk.
Detailing techniques:
- Taped sheathing: Use high-quality, climate-rated tapes; roll them. Prep surfaces: clean, dry, and warm enough for adhesion.
- Gaskets over caulk: Use compressible gaskets at top/bottom plates and around penetrations; they perform better over time than caulk alone.
- Electrical boxes: Use airtight boxes or “service cavity” framing so boxes don’t puncture the main barrier.
- Penetrations: Keep them minimal and grouped. Seal with EPDM gaskets or sleeves for stack vents, stovepipes, and conduit.
- Attics/roofs: If vented, isolate the attic with a continuous interior air barrier and seal all top-plate junctions.
Testing and verification:
- Blower-door test: Even in DIY builds, renting a blower door for a day is transformative. It reveals hidden leaks so you can seal them before finishes go on.
- Target benchmarks: ≤1.0–1.5 ACH50 is attainable with careful work; micro cabins can do even better.
Ventilation balance:
- Tight buildings need controlled ventilation. A small HRV/ERV ensures fresh air with minimal heat loss. In very small volumes, even trickle ventilation balanced with intermittent exhaust can work, but a compact HRV provides the best comfort and moisture balance.
- Filtration: In wood-heated cabins, an ERV/HRV with MERV-rated filters helps indoor air quality.
The result is a calm, draft-free interior where radiant surfaces stay warm and comfort is high at lower thermostat settings—key for a 4-season off-grid shelter.
Vapor control, drying paths, and condensation management
Warmth without power is impossible if your assemblies get wet, lose R-value, or mold. Control vapor, let assemblies dry, and keep sheathing above the dew point.
Core principles:
- One primary vapor retarder on the warm-in-winter side, not two. Avoid trapping moisture between a Class I vapor barrier inside and vapor-closed layers outside.
- Variable-perm (smart) membranes: Tight to vapor in winter, open in summer for drying. Ideal for double-stud or vapor-open exterior insulation like wood fiber.
- Exterior-to-interior R-ratio: In unvented roofs or foam-over-sheathing walls, ensure enough exterior R to keep the interior sheathing warm. Ratios depend on climate—colder zones require more exterior R. This prevents condensation at the sheathing.
- Rainscreens: A ventilated gap behind cladding vents bulk moisture and allows assemblies to dry outward. Even 3/8 inch makes a big difference in small cabins.
Detail the wet zones:
- Kitchens/baths: Exhaust directly outdoors with short, sealed ducts. Keep penetrations within a dedicated chase to avoid punching your primary air barrier.
- Window/door openings: Install sloped sill pans, self-adhered flashing, and back dams. Tie the window tape into the WRB for a shingle-lapped drainage path.
- Floor systems: If over open air, use wind-tight membranes and robust underside sheathing to keep moist air out of insulation.
Moisture sources in micro cabins:
- Occupants: A couple sleeping in a tiny cabin can produce pounds of water vapor overnight. Ventilation is non-negotiable.
- Combustion: Unvented heaters add moisture; prefer sealed-combustion appliances or a properly vented wood stove.
- Bulk water: Roof leaks and splash-back at grade can overwhelm any vapor strategy. Extend eaves, manage site drainage, and use gutters or drip edges.
Monitoring and maintenance:
- Hygrometers: Keep an eye on indoor RH (ideally 30–45% in winter).
- Seasonal checks: Inspect window corners, roof penetrations, and eaves for early warning signs.
Build for drying, not just blocking. A super-insulated micro cabin envelope that breathes in the right direction stays warm, safe, and durable for decades.
Windows, doors, and thermal bridges that make or break performance
Openings are the weakest link in any high-R envelope. Specify them wisely and detail them perfectly.
Windows:
- Size strategically: Concentrate glass on the south for winter solar gain, minimize east/west glazing to reduce summer overheating, and keep north windows modest.
- Glazing: Look for low U-factor units; triple-pane improves comfort by raising interior glass surface temperature. Warm glass means less radiant heat loss from your body.
- Frames and installation: Wood or composite frames often outperform basic aluminum. Use insulated window bucks in thick walls. Set units in the thermal layer, integrate air barrier tapes on the interior and WRB flashing on the exterior.
Doors:
- Tight seals: Choose insulated doors with multi-point latches or strong compression weatherstripping. Add a gasketed threshold and an insulated storm door in extreme climates.
- Air leakage: A leaky door can blow your whole ACH target. Spend time on handles, latches, and continuous seals around the frame.
Thermal-bridge control:
- Continuous exterior insulation: This is your main tool to suppress bridges at studs, plates, and headers.
- Structural elements: Ledger boards, balcony brackets, and roof lookouts can conduct heat. Use thermal breaks or design to avoid penetrating the insulation layer where possible.
- Rim/band joists: Treat them as mini-windows for heat loss. Pack with dense insulation and tape the sheathing edges.
Shading and overheating:
- Overhangs and exterior shades: South overhangs sized to latitude can block high summer sun while admitting low winter sun. Exterior roller shades or shutters add both security and thermal control.
- Night insulation: In very cold regions, tight cellular shades or insulating curtains reduce window losses at night—small but meaningful in micro spaces.
Detailing equals performance. A well-installed mid-grade window beats a premium unit installed with gaps and poor flashing. Be meticulous, especially in a tiny envelope.
Passive heat strategies and low-power heating/backup that sip energy
A super-insulated envelope reduces the heat you need. The rest can come from passive gains and ultra-efficient backups.
Passive strategies:
- Solar orientation: Aim long axis east–west with the majority of glazing facing equator-side. Keep trees or structures from shading winter sun.
- Thermal mass: Even a modest concrete slab, stone hearth, or interior brick can buffer daytime solar gain and release it at night. In tiny cabins, don’t overdo mass—balance storage with responsiveness.
- Interior layout: Place sleeping areas away from doors and create vestibules/mudrooms as air locks to cut infiltration.
Primary heat:
- Tiny wood stove: A small, sealed-combustion stove or efficient micro-stove paired with a well-insulated, airtight envelope can heat the whole cabin with small amounts of wood. Use a proper chimney, outside air kit, and a heat shield to maintain clearances.
- Direct-vent heaters: In some builds, an ultra-efficient, sealed-combustion unit works well and adds negligible moisture.
Backup and resilience:
- Power-light options: A micro infrared panel used occasionally, or a small DC fan to move stratified heat from the loft, can be driven by minimal solar.
- Off-grid generator: During long, sunless cold snaps, a compact, efficient generator can protect batteries and keep ventilation/controls alive without running full-time. If you’re building toward energy independence, consider the Ultimate OFF-GRID Generator as a supplemental power source to bridge severe weather windows.
- Water and food independence: Heat isn’t your only winter concern. A gravity-capable or low-power water tower and shelf-stable foods round out resilience. Systems like The AquaTower provide water security with minimal energy, and planning with The Lost Superfoods helps keep calories on hand when trips to town aren’t possible.
Quiet comfort:
- Ceiling fans on low reverse gently push warm air down from lofts.
- Zoned warmth: Thick rugs on floors, insulated window treatments, and draft stoppers at doors make perceptible comfort gains without burning fuel.
The theme is stacking small, smart moves onto a stellar envelope. Heat demand drops, comfort rises, and you maintain 4-season livability even during gridless cold snaps.
Practical build sequence and cost-saving tips for owner-builders
Execution quality beats exotic materials. A methodical sequence keeps you on budget and on schedule.
Pre-build planning:
- Simplify geometry: One roof, one wall type, minimal bump-outs.
- Buy in layers: Prioritize the air barrier and exterior insulation in your budget; finishes can be upgraded later.
- Mock-ups: Build a window corner mock-up to practice WRB, flashing, and tape sequencing before installing the first unit.
Site and foundation:
- Drainage first: Swales, gutters, and extended eaves keep splash-back off walls and water away from foundations.
- FPSF or insulated piers: For micro cabins, frost-protected shallow foundations cut costs and excavation while preserving thermal performance.
Framing and sheathing:
- Straight and tight framing makes insulation fit better and air sealing easier.
- Sheathing as WRB/air barrier: Tape seams immediately. Keep a “tape and seal” cart on site.
Windows and doors:
- Flash rough openings before window day. Sill pans, back dams, shingle-lapped tape—no exceptions.
- Use a “frame first, shim square, check diagonals” checklist. Only then seal and tape.
Insulation layers:
- Dense-pack or batt install with consistent density; avoid voids. If you can see the back of sheathing through gaps, you just found a cold spot.
- Continuous exterior insulation: Stagger seams, cap nails or screws through furring at prescribed spacing, ventilate top and bottom of rainscreen.
Interior services and finishes:
- Run electrical and plumbing inside a service cavity to protect the air barrier.
- Install the smart vapor membrane with wide overlaps, tape, and clamps or battens at seams.
Quality assurance:
- Blower-door test before interior finishes. Use smoke pencils or a theatrical fogger to hunt leaks.
- Thermal imaging on a cold morning can reveal bridges and gaps.
Owner-builders win with repetition and checklists. The result is a super-insulated micro cabin envelope that performs like a much larger high-end build—without the price tag.
Conclusion: The envelope is your heater
A 4-season off-grid shelter becomes truly livable when the building envelope does the heavy lifting. A super-insulated “micro cabin” envelope—continuous insulation, airtight layers, smart vapor control, and well-detailed openings—delivers warmth without power. Add passive solar design, modest thermal mass, and right-sized backup heat, and you’ll thrive through deep winter on minimal fuel and electricity.
For holistic off-grid readiness beyond the envelope, explore The Self-Sufficient Backyard. For stormy weeks with no sun, the Ultimate OFF-GRID Generator can keep essentials online. Round out resilience with water security via The AquaTower and pantry depth with The Lost Superfoods.
Passive solar cabin orientation
How to choose a wood stove size
DIY rainwater harvesting system
FAQ
- What insulation works best for a small cabin in winter?
The best approach is a system: dense-pack cellulose or mineral wool in cavities, plus continuous exterior insulation (wood fiber or foam) to break thermal bridges. In roofs, higher R-values are critical; use vented baffles with dense-pack or add rigid insulation above the deck. Choose materials you can install well, and prioritize airtightness. - How do you stop drafts in a micro cabin?
Establish one continuous air barrier—either taped exterior sheathing or an interior smart membrane—and connect it at all transitions. Seal penetrations with gaskets, flash windows with tapes, and use airtight electrical boxes or a service cavity. A blower-door test before finishes ensures you’ve found and fixed hidden leaks. - What is the best wall/roof assembly for cold climates?
Two reliable choices are a double-stud cellulose wall with a smart vapor retarder, or a standard framed wall with continuous exterior insulation and a ventilated rainscreen. For roofs, either a vented assembly with baffles and dense insulation, or an unvented roof with sufficient exterior rigid insulation to keep sheathing above the dew point. Both strategies fit a super-insulated “micro cabin” envelope. - How do you control moisture and condensation in a super-insulated cabin?
Use a variable-perm interior membrane, maintain proper exterior-to-interior R-value ratios (especially in unvented roofs), and include a ventilated rainscreen. Provide balanced ventilation with a compact HRV/ERV, exhaust baths and kitchens outdoors, and keep indoor winter RH near 30–45%. Detail window sills with pans and shingle-lapped flashing to drain bulk water.